Columbia Convertible Commuter *FINISHED*

Rat Rod Bikes Bicycle Forum

Help Support Rat Rod Bikes Bicycle Forum:

This site may earn a commission from merchant affiliate links, including eBay, Amazon, and others.
I remember when this article came out. I went down to the basement of oir house and used a hollowed out lamp post bolt and drilled and tapped the wedge nut in my stem.. I was the envy of all my friends and spent the next few weeks doing that to everyone elses bikes..i was 15-16 years old. I'm amazed that the cheap thin walled lamp post bolts never broke and someone getting hurt. We road like that on quarter pipe ramps and whatnot too. Pretty cool to see this article, I haven't thought about that in years
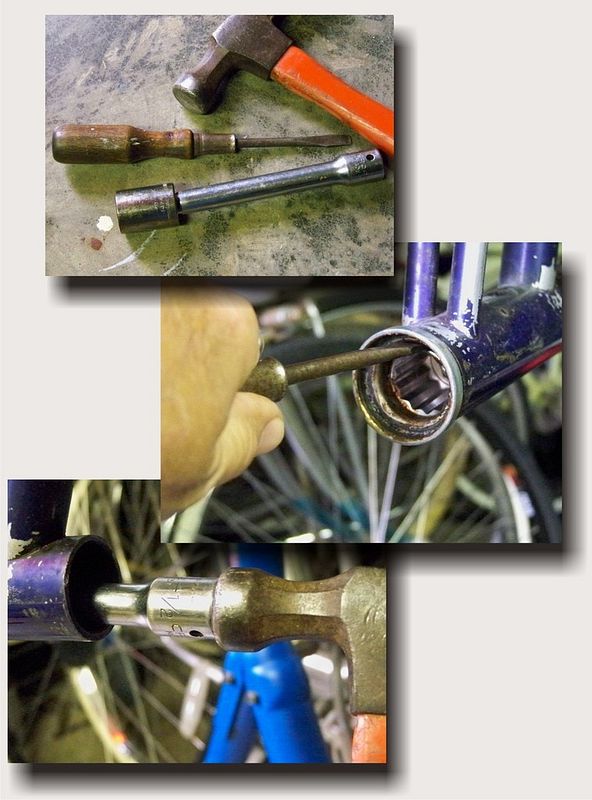
Thats awesome dude those were the days [emoji41]


Sent from my iPhone using Tapatalk
 
@c1run1 did a chrome tank last year. He partially painted it also. Scroll down to post #7 HERE.
It's interesting that you brought up carbon fiber, I had been considering that also! I'll leave that one for you since you brought it up first.:cool: Send me a conversation when you're ready and we'll talk about the holes.:D

I was kind of thinking his was chrome. Would be interesting to see the whole thing chromed. That tank looks great on that trike.

I'd rather see you do the carbon fiber. I have a couple bikes in the queue before I'd do a tank bike but it sure looks fun. Was kind of thinking out loud about what might look good with a chrome frame.

Those flashlights are perfect.
 
Thanks ya'll.
The headlight housings are epoxied in place. Next I'll tackle the switch.
tank%20light%20housing_zps44k4vmtn.jpg
 
Lots of simple solutions out there for that. I like to use the bolt on shimano ones for stops.

prod20765_IMGSET


They're made to bolt to a brazed on shifter boss but I just drill + tap + use a longer screw. Lots of tastefull clamp on guides to just hold the cables.

ahh i was looking for something like this where can i find them
 
I finally got a few hours in this afternoon to tackle the switch.

The LED flashlights have a nice little soft rubber switch made into the end that I really like, so I took one apart to use in the tank. I used a more vintage era style slider switch on the Raceliner, but thought this modern switch would be a much better look for this bike.

Columbia%20headlight%20switch_zps83kh48r9.jpg


It needed to be removable in case I ever have problems with it later on, so I had been thinking about how to do this for the past week. After a handful of different ideas, it finally came to me while laying in bed this morning.

The first step was to make a piece that the switch would slide into like the flashlight. I rigged up a buck out of the actual switch case and covered it with thin foil. Next I mixed some GOOP epoxy and roughly formed the part. After it cured I pushed it off of the plug and removed the left over foil.

Columbia%20headlight%20switch%201_zpsvq7bgzkd.jpg


Next I drilled the tank for the rubber switch. I then used a disc sander on the inside of the tank to get the fiberglass thickness to match the height of the rubber. After getting the proper fit for the rubber part, I ground the epoxy housing piece to sit inside of the tank in the correct position for the plastic switch. I then mixed more epoxy and bonded it to one tank half. Before it started setting up, I screwed in two machine screws. I taped the threads so that I could use them as studs if they wouldn't come out later. As it turned out, I was able to thread them out before the epoxy completely cured.

Columbia%20headlight%20switch%202_zpsx8tldooo.jpg


Here it is after some rough grinding for the contour of the other tank half. It's not pretty, but it's strong!
d9b0ebae-6825-4e7f-a7f3-2a9864b31b47_zpsqhjjkzbd.jpg


Next week I will make a cover to hold the switch in and bolt it in place using the threaded holes to mount it.
 
WOW!!! Awesome work on that switch!!!
Also on melding the light casings too!!
 
I completely broke down the CCC so that I can strip the paint and get it in primer for body work. There was nothing photo worthy about tearing it down. That is, until it came time to knock out the headtube bearing cups. I have used this method in the past, but I thought that I would share in case it might help someone else.

I found the largest socket that would fit through the middle of the cups and put it on an extension. Next, I slid it through one end until it made contact with the edge of the cup in the other end. Using a flat screw driver, I wedged it between the socket and the cup and pressed down on the socket so that it would stay in contact with the cup. Then I knocked it out by hitting the extension with a hammer. It's a good idea to rotate around the cup as it's working out.

Pretty simple, I hope someone can use the idea.
headset%20removal_zpsoh0dzvtp.jpg

I had already removed the first cup before it occurred to me to take the photos. Of course, Park Tools makes a great tool for this, but I don't happen to own one, so this is one way to get around it.:)
 

Latest posts

Back
Top