ENIGMA

Rat Rod Bikes Bicycle Forum

Help Support Rat Rod Bikes Bicycle Forum:

This site may earn a commission from merchant affiliate links, including eBay, Amazon, and others.
I've decided to go in another direction with the faux springer rear end I had been playing with, changed it to this hydraulic fork that I picked up yesterday.

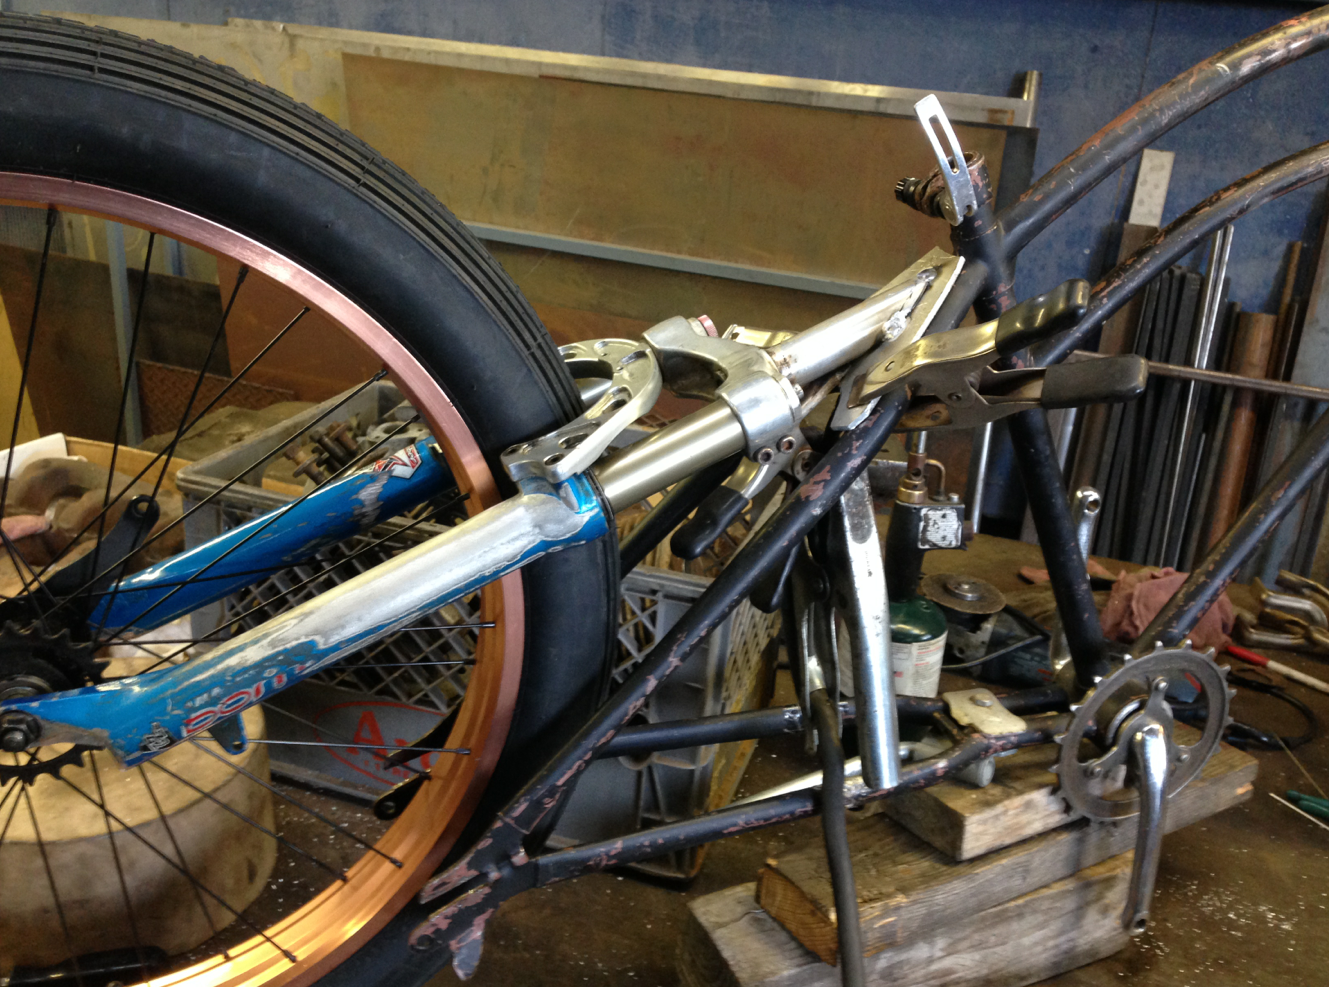
The frame still has not been altered; cut or welded.

I love that hydraulic rear fork! How are you going to make the top pivot? or is it going to be a faux hydraux :happy:
 
I love that hydraulic rear fork! How are you going to make the top pivot? or is it going to be a faux hydraux :happy:

No pivot. The neck of the fork is welded to a 1/4" aluminum triangle. It will sandwich the bridge behind the seat post using another aluminum triangle. Although the fork is somewhat stationary, it still has minimum flex. I actually had to raise the bikes belt line 1.5" to allow for the weight of the rider, and to prevent the crank arms from scrapping the ground when riding.
 
Very cool! I used mesh ones to customize BEER RUN for my buddies pizza joint.
 
Very cool! I used mesh ones to customize BEER RUN for my buddies pizza joint.
Thanks KF, I thought about going with the perforated ones...but I think the disk are better for what I have in mind?

I just finished my first one, I think it came out pretty cool! I must admit it wasn't easy trying to get it to bow.
 
So how did you get it to bow?
Because I've been looking at online sheet metal cone calculators...


Carl.
 
I agree with you that the solid ones should look better on Enigma.
I bet it was harder to bow those babies. Love the Mooneyes speed disc look.
Nice work sanding them for the brushed/machined aluminum look too.
 
No pivot. The neck of the fork is welded to a 1/4" aluminum triangle. It will sandwich the bridge behind the seat post using another aluminum triangle. Although the fork is somewhat stationary, it still has minimum flex. I actually had to raise the bikes belt line 1.5" to allow for the weight of the rider, and to prevent the crank arms from scrapping the ground when riding.
Sounds like you got it all under control! The bike is looking great, a sure front runner! But how DID you bow/dish the pizza trays?!?
 
So how did you get it to bow?
Because I've been looking at online sheet metal cone calculators...

Carl.

How DID you bow/dish the pizza trays?!?

In the absence of a press and a die, or spinning aluminum disc, here’s my makeshift technique to bowing pizza pads. It’s all about finesse and manipulation with oven mitts and your feet. Because everyone has a different way of approaching things, I do not recommend it for the faint of heart – Try at your own risk!


A. Use a no-spoke hoop, same size as your pizza pan.

B. Heat your oven to 500 degrees and place the pan in for 10 minutes with the oven door closed.

C. Pull the pan out of the oven with oven mitts. Align the pan while hot over the hoop. Place a small rounded edge metal directly in the center (I use a heavy water faucet bezel). This is to help distribute the weight.

D. Working fast with the pan still hot, gently step on the center of the pad (I’m 220 lbs) pressing the metal down. The aluminum will immediately begin creasing along the edges…once you have the depth you want…remove it from the hoop, flip it over and begin working out the kinks with your oven mitted hands. This process will take at least 4-5 times in and out of the oven and massaging out the kinks! WARNING: the material is extremely soft and shows all imperfections…don’t bang or hammer the metal.

E. Place on your wheel for fitting. There will be small creases in certain spots but if done right barely visible.

F. Sanding will help to smooth out and eliminate those small creases. I used a hand drill and an arbor.

That’s it! Sure it’s crude, hokey and backwards…but this is about rat rodding, making things work from salvaged parts.
 
Man I'm renaming you Simon Ratsinister


Sent from my iPhone using Tapatalk
 
In the absence of a press and a die, or spinning aluminum disc, here’s my makeshift technique to bowing pizza pads. It’s all about finesse and manipulation with oven mitts and your feet. Because everyone has a different way of approaching things, I do not recommend it for the faint of heart – Try at your own risk!

Awesome!!! You're essentially annealing the aluminum in the oven, making it nice and pliable. Amazing job, I was sure you spun the discs somehow.... Keep it up!
 
I've been vacillating about the fork shared in the last photo ( a reversed style Girvin).


That fork is an AMP linkage fork originally designed in laguna beach, ca.
by AMP bike co. It rises up and backwards when compressing. Probably from the 90's. It has a small two way oil damper on the right side. (most likely blown). Univega bought the patented design later, (as well as other bike brands), and put "concept" on it. When this fork came out,
it was the in thing. I believe the girvin style forks came later...


.

I still to this day, really like this fork design...clean and functional. You have now given me an idea to hang one on a future rod. Never thought of it...
 
Last edited:
My pizza pie pans arrived yesterday, or should I say my hub caps arrived? :happy::happy:
Kudos on the excellent fabrication on those pizza pans, you did a fantastic fabrication job, I'm somewhat familiar with disc... Just amazing!!!

One caution for everyone with a homemade or purchased disc wheel... They can be unruly even when they are spun or balanced. Watch out for these puppies on roof racks when a crosswind hits :)

Thanks, and you're so right about wheels and discs. A strong crosswind can be a force that weakens the strong.;)
 

Latest posts

Back
Top