Classic Rat

Rat Rod Bikes Bicycle Forum

Help Support Rat Rod Bikes Bicycle Forum:

This site may earn a commission from merchant affiliate links, including eBay, Amazon, and others.
I have these two caps from another old frame that fit on the bottom bracket. I assume they are to help keep the dirt out. But I am unsure how they get attached to the crank. Do they get placed between the lock nut and cones so they end up spinning with the cranks? Any help and pictures are appreciated.

 
Yes that is correct, I took mine apart yesterday. Sorry didn't take pics but should have. Between the cones and nut.
 
not sure if these photo's show it but like this? How tight/loose are the covers on there? Should they spin pretty freely when in place?

 
Not much of an update but the wife insists every once in a while i actually earn some money.
Started to try and make a battery holder for the headlight/taillight. So decided to try something in the industrial steampunky relm. I found 2 single D cell battery holders that I can stack and they fit very snuggly in an 1 1/2 inch pvc tube. The picture makes it look a little big then it really is but I do not have the caps all the way on yet. Need to figure out some more texture for it but am thinking of a faux patina copper paint job. Always open for any suggestions.

 
I'm a huge pvc fan. Made a canoe / lumber rack for a pick-up out of it, cargo bike trailer, P.A. speaker stands....looks good as a battery case too! Check out the Rustoleum "Hammered" rattle paint, believe they have one in copper color. Maybe add a little mint green and ivory dabbed on with a sponge or rag to add the "aged copper " look:
 
Have not been able to post anything since my computer is on the fritz. Hoping it is just the video card but it is in the shop now for repairs. Keeping up to date on the builds with my iPad.
While putting parts together found my bearing cups were shot so had to order some generic ones from my LBS. got them in and smooth as silk. Still working on battery housing so will post pictures first chance I get.
Yeah, looking forward to that battery housing.....:113:
 
Computer is back but still acting funny but will be using it anyway.
Here is were I am at with the battery housing. Not sure if I am going to go a copper look or a galvanized paint scheme. I think I still might need a few more pieces.
This is how it will connect to the bike:

Here it is so far:

Detail shot:
 
That's gonna look pretty cool!
 
Need some help with figuring out wiring. Had some good advice before so looking for it again.
The photo shows what I have to work with. Was not sure if it is the correct switch.
Want both lights to turn on when switch is thrown just can not remember back 35 plus years to shop class to make this happen.
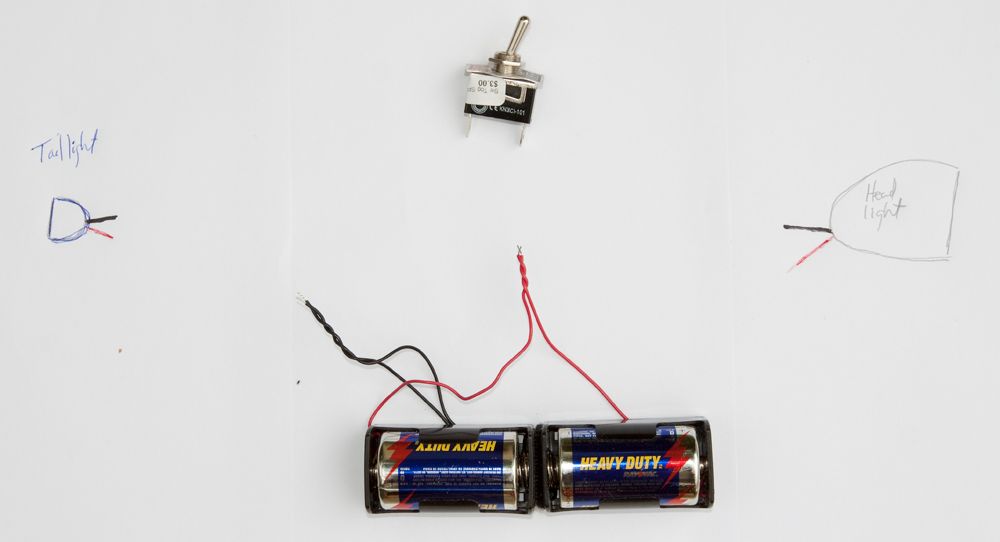
Hey G, I think what you want is a "series" connection where both bulbs light up when the switch is thrown. Also, the positive of one battery is connected to the negative of the other.....these fairly basic diagrams and instructions should help...
https://www.teachengineering.org/vi...ricity/cub_electricity_lesson05_activity1.xml
 
That looks simple enough. Just one big circle. Dr Tankenstain talked of putting them in parallel but for what it is as simple as possible is my goal. Thanks!
 

Latest posts

Back
Top