In for this.
You are using an out of date browser. It may not display this or other websites correctly.
You should upgrade or use an alternative browser.
You should upgrade or use an alternative browser.
DRAG KING ___Raceliner Dragster___
- Thread starter The Renaissance Man
- Start date


Help Support Rat Rod Bikes Bicycle Forum:
This site may earn a commission from merchant affiliate
links, including eBay, Amazon, and others.
The Renaissance Man
__CERTIFIED DIVER__ (Open Water & Open Dumpster)
Staff member
Moderator
Pro Member
I never get tired of the step by step stuff!
It always good to see what's going on behind the scenes with no veil of secrecy or black magic when sometimes such cool details just seem to magically appear. Awesome stuff!

Looking good TRM!
Totally agree!
Luke.
Thanks guys, This part just seems to have been dragging out to me. I'm ready to move to the next challenge which should happen this next week!I love step by steps too! keep 'em coming! The seat clamp welded to the pedestal is awesome
Good thinking on the seatpost..
Quite simply ......stunning!
Sent from my iPhone using Tapatalk
Liking it!! really nice build,gonna be building my Evans dragster style over the summer!
Thanks for the nice words!In for this.
Thank you so much for that! I did spend a good bit of time trying to create a profile that harmonized with the nice flowing lines of these old frames. My intention for the tank was to make something that (to an uninformed person) would look original to the bike and not something radical that looks like a custom. I know that the bike will be far from original looking in the end, but I hope that the tank will look stock.The center void and the lower line shapes formed from your tank shows a lot of thought went into making them flow. Really sleek and cool lines going on there, some real eye candy.
The Renaissance Man
__CERTIFIED DIVER__ (Open Water & Open Dumpster)
Staff member
Moderator
Pro Member
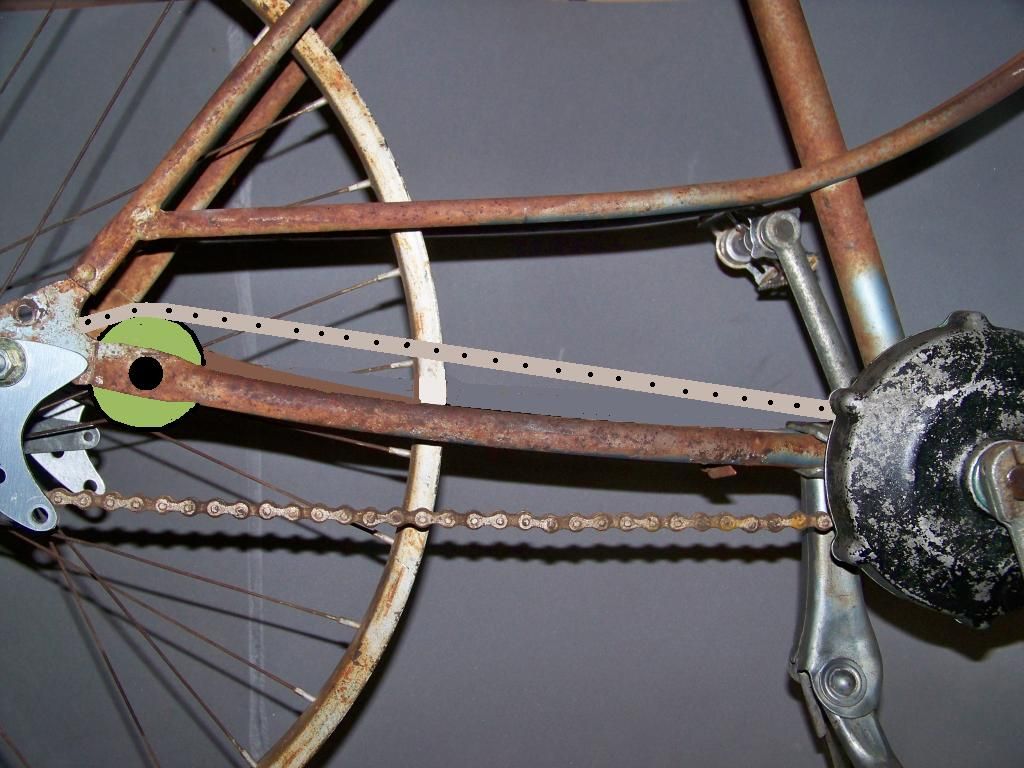
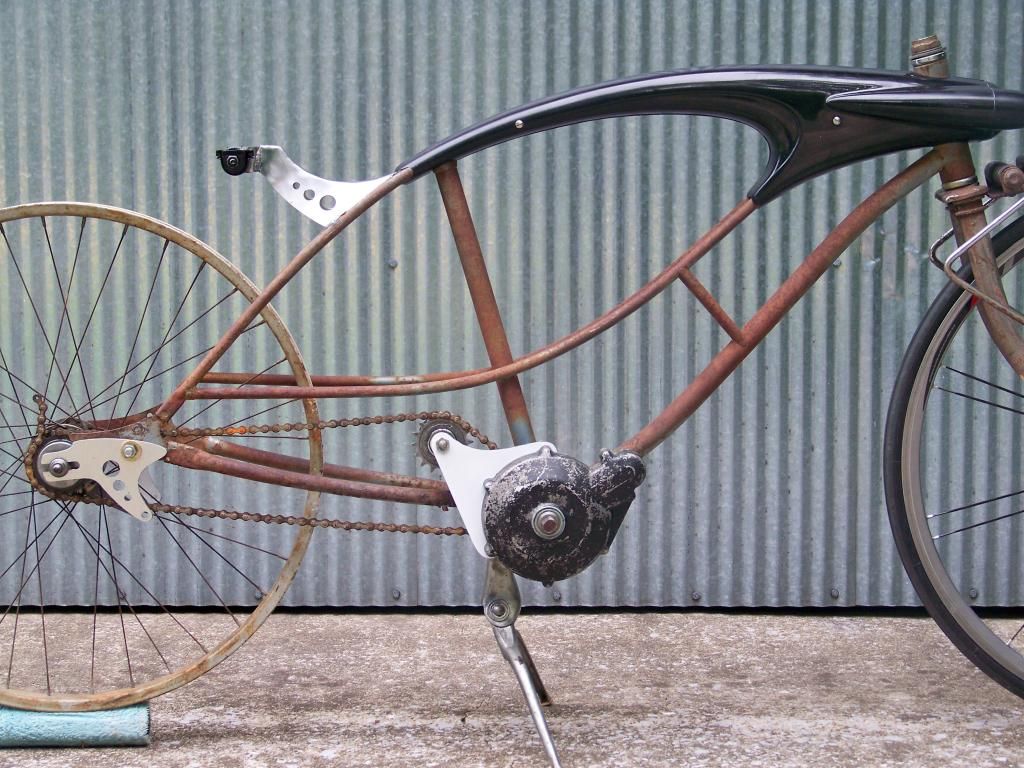
Here's this weeks challenge. The Dana has a 13 tooth gear and the Bendix has a 15 which causes the chain line to be practically horizontal with the chain stays. I did a test fit with an old chain and because I lowered the rear dropouts, it just touches as it passes the chain stay toward the rear. This will have to be fixed!

asymmetric chainstays like a Pinnarello???
Or a derailleur idle sprocket popped in on the back of the chain stay to lift the chain?
Sent from my iPhone using Tapatalk
Sent from my iPhone using Tapatalk
Is there enough room to run a ghost sprocket in there?
Start all over... 
The derailleur is a quick and easy fix. I used one on my last build, I had those dropouts with zero adjustment. You can get them that lock into place, and even tho they said it wouldn't work with my coaster... it does. But I'm betting you want clean lines so it looks like your rear bracket/dropout shape needs to change, effectively raising your axle just a bit...
Carl.
lathe skateboard wheel 
The Renaissance Man
__CERTIFIED DIVER__ (Open Water & Open Dumpster)
Staff member
Moderator
Pro Member
Thanks everyone for the suggestions! These are all good solutions.
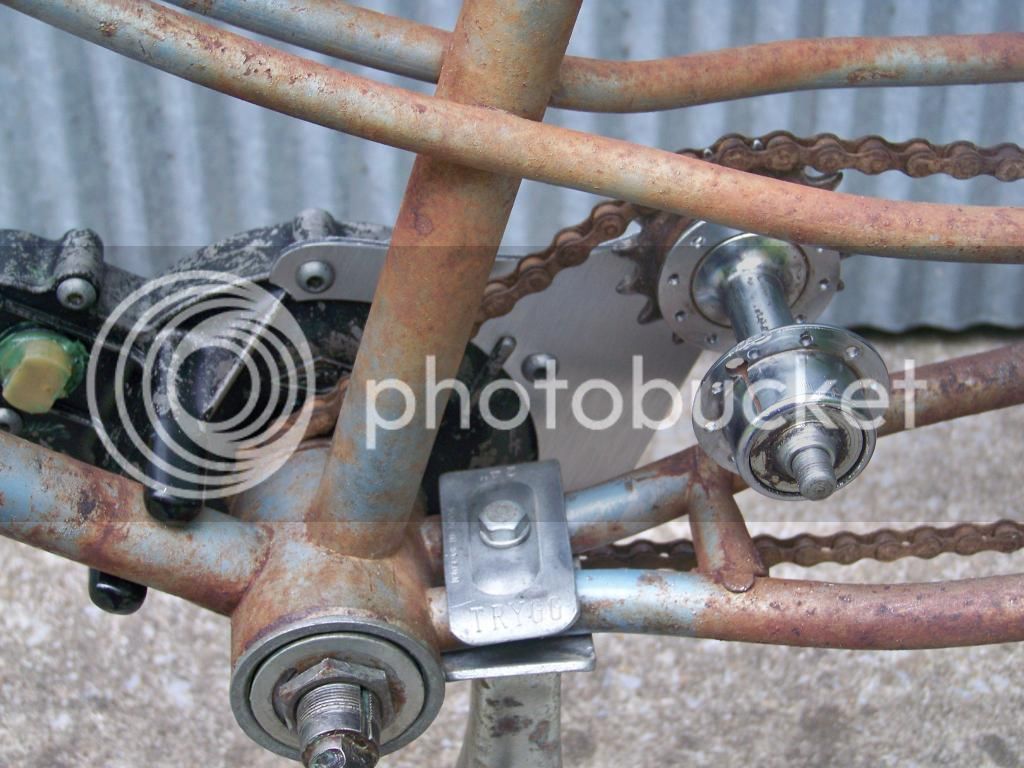
Today is one of my regular days off, so I went to the shop and started messing with ideas for most of the day. I decided to use a fixed gear hub for an idler gear. I tried a couple of bracket designs that would've attached to the chain stays, but I never got that good feeling about it. It just kept feeling forced. Then out of nowhere, it occurred to me to attach it directly to the Dana to keep things in line. After that, things became easy and started to fall into place. I love when that happens!
This will still go through some refining, but that's the fun part after the direction is set. The left side of the axle will get some sort of bracket that will attach to the frame to completely secure the hub and it should be very strong!
Here's the basic idea cut out of the same composite material that I've been using for a mock up...
Perfect solution! Looks great!
Luke.
Luke.
Great solution! U feel like cutting that hub down to the base? With the axle threaded all they way through it shouldn't be too hard...
With the axle threaded all they way through it shouldn't be too hard...The Renaissance Man
__CERTIFIED DIVER__ (Open Water & Open Dumpster)
Staff member
Moderator
Pro Member
I didn't know you, but looked up some of your builds and have to say that based on your work, I'll take this as a huge endorsement! THANKS!Some of you know me, most of you don't. Renaissance Man....This should be the winning bike!
Last edited:
The Renaissance Man
__CERTIFIED DIVER__ (Open Water & Open Dumpster)
Staff member
Moderator
Pro Member
Thanks!Perfect solution! Looks great!
Luke.
Jasper, that's a great idea, thanks!Great solution! U feel like cutting that hub down to the base?
The hub needs to be narrower to fit the space better and to make room for something else that I have planned for later.

American Vintage Bicycle Supply
Double Nickle

Great solution and it ads yet another little bit of wow to the overall design. Top stuff
Sent from my iPhone using Tapatalk
Sent from my iPhone using Tapatalk
Your rear drops are going to be on shocks, aren't they? If they move, then you might consider making the tensioner hub able to move with it, to keep the slack where you want it.
The Renaissance Man
__CERTIFIED DIVER__ (Open Water & Open Dumpster)
Staff member
Moderator
Pro Member
I wasn't necessarily trying to match the stand, but was trying to continue using the curving lines from the tank. This was just the basic mock up to see if the concept would work, but I like the speed holes, so it may get some!I don't know if it was on purpose, but the idler arm flows with the seat stand. I'm just trying to picture it with matching holes in it. Or maybe that would be too much.

I've always thought those free floating gears (or ghost sprocket KF called it) are cool.I really like your way better, but just wanted to show you a very simple way of how I solved the chain clearance problem when I used a Dana with lowered drop outs on my Offenhauser bike:


That's what I was hoping for, I like for the form to follow function as much as possible. I really like adding visual appeal, but it's just that much better if there is a purpose for it.Great solution and it ads yet another little bit of wow to the overall design. Top stuff
Sent from my iPhone using Tapatalk
No, the rear wheel will be stationary. It will eventually be secured with tie rods acting as 'traction bars'. That would be cool to built one like that though!Your rear drops are going to be on shocks, aren't they? If they move, then you might consider making the tensioner hub able to move with it, to keep the slack where you want it.
dang, my not on purposes are usually followed up by a sawzall and grinder!!!!!I don't know if it was on purpose, but the idler arm flows with the seat stand. I'm just trying to picture it with matching holes in it. Or maybe that would be too much.
love the flow of the dropout, seat post, and idler!!!! way coolTroy