GLENDERSON - [winter build off]

Rat Rod Bikes Bicycle Forum

Help Support Rat Rod Bikes Bicycle Forum:

This site may earn a commission from merchant affiliate links, including eBay, Amazon, and others.
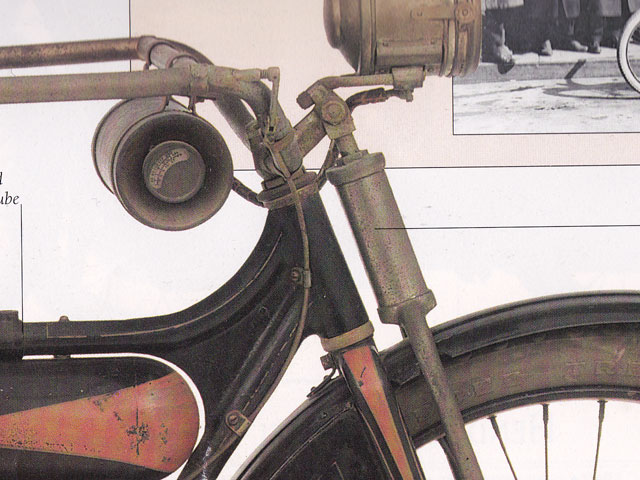
Wow! A hidden springer! Never seen one of those before, very cool.

Luke.

Thanks Luke.

Yeah, I'm trying to emulate the Henderson springer...

12_HendersonSpringer.jpg


And mine so far for comparison...

10_SpringerTop.jpg


I will need to put another piece of tube over it (head tube size) to make it look better.

Glen.
 
Oh yeah, internal spring...cool.
Nice piece of tubing slid over it to beef up the look...
I can see it! Nice detail.

Carl.
 
Hey Glen just a suggestion to cover that front tube, yep steel would be
ideal if you find a bit the right size. Scrap pvc (plumbing pipe) used a bit
on my tandem worked a treat to thicken up a post that looked too thin,
no strength need there so may be an option.
 
I really like the direction you're going with this build, gonna have to pay attention:praise:
Gizmo
 
07/01/2014

Two steps forward... one step back...

I used the old piece of exercise equipment to hold the down tube taught in it's curved shape like so...

13_DownTube.jpg


So in my youthful exuberance (read - old fart impatience), I welded it up but unfortunately I taught it too much and the curve was too curvy. So I will have to make another cut to solve that wee mishap :blush:

In answer to rubsterob - yes, the springer front should indeed be functional... I hope :angelic:

Good idea about the PVC Pushie... was thinking of using PVC for the tank cyliner, but not sure about the dome ends :confused:

Thanks everyone for your input, enthusiasm and general nice comments :)

Glen.
 
Sorry your photos aren't showing on tapatalk. I went to the web view and answered my own question. At first I just saw the two forks. Didn't see the spring inside.


Sent from my iPhone using Tapatalk
 
08/01/2014

Just when I thought I wasn't going to do anything today... some parts jumped out at me shouting "weld me, weld me". So I used the remnants of that old exercise thing to hold the rear triangle so I could weld some bits to it thusly...

14_RearJig.jpg


Before long I was here...

15_BottomMock.jpg


It's not all welded yet but just some parts tacked. It is going to be hard to hold it all together for welding...

:eek: "a jig, a jig, my kingdom for a jig"

Oh wait... no kingdom = no jig. Oh well, I guess it'll be the old pallet and the g-clamp trick again o_O

:)

Glen.
 
Nice work Glen!

In the middle of designing a jig myself, think I am going to need one for the next build...

Luke.

Thanks Luke,

Would like to see how you do that jig. It would help so much to be able to hold things in place. I don't even have a bench vice... or a bench :rolleyes: My bench grinder is on the floor and I have one g-clamp and two vice grips o_O Not complaining too much though as I do have a drill press (also on the floor) and a welder... so pretty lucky really :113:

Oh and by the way, about your signature line... I just tried to add a line to mine and it wouldn't let me. How did you get to have two lines there? Is that a pro-member thing?

Glen.
 
Oh and by the way, about your signature line... I just tried to add a line to mine and it wouldn't let me. How did you get to have two lines there? Is that a pro-member thing?

Glen.
As far as I know it is just a normal set up, the limit is two lines but maybe because you have yours in a large font it counts as two? Maybe try a smaller font and see if you can get two lines.

Luke.
 
As far as I know it is just a normal set up, the limit is two lines but maybe because you have yours in a large font it counts as two? Maybe try a smaller font and see if you can get two lines.

Luke.

No that didn't work... took it down to size 2 and it still wouldn't let me have two lines. Then I just added the text to the one line and it still said I was one line too long or some such thing o_O Weird. But nevermind... it's not important :)

Cheers mate,

Glen.
 
Check the last post in the jig thread...lol :crazy:
Unistrut is inexpensive, strong if used correctly, and with some threaded rod
you can build just about anything. A metal square is essential too!

Carl.
 
http://www.ratrodbikes.com/forum/index.php?threads/HOW-TO-BUILD-A-JIG.2010/
I didn't reads through it much at all. But I saw it and figured you might like it.

Yeah... that jig thread is great... thanks rubsterob.

Check the last post in the jig thread...lol :crazy:
Unistrut is inexpensive, strong if used correctly, and with some threaded rod
you can build just about anything. A metal square is essential too!

Carl.

Thanks Carl, I have not heard of "unistrut" but will keep my eye out for it or something similar.

I see in your signature line that you are after a vintage clothes pin. Is this the type you are after...

il_430xN.18849273.jpg


We (my brothers and I) used these type of pins (pegs) on our bikes when we were kids to attach "flickers" to the mudguard braces... bits of cardboard that flicked against the spokes. o_O Is that what you are after? If the pegs in the photo above are the kind you want, I have some and can send you one or two if you like. I find it hard to believe that you can't find any in the USA :confused:

Glen.
 
Maybe because you have a link in the text? See how mine has the link separate? If your link is too long just go to tinyurl.com and get a new one. My actual link is: http://www.ratrodbikes.com/forum/in...ers-intro-and-links-no-longer-a-newbie.65513/ (105 characters) but the tinyurl one is http://tinyurl.com/LTJ-homepage (31) is much shorter...

Luke.

Thanks Luke,

It seems you are right... a combination of character number and size. Still have to have it on one line but that's okay. I might make it all a bit smaller yet... we shall see :39:

Glen.
 
Sometimes the signature line is used for something supposedly humorous...
mostly when the poster really has nothing much intelligent to say...
But I do like your clothes pins and story... did the same as a boy...

Carl.:crazy:
 

Latest posts

Back
Top