M*A*S*H 4077 tribute bicycle; FINISHED!!

Rat Rod Bikes Bicycle Forum

Help Support Rat Rod Bikes Bicycle Forum:

This site may earn a commission from merchant affiliate links, including eBay, Amazon, and others.
hm...cut just the top, or cut the top and bottom? Because, if I cut the bottom side of the plate, I need to make longer bracket. And if just cut the upper one...well, not sure how it'll look.

I'm more fond of leaving it this way, because later I plan on installing square carrier bags on the back, so that shape will match.
 
that side so-so, but on the other side I had a "accident".

Green paint is nitro based and it's some sort of polyurethane paint; it's resistent to paint thiner, gasoline, petroleum, nail polish remover....but not on aerosol nitro based spray paint.
So when I painted the plate green I made a stencil of letters, bought a white aerosol paint in a can (both nitro based) and imagined it shouldn't be a problem.
And it wasn't, on one side; I moved the stencil a little bit so it smeared fresh white paint, and the edges are smuged (but that's relatively ok).
On the other side I didt the same procedure, but when I looked closer, I could see that on the areas where white paint was thicker it started to "lift" dry green peaint underneath. It was ruined, so I wiped off fresh white paint and it got the green one as well off, more sucesfull than a paint thinner!!

Funny thing; you can see stencil marks on bare metal, even though all the paint is wiped off.

I tried putting water based white paint over the dry green one, and ofc, it doesn't lift it. So my next move will be cleaning the plate to bare metal, spraying it green again (have some leftover green paint from the frame) and then using water based white paint for the stencil work.


I know that the best and most efficient way to do this is first paint the plate white, then stick some vinyl adhesive letters on it to protect the white, then paint it green. When dried, carefully peel the vinyl off and voila-grene plate with white letters!
But the problem is that I'm having a hard time finding someone to make me me vinyl letters; it's a small thing so nobody wants to hassle with it-either they say they can't do it or they skyrocket the price.
Another thing is-it's a custom font; I could do it all by myself if I had a plotter or a laser cutter/engraving machine-but I don't.
And when I start explaining to someone that I need a "custom font letters in specific size cut out on by one so I can make a stencil for a bicycle", people lose their enthusiasm.
 
I want to start by saying hello and Welcome! Im not one of the lucky members that introduced themselves when you first got in, and to my amazement! Gee Whiz!

I've been watching MASH literally every night to fall asleep with some Humor for the last 14 years or so. I have a hat, the complete episode theme book., bunch of the bubblegum cards and more.
My dad was the one who got me onto it of course., and with that it holds something special for me.,
Ive seen a lot of army themed bikes, heck.. I've seen a lot of just green bikes., But the MASH theme might add a few little quirks where the others were Drier than Vermouth. You know this is gonna perk some ears, doncha fella?

Well, just be sure to keep ol' Radar in the loop, eh good buddy?
I'll be watching intently of your work and posts from here to Adams Ribs by the Dearborne street Station, Chicago. [The place with the big Shoulders..]


MASH 4077 Walter O'Reilley Out.

[PPS: if you should want advice, ideas., opinions or just some good snapshots of the bikes they used in Mash for that little extra something.. Im you're guy and I dont mean guy like Klingers a Guy., a little more defined ;) ]

FZ​
 
To me, what you're doing with the stencil is more fitting than doing the vinyl that you described. The imperfections of a stencil are what you would expect for a war time military placard.

Also, it's not likely that the military would stencil letters in an arc. Since your plate is not arched, it might possibly look good to keep the lettering squared also.
Just thinking out loud.
 
My leather guy is...pretty awesome.

He finished way before I could dream he would, and he did an excelent job!
So I mounted handlebars...
20150722_190056_zpsztgevqwg.jpg


And then the seat too (it's the same colour like handles, just a camera color distortion)
20150722_194306_zpsihrgj0fa.jpg


I was so satisfied with it that I mounted the carrier sidebags bracket (which you could see earlier), and a honey tan leather bag.
20150722_210230_zpscu65lepc.jpg


Not the most elegant solution, but it's efficient and it gives place for mounting something on it (maybe a case or a box, maybe a rear light, maybe I'll just leave it like this-it's pretty sturdy and it can take a lot of weight, so it can come usefull).

And the bike now looks like this:
20150722_214338_zpsqwupsgxx.jpg


I took the front light off for painting the bracket and nuts and bolts, and the plate...it sort of pissed me off, so I'll leave it for the end of the build (which is pretty near).
 
Beautiful leather work!!!!
Cool pannier rack idea too.
 
Yes, I'm really satisfied with the leather work, he has an eye for details and he's precise; he deales with custom wristwatch straps (mostly leather).

I'm on a lookout for a rear light and today I'm going to go through my military surplus...have an idea of a canvas saddle bag for the other side.

I'm beggining to see the end of the build-just in time.
 
Didn't found a suitable back light today, but when I came home from work I went through my military surplus closet and found this baby; perfect for the back, so beautifully unsimetrical that it just sits there like it was made for loving you baby you were made for lovin' me....sorry, I got carried away. :D

I present to you; the gas mask side bag!
20150723_215357_zpsixhkfpwp.jpg


Then I remembered that my leather friend gave me a little laser burnt leather tag that said MASH. I didn't want to use it because the font wasn't original and it just said MASH, with stars instead od asterixes between the letters or 4077 number. Then I went little creative (I'm a very lousy at drawing) and "enhanced" it....sort of.

received_bWVzc2FnZV9ibG9iX2F0dGFjaG1lbnQ6MTAxNTMyOTc4NTE0OTcyNTg_zpst5yfa0vo.jpeg


Then it was time to saw it to the bag; but on what location?

1.
received_bWVzc2FnZV9ibG9iX2F0dGFjaG1lbnQ6MTAxNTMzMDU0NDI0ODcyNTg_zpspw9yyizj.jpeg


2.
received_bWVzc2FnZV9ibG9iX2F0dGFjaG1lbnQ6MTAxNTMzMDU0NDI4MzcyNTg_zpswybgitt4.jpeg


3.
received_bWVzc2FnZV9ibG9iX2F0dGFjaG1lbnQ6MTAxNTMzMDU0NDMxOTIyNTg_zpshzfxgeig.jpeg


4.
received_bWVzc2FnZV9ibG9iX2F0dGFjaG1lbnQ6MTAxNTMzMDU0NDU4NDIyNTg_zpss8vbgpeg.jpeg


I have a personal favourite in no. 2., but what do you guys think?
 
^^^^^^^^^what they said ^^^^^^^
 
Unanimously!

then #2 it is; it's my favourite too, because it's lined with the chainstay, it gives a nice leather colour balance to the seat and handles (which are in the upper half of the bike if you count top tube for middle), and it visually best belongs to that corner of the asimetrical bag.

Now, it's just the rear light (I'm hoping I'll find something worthy on the flea market on Sunday) and MASH plate.

Tommorow I'l try another approach for stencil making-hope it works better than the last time.
 
Love your work on the light and batteries!
The stencil job actually looks good to me, it looks like the ones in the show which are not perfect and not meant to be...

Luke.
+1 on leaving the stencil as is....more ratty!
 
Leather looks awesome! And your bracket for the rear panniers, the battery out of a wood block, light mount and housing....rat-ification at it's finest!
 
ratification goes on with the plate; experiment #2 didn't work. :D

Because first paint job on the plate didn't work for two reasons (1. aerosol paint made a bad reaction with the undercoat and everything got wiped off; 2. stencils were made od light cardboard that got bent when sprayed with aerosol, so the letters came out fuzzy and smuged), so I got to phase 2 of stencil making.

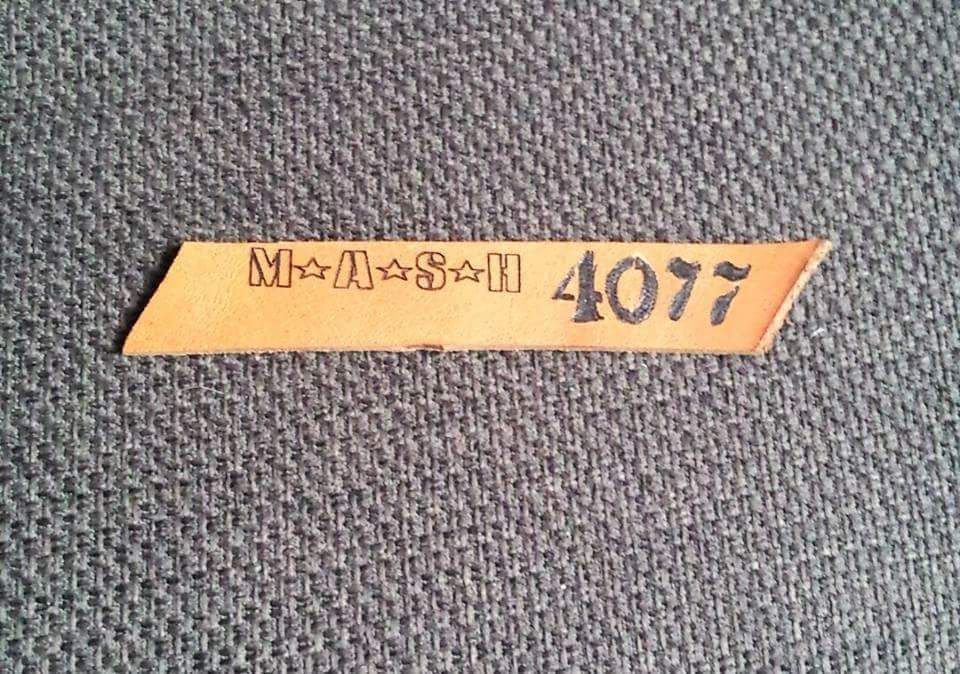
Printed out the letters on a paper sticker (not vinyl!) and spent another hour or so cutting them out. Prior to that, I striped the plate to bare metal (again!) and painted it green. When the paint was dry and the sticker cut out, it was white magic time in the Swamp; because aerosol paint lifted the green this time I used synthetic, water based paint which is less agressive, and aplied the paint with a brush.

Original plan was to, when the white paint dries out, peel the sticker off. White letters stay sharp, green comes back, and I can carry on, carry over, carry forward, Cary Grant, cash and carry, carry me back to old Virginia....

But no.:acute:

First I couldn't peel the sticker off; it left gluey residue on the plate which wouldn't come off even when I boiled the whole thing in hot water. Second problem was that the white paint stick to the paper and to itself, but not so much on the green undercoat, so when I peeled off the paper, white letters also came down.

Grind the plate to zero point and start over.
Casual problem; I ran out of green paint.
Green paint which was hand mixed.
In a store 100 miles away, in direction opposite from my daily home-work journey.:banghead:


Attempt #3 wiill be carried on later this afternoon, at 5 o'clock (now I know how 5 o'clock Charlie was feeling).:comando:
 

Latest posts

Back
Top