- COMPETITIONS
- THE COMPETITION ARCHIVES
- RRBBO OFFICIAL COMPETITIONS
- BUILD OFF 12 (2017)
- BUILD OFF 12 BUILD JOURNALS
You are using an out of date browser. It may not display this or other websites correctly.
You should upgrade or use an alternative browser.
You should upgrade or use an alternative browser.
Multi-ColorFlow, Boba, Scribble's Rat-Flow. Part XVIV Finished For Real This Time I Swear
- Thread starter Scribble
- Start date


Help Support Rat Rod Bikes Bicycle Forum:
This site may earn a commission from merchant affiliate
links, including eBay, Amazon, and others.
Something to make real rust on the bare metal might look cool. Could be tough to match the original paint.
Agree with my two compadres ^ . If you can get a little age to the skirt and chain guards they might blend a little better. If you do, you might want to consider giving the springer a little of the same treatment. I didn't realize how shiny the fork was until I enlarged your most recent pic.
If you are brave, my old standby Rustoleum Multicolor texture paint, just lightly applied from a distance of 4-5 ft, in a swooping, misting kind of manner would help to 'age' them. If they are bare, with no oils, polish, etc on them it sticks pretty well. When dry, lightly rub it smooth for that 'old rust' look.
If you are brave, my old standby Rustoleum Multicolor texture paint, just lightly applied from a distance of 4-5 ft, in a swooping, misting kind of manner would help to 'age' them. If they are bare, with no oils, polish, etc on them it sticks pretty well. When dry, lightly rub it smooth for that 'old rust' look.
Whatever you do will only make a beautiful bike even more beautiful.
Whatever you do will only make a beautiful bike even more beautiful.
Agree with my two compadres ^ . If you can get a little age to the skirt and chain guards they might blend a little better. If you do, you might want to consider giving the springer a little of the same treatment. I didn't realize how shiny the fork was until I enlarged your most recent pic.
If you are brave, my old standby Rustoleum Multicolor texture paint, just lightly applied from a distance of 4-5 ft, in a swooping, misting kind of manner would help to 'age' them. If they are bare, with no oils, polish, etc on them it sticks pretty well. When dry, lightly rub it smooth for that 'old rust' look.
Thanks guys, I've already started messing about with the guards, nice thing about them is I don't have to worry about wrecking OG paint if I don't like them I can always start over
 .
.


LOL, I've done a few bikes in the same exact paint!

Lots of steel wool, scotch bright and sand paper. Looks much better then bare steel in my option.


I was trying to match the patina, as you can see it's paint and bare steel not much rust if any.
I think it's a fairly good match.


I used one of my grimy rags to buff the paint to a more matte finish.


The band on the chain guard and left side skirt guard ought to match fender brace color if you are trying to emulate original paint. It's looking very good as is though.
Sent from my iPhone using Tapatalk
Sent from my iPhone using Tapatalk
The Renaissance Man
__CERTIFIED DIVER__ (Open Water & Open Dumpster)
Staff member
Moderator
Pro Member
Glad you decided to go for it with the paint, it looks 100% better than the bare metal!
I also agree with @MazdaFlyer on painting the bands on the guards.
I also agree with @MazdaFlyer on painting the bands on the guards.
The band on the chain guard and left side skirt guard ought to match fender brace color if you are trying to emulate original paint. It's looking very good as is though.
Sent from my iPhone using Tapatalk
Glad you decided to go for it with the paint, it looks 100% better than the bare metal!
I also agree with @MazdaFlyer on painting the bands on the guards.
Guess I'm off to find some gold paint.
also I was thinking about doing some of these drilled holes on the guard.

Nice work on those skirt guards! I agree with the boys ^...paint really ties it together.
Just a thought. If you wanted to, find some of the 'splatter paint' colors that are found on your frame. Dip the very tip of a small brush, say 1 1/5" bristle width. Stand back and 'flick' the bristles and let some of the splatter randomly hit the skirt guard. I see yellow, light blue, red, orange...might really tie it together.
Otherwise, the rubbing and the more matte finish you can achieve will keep blending the skirts with the frame as well. Isn't this 'aging process' stuff a blast?!
The Renaissance Man
__CERTIFIED DIVER__ (Open Water & Open Dumpster)
Staff member
Moderator
Pro Member
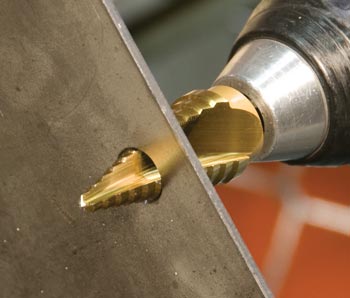
That would be a big challenge getting that many holes perfectly aligned like the factory guards were. But if you do decide to try it, you most definitely need to use a step drill on that thin sheet metal. Harbor Freight has them for cheap.
That would be a big challenge getting that many holes perfectly aligned like the factory guards were. But if you do decide to try it, you most definitely need to use a step drill on that thin sheet metal. Harbor Freight has them for cheap.
I've got one of those step bits. It would be perfect if someone that has one of those factory drilled guards, Could make me a template of where those holes are.
Or I could just wing it and do my own pattern for the holes.
- Joined
- Jan 20, 2015
- Messages
- 14
- Reaction score
- 18
You've already got the hole template in your rear rack.
How do you control the DIA with a step drill, I've never used one?
Sent from my iPhone using Tapatalk
Sent from my iPhone using Tapatalk
How do you control the DIA with a step drill, I've never used one?
Sent from my iPhone using Tapatalk
There quite easy to use, I've only ever used one for pre-drilling into wood. To use a step bit is in the name you just decide which step you want, and then let the drill do the work for you then stop once you get to the diameter you want. Don't know if that was a good explanation. I'm not very good at conveying things in text.
You've already got the hole template in your rear rack.
Now why didn't I think of that
 .
.Your a genius


Almost done, not much more I can add at this point unless someone has a Color-Flow tank they would part with. Other wise Look forward to some more finished photos maybe evan a ride video around down town Boise ID. Also for anyone that might not have watched the whole build from the start, here is what the bike look like before.


.... unless someone has a Color-Flow tank they would part with.
I might... i was stock piling for a build similar to yours and got some doubles along the way. I'll check Smaug's mountain lair(ie my basement) and I'll let you know.