Found out what they cost after I traded. I came on the good end.Yes, the price lol you dodged a bullet
- COMPETITIONS
- THE COMPETITION ARCHIVES
- RRBBO OFFICIAL COMPETITIONS
- BUILD OFF 16 (2021)
- BUILD OFF 16 - CLASS 1 - BUILD JOURNALS
You are using an out of date browser. It may not display this or other websites correctly.
You should upgrade or use an alternative browser.
You should upgrade or use an alternative browser.
‘Humpster’
- Thread starter Dr. Tankenstein
- Start date


Help Support Rat Rod Bikes Bicycle Forum:
This site may earn a commission from merchant affiliate
links, including eBay, Amazon, and others.
Thanks for the info. I'm using 50mm with 2.35 tires. I'm going to give it a try. Heard nothing but good about them.The only ‘issue’ I’ve found is the cup/bearing combo is wider/deeper than stock. I was installing it on a bike that needs the chainring spaced out to avoid chain/tire contact (the rear wheel is 80mm and a 26x3.5” tire...) this scenario left very little threads on the non-drive side, unless you find a wider crank (like old MTB stuff).
I’m not expecting that issue on this bike, as I’m using a 1.5” wide rim and a 26x 1.75 tire.
I can tell you this, when it was installed, it was as smooth as glass
Sent from my iPhone using Tapatalk
I just picked up a smallish blasting cabinet hopefully I can fit mostly everything except frames in it.been using a homemade one made out of a airgun didn't work to good for me sand everywhere wasting a lot.
Found out what they cost after I traded. I came out on the good end.
Started stripping the house paint/enamel off today. Whoever painted it red apparently stripped the original Opaque Blue and red oxide primer off most of the frame. I did find some original paint and primer on the BB shell and inside the tubes.
I will not be returning it to its original color
Got the ‘easy’ tubes stripped, I’ll start the rear triangle tomorrow.

Sent from my iPhone using Tapatalk
I will not be returning it to its original color
Got the ‘easy’ tubes stripped, I’ll start the rear triangle tomorrow.
Sent from my iPhone using Tapatalk
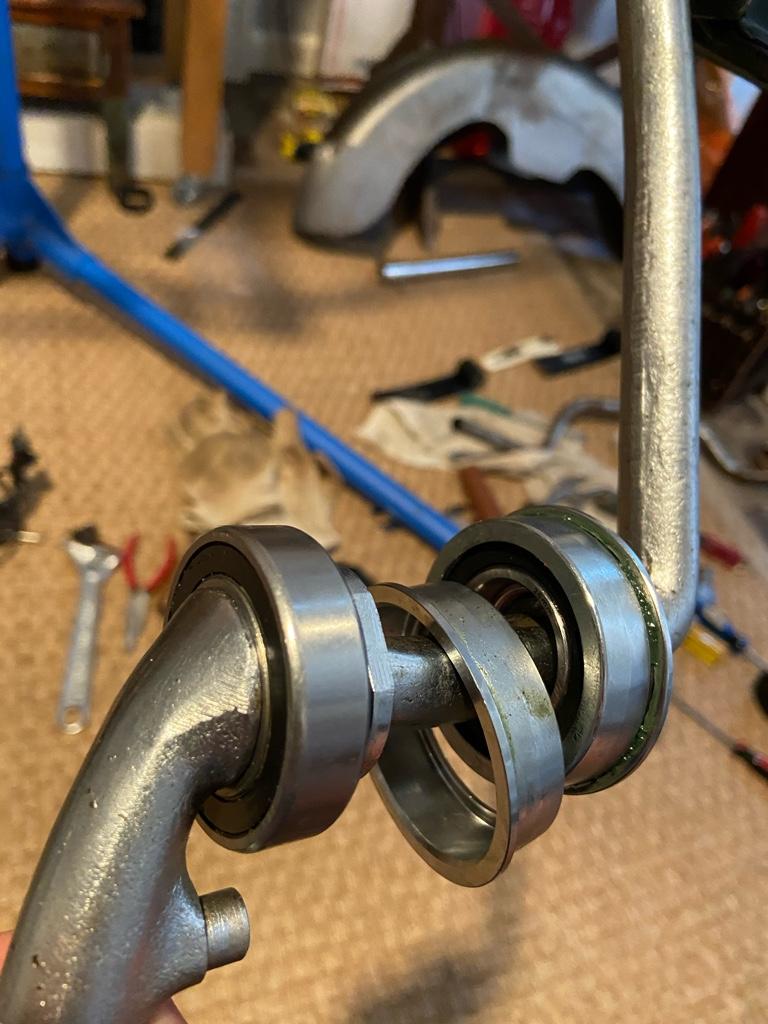
Awesome crank! Is this bottom bracket custom made? Or can you order this somewhere?Crank will be this 1956 JC Higgins mated to a sweet sealed cartridge bearing BB setup. A set of all black ‘Schwinn bow tie’ style pedals. Chainring will either be the Schwinn cloverleaf (chrome is shot, so painted), then I’d need to source/fabricate a chainguard OR the Tuf-Neck chainring with the bash guard. Would need to source a spider for it. Leaning towards the Tuf-Neck
Sent from my iPhone using Tapatalk
My guess: the nut and cone that holds this together is on the other side of the picture.
I like the direction you are going with this build!
Started stripping the house paint/enamel off today. Whoever painted it red apparently stripped the original Opaque Blue and red oxide primer off most of the frame. I did find some original paint and primer on the BB shell and inside the tubes.
I will not be returning it to its original color
Got the ‘easy’ tubes stripped, I’ll start the rear triangle tomorrow.
Sent from my iPhone using Tapatalk
The sexy curve of that top tube shows up well now that it's nekkid!
It’s a older Tange unit, here’s the pics from the eBay auction.Awesome crank! Is this bottom bracket custom made? Or can you order this somewhere?
My guess: the nut and cone that holds this together is on the other side of the picture.
I like the direction you are going with this build!


- Joined
- Apr 26, 2020
- Messages
- 1,562
- Reaction score
- 4,939
Great work Doc.
Thanks for sharing doc, that is some neat stuff. Maybe I can mill something myself in the future, but keeping my eyes peeled for now.It’s a older Tange unit, here’s the pics from the eBay auction.
View attachment 158282View attachment 158283View attachment 158284
My ‘workshop’ is actually my home office (much to my wife’s dislike). All ‘dirty’ work is gonna have to done out in the Savannah sun this build off. If the price of lumber ever returns to a normal level, I have plans for a new shop to be built.


MattiThundrrr
Rattus All Terrainus
Meanwhile, in matti's shop

summer is in full swing
summer is in full swing
Gonna repost the update
Last edited:
Looks like you properly diagnosed the ailment and prescribed the appropriate physical therapy, Doc! Looks good. 
Glad the backyard engineering worked to give the frame a little attitude adjustment!!! Nice work.
Tried to fix the double posted pics, got frustrated, so here goes try #2.
So, took the rear wheel to my LBS to get it properly laced and trued, that should take about a month.
Before getting further into the paint stripping, decided to get the ‘squat’ out of the rear of the frame. Here’s a comparison of where it was and areference pic (the yellow one)


built this jig to hold the rear down while I pushed on the headtube

before:

after:

much better, now the chainguard mounts line up

After the holiday, gonna make arrangements to get it welded in place. The chain(s) came in this week too. KMC RustBuster. With the humidity and salt in the air here, they have become my ‘go to’ choice.

gonna get back to stripping paint, may do the chainguard so I can mock up the paint scheme (nothing crazy, more of a subtle one this time around)
Stay tuned!
So, took the rear wheel to my LBS to get it properly laced and trued, that should take about a month.
Before getting further into the paint stripping, decided to get the ‘squat’ out of the rear of the frame. Here’s a comparison of where it was and areference pic (the yellow one)
built this jig to hold the rear down while I pushed on the headtube
before:
after:
much better, now the chainguard mounts line up
After the holiday, gonna make arrangements to get it welded in place. The chain(s) came in this week too. KMC RustBuster. With the humidity and salt in the air here, they have become my ‘go to’ choice.
gonna get back to stripping paint, may do the chainguard so I can mock up the paint scheme (nothing crazy, more of a subtle one this time around)
Stay tuned!