Frisco Flip (formerly Trike Trimmings)

Rat Rod Bikes Bicycle Forum

Help Support Rat Rod Bikes Bicycle Forum:

This site may earn a commission from merchant affiliate links, including eBay, Amazon, and others.
Joined
Feb 16, 2012
Messages
40
Reaction score
67
Okay, so now that I've finished spamming the gallery with a bunch of my builds in an attempt to build a "resume", I am going join this year's build off. I have a Joannou trike frame and some nice anodized 26" rims left over from my Secret Trike build. I love the lugs on this frame and think it would make a phenomenal frame flip candidate.


In the interest of full disclosure I threw the parts together last summer to gauge the complexity of it as a build. I decided that it was going to need a significant amount of effort and put it aside.


If this DQs me from the build off please let me know. Otherwise, I am planning on fabricating lugs and tubing to make dropouts that match the truss-like nature of the frame. I will need to source another bottom bracket in order to keep that awesome sprocket, as well. I'm thinking gloss black tubes, white/cream lugs, and orange pinstriping.
 
ya man love up side down bikes
 
I don't think a mock up DQs you at all.
Great vision to see that as a perfect flipper!!
Welcome to RRB!
 
Okay, so I got the cranks off so that I could measure the BB and try to find a new shell. Here is a pic of that awesome sprocket.


I took some measurements and from what I can find I think I found a shell. I still have one question before I order it up. Are the threads likely to be standard? I measured the length of the insert, counted the threads, and converted that number to 1". Between the diameter I measured and the calculated thread count it should put me at the standard 1.370"- 24tpi.


The headbadge is definitely getting saved and flipped. I'm just hoping that the holes will still line up so that it's centered when I flip the frame. It doesn't quite look that way, though. This is also a good shot to show the lugs.


One of my friends pulled these Delta lights off of a kid's bike she picked up for her son. The guts are missing out of the red one and the cover is mangled on the headlight. I don't know if I want to tackle rebuilding the headlight cover. (I'm not too fond of it anyway.) The tail lights are cool, but I'm not too sure if they're going to fit the style that I'm working towards.


TT-008.jpg


But I do have a plan for them, however. Like I said, the bulb and reflector are missing out of the red one. So I picked up two Rayovac repop flashlights and massaged the donor parts to fit in the housing. I had this necklace "bead" that I picked up from a craft store when I was building the headlight for my Old No. 3. I had split the bead in half and was going to graft it onto a Bell head lamp light. I mounted the Bell guts into the copper candle holder instead; so now I'm left with the bead halves. Well 'lo and behold, they fit perfectly into these housings. Now I'll have side-by-side snub-nosed finned headlights!


So I think with the curly headlights and the arch theme on the frame, this fine piece of home decor would make a good start to a luggage rack. I'll have to see how well it plays with the "not much there" look of the frame.

 
This is looking cool. You have some great ideas going on too.
 
Okay, so I haven't let this project die. I've just been busy. For some reason I decided two weeks before the start of the buildoff that a hack 'n' tack hot rod bike was just the warmup that I would need to get this build started. So now that I've finished that one and got the paint finished on my nephew's "secret" trike I can dedicate myself to this one.

This build was going to need some planning before I started to order up a bunch of tubing. I ordered up the BB shell and it fits the crank spindle just fine. So once I knew I was going to be able to move on with the same crank setup I could start to throw down some digital "tubing". I first made a whole bunch of measurements. Then I rooted around in my head to dig out some old high school trig formulas. Then I built the existing frame into my modeling program.


A little color since I could:


I had an idea in my head to make the rear arches start partway back on the chain stays and make a "lug" that wrapped around the stay.


Luckily I realized that this wasn't going the be the best setup as the chain would run through pretty much every piece I was going to add.....

So the next option was to run the arches all the way up to the bottom bracket. This was going to be better support for the crank, make for a clear chain line, and be a closer match to the size of the existing arch in the frame.


I don't have the taps to clear out any mangled threads in the BB so what I plan on doing is making a lug with an inner diameter that matches the outer diameter of the threaded shell. Once I get that lug all welded up I can braze in the threaded shell.

All of the tubing and plate for the dropouts is on order and I should be able to start going crazy on this shortly.
 
Normally I'm not a fan of the upside down bikes. But I must say this one really works for me . Nice job! :thumbsup:
 
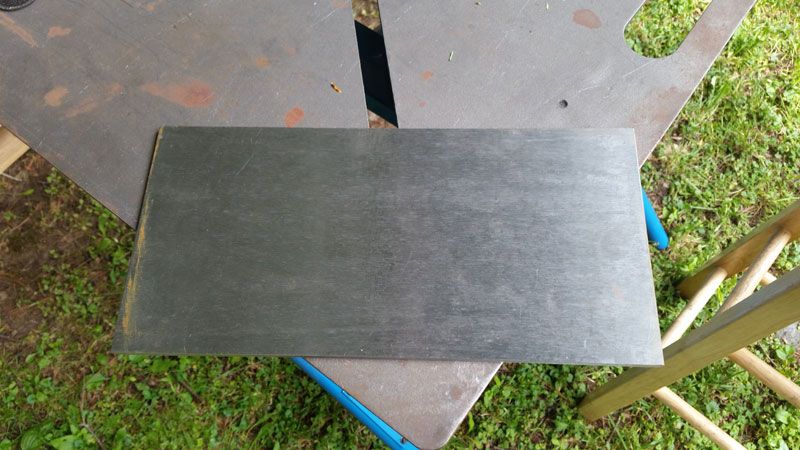
Okay, sparks have flown, grinding dust is piling up, and parts are taking shape. I figured I'd start with the easy parts. And by "easy" I mean parts that won't require the use of any artistic license: the dropouts. The original dropouts on the frame are 3/16" so I wanted to match this to make the transition to the new dropouts seamless. I played with the outlines and tried to arrange them so they fit on a standard piece. I started with a piece of 6" x 12" x 3/16" steel.


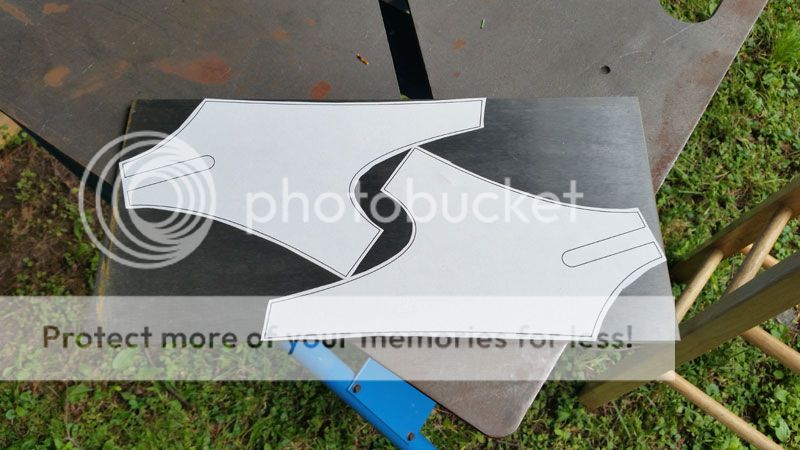
I printed and trimmed the templates, sprayed a little adhesive on the backs, and slapped them on the sheet.


Using the Dremel with a cutoff wheel, I started to separate the parts.


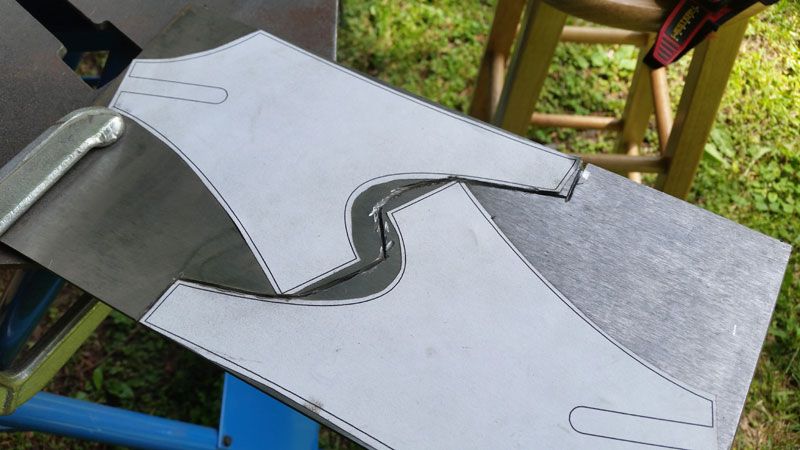
Once separated, I drilled a hole at the end of the slot in each plate to bolt them together. This allowed me to index the two parts so that I would end up with two identical dropouts after grinding. This task was going to take more than a Dremel, so I used an angle grinder with a cutoff wheel to cut out the basic shape. (Also, as a public service message: freshly cut shards are sharp enough and hot enough to RIGHT through Mechanix-type gloves. Use the correct PPE.)


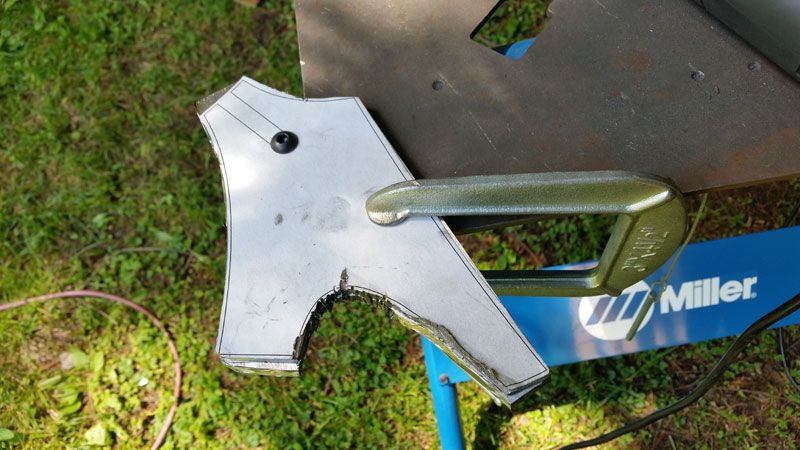
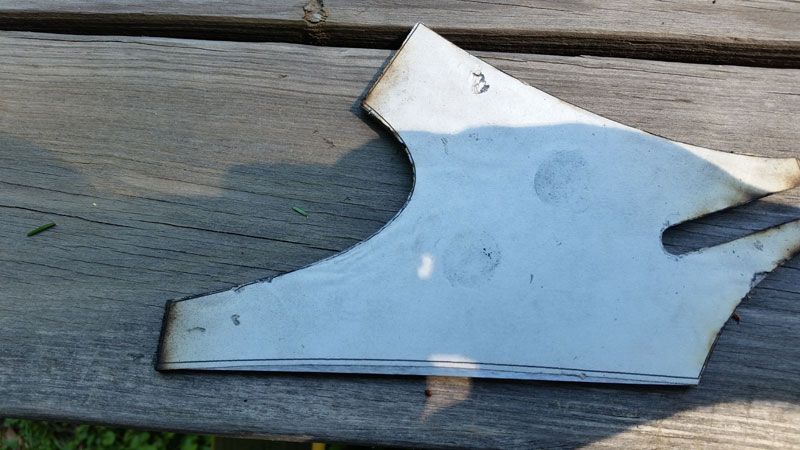
I swapped out a grinding wheel for the cutoff wheel, generated some sparks and dust, and ended up with some raw dropouts. I will put the final shaping on the bottom of the pieces once I see what the arc is going to be like in that area. I have learned that it's usually better to remove material than add it, remove the excess, and shape it until you can't see the mistake "exercise in gaining experience". I will probably do the welding/brazing and then go back at it with a grinding wheel and files.


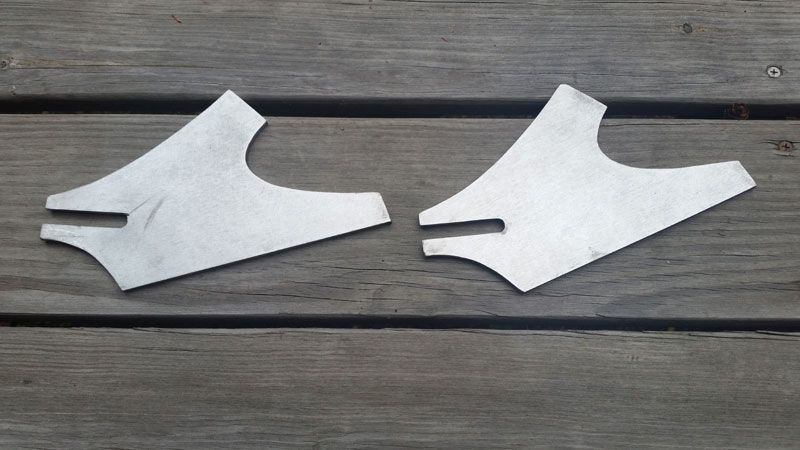
A quick buzz with the orbital sander removed the parts of the templates that were baked on by the heat from cutting/grinding.


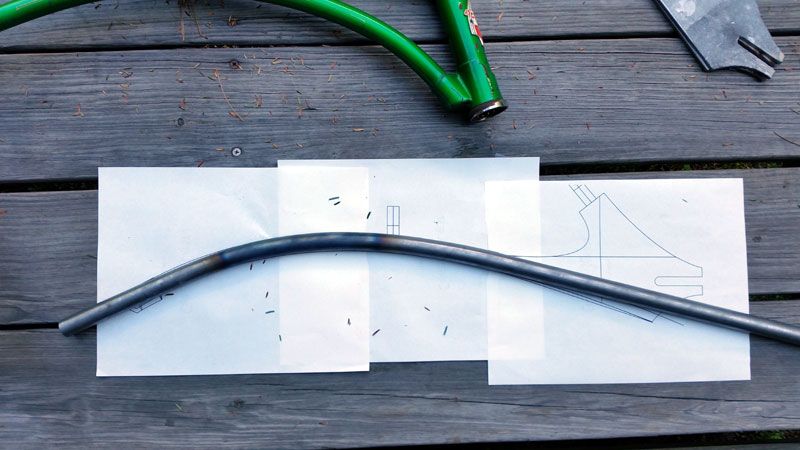
Okay, so now for something with a little less rigid of a template: the chainstay arcs. So apparently when I ordered the 0.75" tubing for the arcs I grabbed the first general purpose tube with a reasonable price. It turns out that it has a 0.188" wall.... This thing looks like a really early rifle barrel! One benefit to the super thick wall, though, is that it bent relatively smoothly in the cheap HF hydraulic bender. I over bent a couple of times, but a little heat from the MAPP torch and I could pull it back open. It was a process of bend, check against the printed template, bend in the next spot a little further down, recheck, repeat..... Here is a shot of one of the times I checked a bend against the template.


Once I had the arcs bent I needed to carve the slots for the dropouts. I wanted to do this after I had the bends so that I could get them perpendicular. I used the angle grinder and cutoff wheel to do the initial pass.


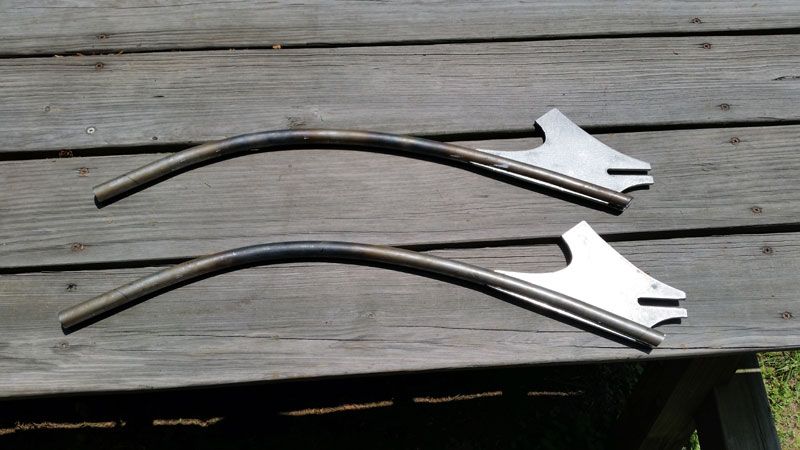
Using a thin grinding wheel and a whole lot of filing, I widened the slots so that the dropouts slide in smoothly but still have complete contact. And as a bonus, if this build goes belly up I'll have some wicked axes! You can see where the chainstays actually have some arc at the bottom of the dropouts and the material that will need to be removed. I also will need to cut each end of the arc to length.


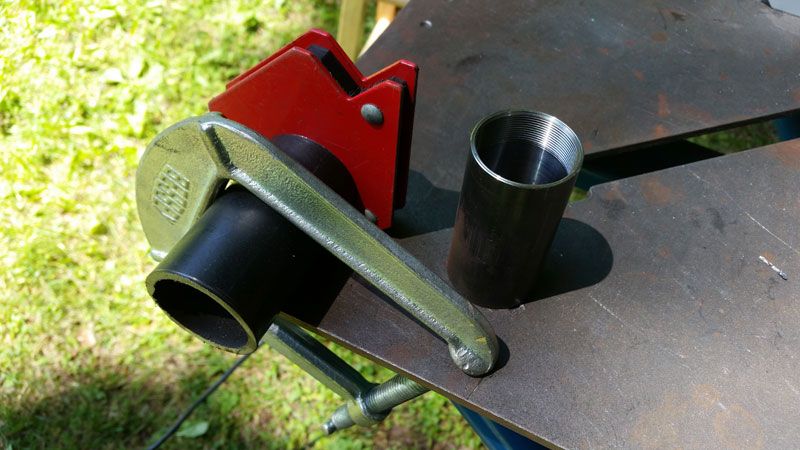
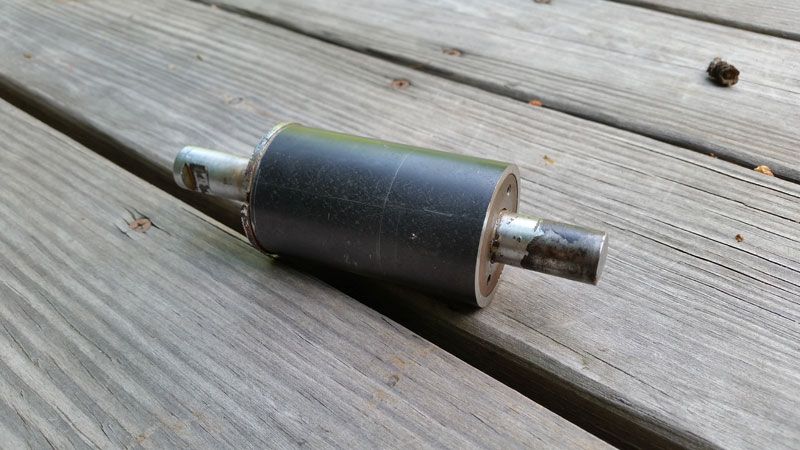
So now that I have the back half squared away I need to work on the BB. As I mentioned earlier I am going to make a lug that holds the arc & frame attachment points and then braze in the threaded shell. I cut a piece of tubing that had an appropriate ID to match the OD of the threaded shell.


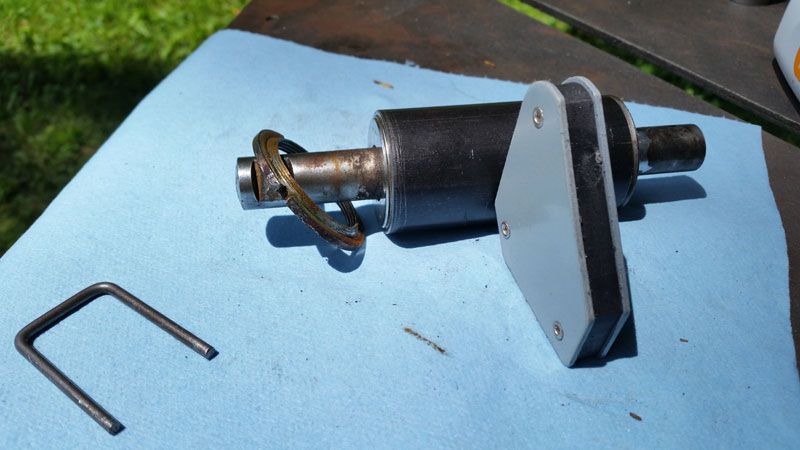
Before grinding/filing to size I realized that I needed to address the threaded piece first. The shell that I bought was just a hair long. The lock ring on the chain side didn't have full purchase on the threads. The other side wasn't countersunk so it looked like I could make up some room there.


After a minute or two of hemming and hawing about hosing the threads, I CAREFULLY countersunk the one side with a stone grinding cylinder in the Dremel. Going slowly, it took a couple of times to go far enough to get the insert to seat properly. I reassembled the BB and it wasn't going to bring the spindle over enough to bump the thread insert out far enough. So I ground the chain side of the shell down to expose enough threads for the lock ring. Again, I did this SLOWLY and over multiple times.

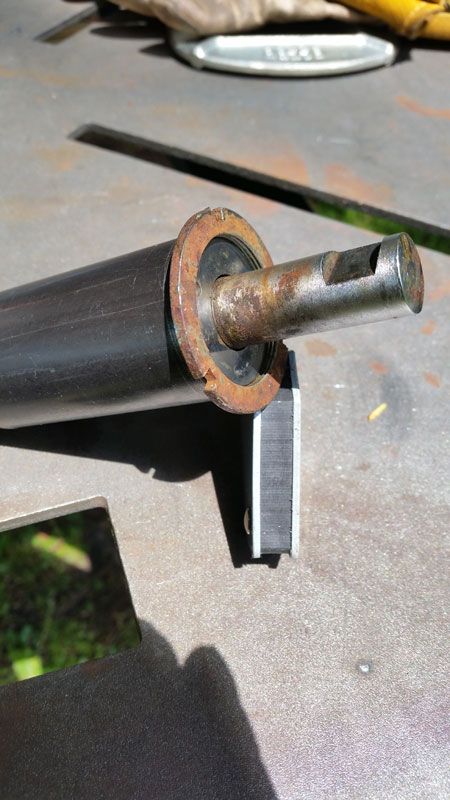
I didn't take any pictures of the shell before I finished the lug sleeve. I finished the lug to a length that will cover the whole inner assembly. You can see how tight the lug sleeve fits around the threaded shell; it's the same OD as the threaded insert.


So that's where I sit for now. This weekend I'll probably get to the rest of the BB lug. I finished off my argon tank the other day welding up a kayak rack; so hopefully I can scrounge up a tank and weld the new dropouts to the old dropouts. If I can get that done then I'll be able to start attaching the rest of the new frame parts. I think that with how clean the arcs meet the new dropouts I'll braze them in for a cleaner look than welding. There is so much metal contact I don't think I need to be worried about it not being strong enough.
 
Very unique drops and chainstays!
 
Okay, so with my Ar tank refilled and some great weather I'm starting to make some progress on the frame mods. My first mission was to make some progress with the bottom bracket shell. I cut a piece of tubing down to the length I was going to need. I fishmouthed another piece of tubing that would act as the lug for the frame extension. A little TIG-ing later and I had a nice new BB.


I'll have to grab a detailed picture, but from the last one you can see I cut the lug to length and added the frame extension piece. In order to increase the strength I added a piece of seat post that will slide into the frame and tighten down like the original seat post. My chain and pedals should be in this afternoon. So at that point I'll square up the whole BB assembly and braze it into the frame. Brazing will allow me to keep all the straight edges of the lugs. Here are a couple of pics of the bike after I welded the dropouts on to the frame. I still need to cut out a couple of pieces of plate and weld them in to fill the original dropouts.


I had a stem kicking around that was nearly a perfect match for the new neck angle. It follows parallel to the top tube. So with the square carcass and tread pattern of the tires, it makes me think of a 'Frisco style motorcycle. So to keep with that theme I added a pair of mountain bike bars as drag bars. I'm going to cut 1.5"-2" off the end of each end to narrow them up and add a set of ifitsfreeitsforme's coke bottle grips.

While working with the front end I finally faced the fact that I was going to have to deal with the forks at some point. Those cool square tires were a little too wide for the original frame design.


Adding washers wasn't going to stretch the forks out far enough. This was going to call for some more extreme action. Purists and those with weak stomachs or heart conditions be warned: there was some cutting involved in this procedure..... (Don't worry though, it all worked out in the end.) I took the bearing support off of the stem and cleaned away the paint with a wire brush on the Dremel.


The idea was to extend the top "spreader" tube to which the forks were attached. As long as I did one side at a time, this was going to be more reliable than removing and rebrazing each of the fork sides onto the existing tube. I cut & ground two pieces of tubing to the same length, cut the original top tube, and spliced the new extensions in to each side. Here is some pics of tacking the first fork extension back on.


Cutting the second side off:


After welding, grinding, and sanding with 80 grit on the orbital. The original setup had a bend in each fork to make the spread angle. A little work with the "hot wrench" and the vice and they straightened out nicely. I probably went a little overboard with how much I spread them, but pulling the rear tire out as far as I did added a lot of space between the tire and the frame there as well.


So here's a quick mockup of where the bottom tubes should lay out. I still have to cut/bend them to match the existing chainstays. Then I need to slide on the new lugs and weld them to the BB shell.


I have a seat squared away, but haven't added the mount yet. It required a springer seat, an extra set of rails from a mountain bike seat, and the original WCC seat from my chopper. I'm also going to need a taillight that will rival the headlights. It will be heavily "inspired" by "The Black" from Falcon Motorcycles.
 

Latest posts

Back
Top