You are using an out of date browser. It may not display this or other websites correctly.
You should upgrade or use an alternative browser.
You should upgrade or use an alternative browser.
GLENDERSON - [winter build off]
- Thread starter Glen
- Start date


Help Support Rat Rod Bikes Bicycle Forum:
This site may earn a commission from merchant affiliate
links, including eBay, Amazon, and others.
You got my mind spinning now, figuring a way he could make a four cylinder mock-up motor that the pistons go up and down with the pedalling... Let me know if you want some rather complicated ideas Glen... 
Luke.
Luke.
You got my mind spinning now, figuring a way he could make a four cylinder mock-up motor that the pistons go up and down with the pedalling... Let me know if you want some rather complicated ideas Glen...
Luke.
Luke, I clicked the "like" button on your post above because I like that you are thinking up ways to complicate other peoples lives. I'm already confused, and that's just about the mudguards...

Might this four cylinder mock-up motor have something to do with four sprocket-type doohickeys spaced strategically along the length of the drive chain actuating piston-like thingamajigs that thrust up and down as I pedal furiously?
No!
Okay then Luke... complicate away... I bow to your superior bike building prowess oh mighty guru-of-oz

Oh, and thanks for reminding rubsterob that I won't be putting a motor in it... unless your complicated mock motor is far less complicated than you let on
Glen.
- Joined
- Oct 23, 2011
- Messages
- 669
- Reaction score
- 1,053
Hi Glen,
Re the guards you are after, I have got stuff from this guy in Melbourne,
Mark at Saint Side, yep post from Aust to NZ would still be a bit exy but
have a look! I have a set on my World's Slowest Indian and Zundapp builds.

I can confirm that 26 x 2.5s fit no dramas inside these guards.
Link to guards.
http://saintsidebicycles.bigcartel.com/product/26-fender-ducktails-chrome
Re the guards you are after, I have got stuff from this guy in Melbourne,
Mark at Saint Side, yep post from Aust to NZ would still be a bit exy but
have a look! I have a set on my World's Slowest Indian and Zundapp builds.
I can confirm that 26 x 2.5s fit no dramas inside these guards.
Link to guards.
http://saintsidebicycles.bigcartel.com/product/26-fender-ducktails-chrome
Hi Glen,
Re the guards you are after, I have got stuff from this guy in Melbourne,
Mark at Saint Side, yep post from Aust to NZ would still be a bit exy but
have a look! I have a set on my World's Slowest Indian and Zundapp builds.
I can confirm that 26 x 2.5s fit no dramas inside these guards.
Link to guards.
http://saintsidebicycles.bigcartel.com/product/26-fender-ducktails-chrome
Thanks for that Pushie... I'll have a looksee.
Cheers,
Glen.
Might this four cylinder mock-up motor have something to do with four sprocket-type doohickeys spaced strategically along the length of the drive chain actuating piston-like thingamajigs that thrust up and down as I pedal furiously?
Yep! With steel rods sleeved with trailer spring bushes as guides for the pistons so you can see them working, fake sparkplugs and cloth wrapped wires... I got plenty of ways to complicate your build for you Glen!
 Been planning it myself for a future build for a while...
 As regards Pirates suggestion of Saintside cycles for your guards, yep, would highly recommend them! Mark is a nice bloke and last time I was down there he cut me a deal on the big banana seat I used on my last muscle bike build...
Luke.
Well, that certainly does sound like it would complicate things... hmmm... sounds like it could look very steampunkish... hmmm... 
Anyway, thanks for confirming Pushie Pirate's mudguard suggestion. I had a look and they are pretty good. Was hoping for older looking ones. They have the ducktail part on them which I was hoping to not have... and they are chrome. I just hate painting over nice chrome and nice shiny chrome just will not do on this build. I might just take a closer look at the guards I already have and contemplate butchering them. Can't go spending too much money... literally... 'cause i don't have much to spend.
Cheers,
Glen.
01/01/2014
Thanks everyone for the comments so far.
I promised myself that I would start on Glenderson on 01/01/2014 so today I started dismantling the donor bike. Hit a problem... the quill steerer is in there tight and will not budge.
So I banged it with all manner of implement, including my hand... yes it did hurt... but it will not move. And it is soo hot and humid here today that I decided to just go and get another frame to use. This one was much friendlier and the stem and fork jumped out at me as if I was some long lost relative that has been missing for years.
Here is a photo of the two frames. The naughty one is the dark coloured one and the nice one is the blue one...
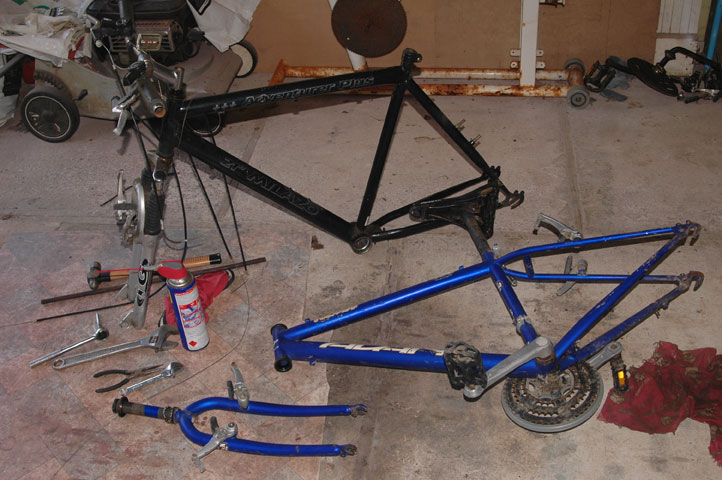
So now I will use bits from both these frames, and a happy coincidence... serendipity I think it's called... is that the fork on this blue frame is the same as the old Chopster fork. That means I should be able to make a springer type fork to replicate the Henderson one somewhat.
Cutting stuff tomorrow.
Thanks everyone for the comments so far.
I promised myself that I would start on Glenderson on 01/01/2014 so today I started dismantling the donor bike. Hit a problem... the quill steerer is in there tight and will not budge.
So I banged it with all manner of implement, including my hand... yes it did hurt... but it will not move. And it is soo hot and humid here today that I decided to just go and get another frame to use. This one was much friendlier and the stem and fork jumped out at me as if I was some long lost relative that has been missing for years.
Here is a photo of the two frames. The naughty one is the dark coloured one and the nice one is the blue one...
So now I will use bits from both these frames, and a happy coincidence... serendipity I think it's called... is that the fork on this blue frame is the same as the old Chopster fork. That means I should be able to make a springer type fork to replicate the Henderson one somewhat.
Cutting stuff tomorrow.
Last edited:
Awesome stuff Glen! reading these posts is more entertaining than watching TV any day!
Luke.
Luke.
02/01/2014
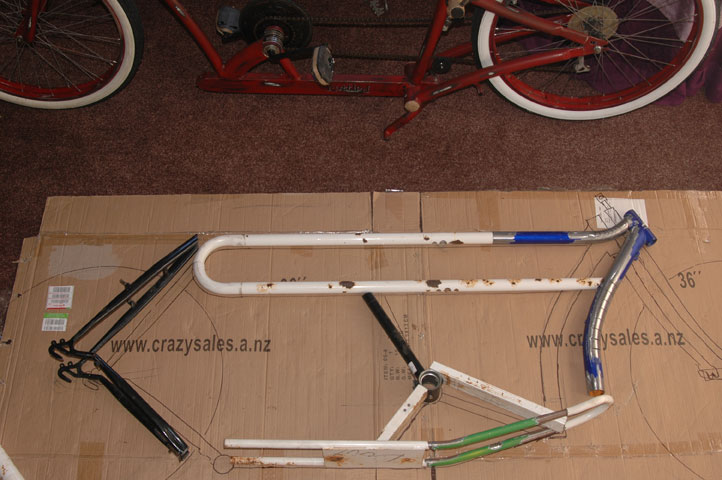
As promised, stuff got cut today. Here is proof...
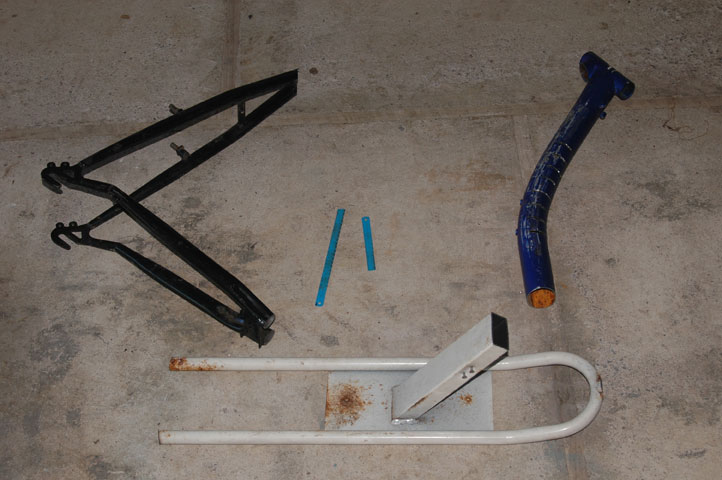
The hacksaw blade I purchased just the other day decided it wanted to still be on holiday and protested by snapping and flying off the handle. You can see the stubborn thing in the photo above
I laid out the bits on a large bit of cardboard to draw up the frame design using the photo in the book as a guide...
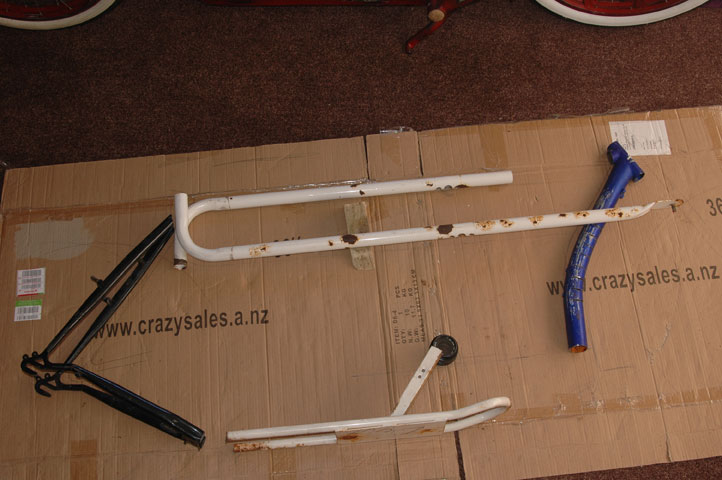
I have only ever done a full size drawing once before (for Rattled) and that bike turned out well... my best so far... so I figured it might be a good idea to do the same this time. Rattled is on the other side of the cardboard in the photo above.
Will hopefully do that drawing and some more cutting (with the old blunt hacksaw blade that is not a weakling like the new one) tomorrow.
Glen.
As promised, stuff got cut today. Here is proof...
The hacksaw blade I purchased just the other day decided it wanted to still be on holiday and protested by snapping and flying off the handle. You can see the stubborn thing in the photo above
I laid out the bits on a large bit of cardboard to draw up the frame design using the photo in the book as a guide...
I have only ever done a full size drawing once before (for Rattled) and that bike turned out well... my best so far... so I figured it might be a good idea to do the same this time. Rattled is on the other side of the cardboard in the photo above.
Will hopefully do that drawing and some more cutting (with the old blunt hacksaw blade that is not a weakling like the new one) tomorrow.
Glen.
Very cool! I use the big full size drawing method too!
Luke.
Luke.
- Joined
- Oct 23, 2011
- Messages
- 669
- Reaction score
- 1,053
Looking good cuz, this will be a cool bike!
03/01/2014
I am looking for an old seat to replicate the look of the Henderson seat. (is it seat or saddle? I never know... what's the difference?) So if anyone has an old "thing for me to sit on" that has big long springs and worn leather and is foor freeeeeeee... or at least cheap... ish... and you are willing to ship to New Zeal... okay, nevermind
So I did some more cutting and laying-of-metal-bits-on-cardboard resulting in the puzzle pieces and full-size drawing seen here...
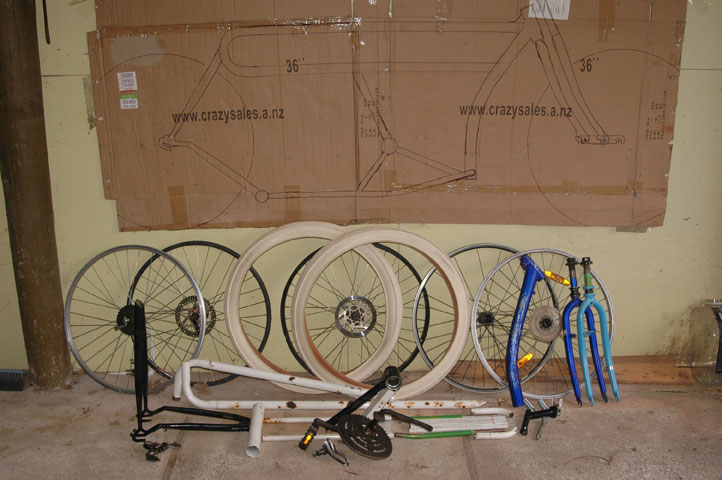
Hopefully I will get started on the welding in the next couple a days.
Glen.
I am looking for an old seat to replicate the look of the Henderson seat. (is it seat or saddle? I never know... what's the difference?) So if anyone has an old "thing for me to sit on" that has big long springs and worn leather and is foor freeeeeeee... or at least cheap... ish... and you are willing to ship to New Zeal... okay, nevermind
So I did some more cutting and laying-of-metal-bits-on-cardboard resulting in the puzzle pieces and full-size drawing seen here...
Hopefully I will get started on the welding in the next couple a days.
Glen.
Very cool!
Luke.
Luke.
04/01/2014
Spent some time this morning on the computer looking at the angles of the front end and realised that doing a leading link on this with the curved forks (as opposed to the straight ones on the Henderson) will most likely give me some negative trail...
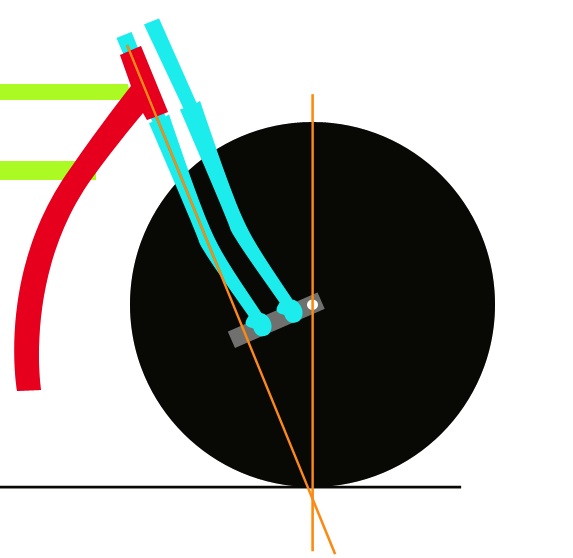
But doing it as trailing link will give me some inches of positive trail. (I think I have that right... correct me if I am wrong)
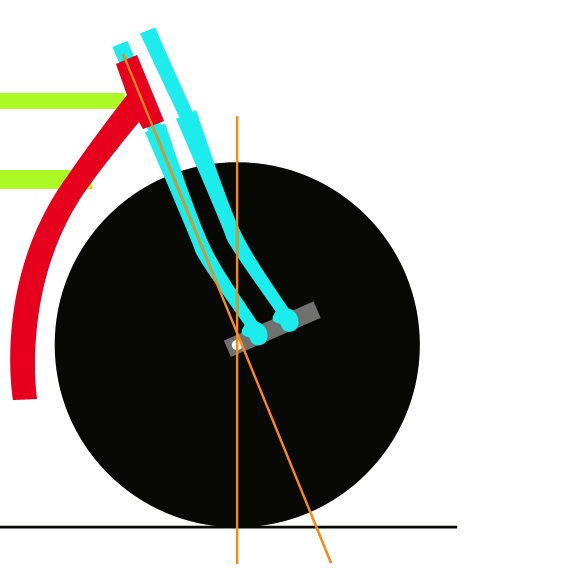
This is the first time I have worked with this type of fork setup, so any advice would be appreciated... and contemplated
I think the leading link looks better except for the large space between the tyre and down tube. The Henderson has a much smaller space there which is closer to what the trailing link will give. The Henderson apparently had a wheelbase of 165cm and my drawing measures 170cm as is with the leading link. The trailing link will shorten it a bit but I can gain some length elsewhere I think... yes I want it at least as long as the original
What do you folks think... leading or trailing link?
More to come...
04/01/2014 - continued
Boy oh boy... a lincoln toy! It is hard work cutting metal with a blunt hacksaw blade on a hot 'n' humid day without any good clamps or a vice... but I managed to do some and do another lay up...
As you can see, the frame has already gotten slightly longer than the drawing. I suspect a lot of to-ing and fro-ing will be required before any welding is administered.
I am happy with how it is going so far though... except for slightly annoying thing that happened. I was outbid on Trade Me on a headlight that would have been perfect... it was very similar to the one in the Henderson photo... oh well, guess I'll be making one of those too
Glen.
Spent some time this morning on the computer looking at the angles of the front end and realised that doing a leading link on this with the curved forks (as opposed to the straight ones on the Henderson) will most likely give me some negative trail...
But doing it as trailing link will give me some inches of positive trail. (I think I have that right... correct me if I am wrong)
This is the first time I have worked with this type of fork setup, so any advice would be appreciated... and contemplated
I think the leading link looks better except for the large space between the tyre and down tube. The Henderson has a much smaller space there which is closer to what the trailing link will give. The Henderson apparently had a wheelbase of 165cm and my drawing measures 170cm as is with the leading link. The trailing link will shorten it a bit but I can gain some length elsewhere I think... yes I want it at least as long as the original
What do you folks think... leading or trailing link?
More to come...
04/01/2014 - continued
Boy oh boy... a lincoln toy! It is hard work cutting metal with a blunt hacksaw blade on a hot 'n' humid day without any good clamps or a vice... but I managed to do some and do another lay up...
As you can see, the frame has already gotten slightly longer than the drawing. I suspect a lot of to-ing and fro-ing will be required before any welding is administered.
I am happy with how it is going so far though... except for slightly annoying thing that happened. I was outbid on Trade Me on a headlight that would have been perfect... it was very similar to the one in the Henderson photo... oh well, guess I'll be making one of those too
Glen.
Last edited:
I much prefer the look of the leading link drawing, it wont be perfect steering though...
Comparing your drawing with the original bike, it looks like the original had a steeper headtube angle, if you could do that on your drawing, it should fix the trail issue and bring the wheel closer in to the frame like you want?
Luke.
Comparing your drawing with the original bike, it looks like the original had a steeper headtube angle, if you could do that on your drawing, it should fix the trail issue and bring the wheel closer in to the frame like you want?
Luke.
Thanks Luke, I agree about the leading link looking better.
Wouldn't making the head tube steeper give more negative trail? Or do I have that mixed up?
Wouldn't making the head tube steeper give more negative trail? Or do I have that mixed up?
Actually you are right! Whoops!Thanks Luke, I agree about the leading link looking better.
Wouldn't making the head tube steeper give more negative trail? Or do I have that mixed up?
Looking again at the original picture it looks pretty neutral trail wise, similar result to your original drawing...
Luke.
05/01/2014
No photos today, as I didn't do much except look at and rearrange pieces of metal over and over again... and do a lot of mental gymnastics
Thinking about all the things needed and what I'll use... for example, should I have coaster, drum or disc brakes on it? Where will I get an appropriate seat? How will I do the handle bars?
I'm sure it will all fall into place though... it usually does
Glen.
06/01/2014
Some things fell into place today...
I did some work on the springer front end with some bits and pieces I found lounging around with nothing better to do...
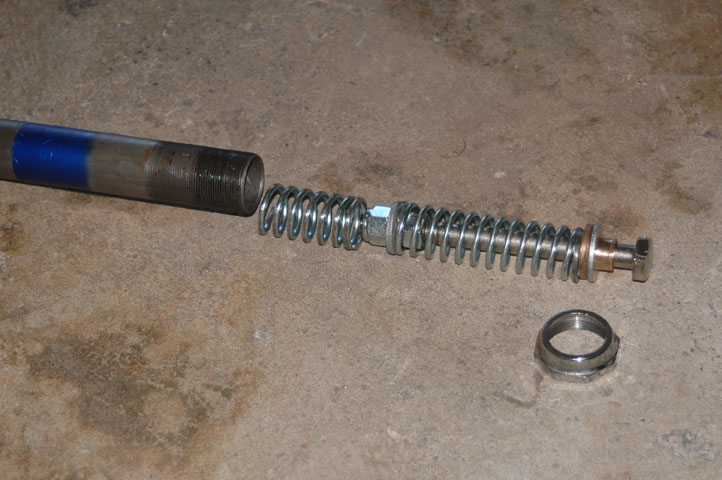
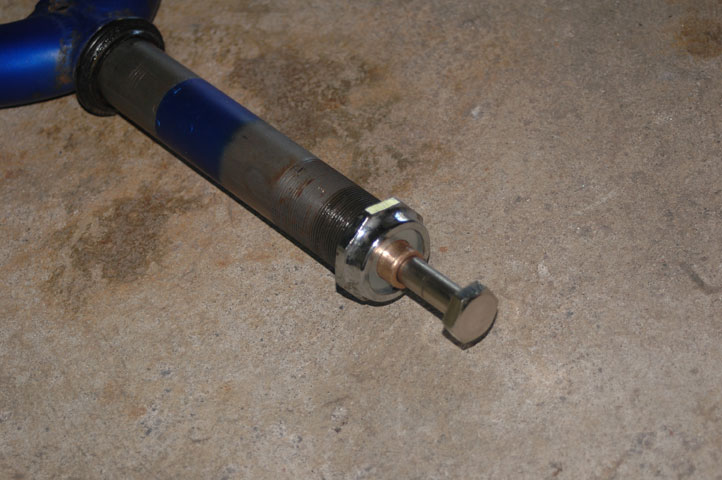

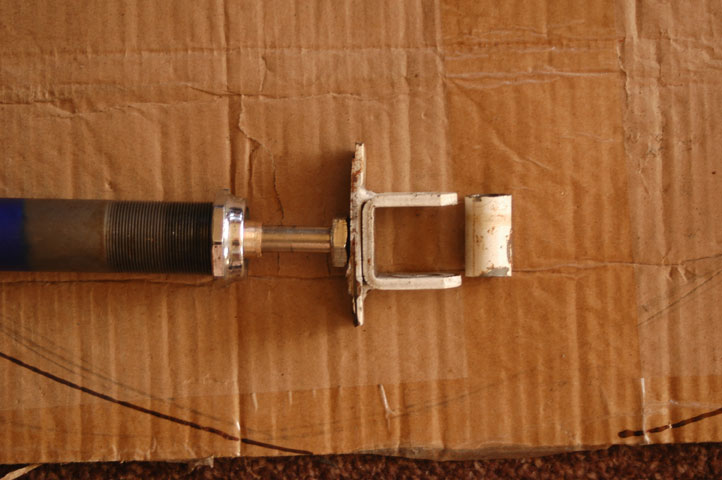
Hopefully the photos explain it better than my words can.
Glen.
Some things fell into place today...
I did some work on the springer front end with some bits and pieces I found lounging around with nothing better to do...
Hopefully the photos explain it better than my words can.
Glen.
Latest posts
-

-
 Bike from the Dead's Freshly-Exhumed Finds (Everything I've dug up since 6/15/21)
- Latest: Bike from the Dead
-
-

-

-

-

-

-

-
