You are using an out of date browser. It may not display this or other websites correctly.
You should upgrade or use an alternative browser.
You should upgrade or use an alternative browser.
iDood's Board Track Racer...
- Thread starter iDood
- Start date


Help Support Rat Rod Bikes Bicycle Forum:
This site may earn a commission from merchant affiliate
links, including eBay, Amazon, and others.
Thanks everyone for the kind words...I appreciate it.
")
Again, thanks for the kind words, thoughts and encouragement.
I might do something similar…but I would just cut off the top of the seat tube (where the clamp is) and let the seat post drop into the tube with no clamp. The seat is very securely held in place by the rear bracket, but I dunno…I'm still thinking. I appreciate the feedback…it gives me some more ideas.ridemybikebro said:I had an idea about the seat mount. I saw this video on youtube,
think it's called (zoombicycle). This guy Barry cut his seat tube and
welded some steel there for a seat mount. Really cool idea and i will
probably do this to my bike when I learn how to weld.
I'm thinking of a deep red… not maroon… but not bright red (how's that for a flakey answer?) Maybe something like the upper part of the banner on this website…or the red in my newly created signature line...something like that. I'm a long way from paint though...still lots left to do.outskirtscustoms said:what are you thinking for colors?
Again, thanks for the kind words, thoughts and encouragement.
I think dark red would be appropriate for all the blood sweat and tears you've put into this buld so far.
This is one of the nicest motorized bikes I've seen and a 'classic' paint scheme is definitely in order,
like this 1935 Crocker Speedway.

or this 1923 Harley

or this 1929 Harley

Cheers!
Dr. T
This is one of the nicest motorized bikes I've seen and a 'classic' paint scheme is definitely in order,
like this 1935 Crocker Speedway.
or this 1923 Harley
or this 1929 Harley
Cheers!
Dr. T
No pictures to add this morning, but things are happening...
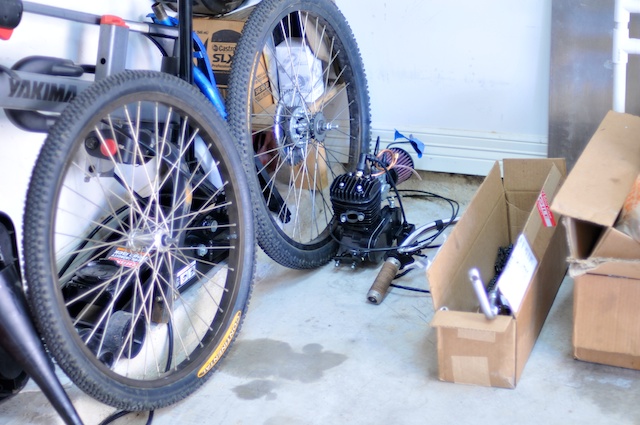
My Sturmey Archer front hub arrived, so I dropped it off at the bike shop last night to have a wheel built. While the original board track racers didn't have brakes, living in Houston requires a front and rear brake! I thought about doing a disk brake up front, but stylistically it's not appropriate for the era; hence, I went with a hub brake. I also ordered stronger rims and spokes. The 12-gauge spokes I have now look the part, but the reality is they are just old pot-metal spokes...so I'm having some double-wall downhill-racer wheels built--black rims, chrome spokes.
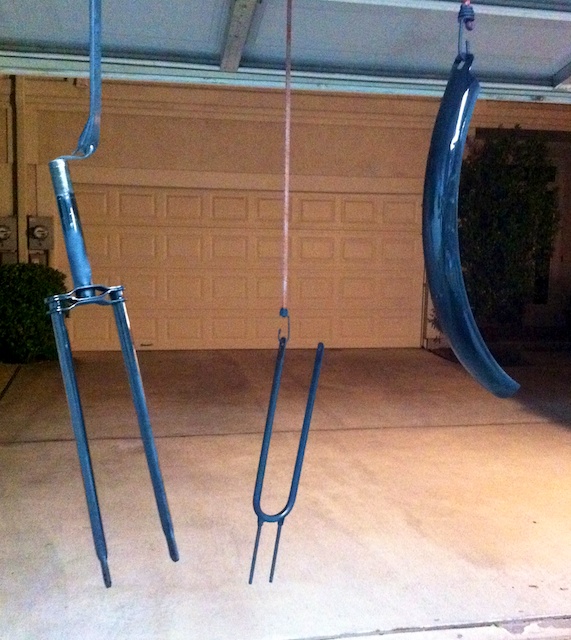
I also ordered a new front fork...again, something appropriate for the period. I went with a Monarch replica. And yes, I've read all the comments on the Monarch forks. I actually called the guys at Crossbow--apparently they were aware of earlier problems with the forks and have addressed the issues. The forks are now welded--not brazed--but if needed, I'll reinforce it with extra welds where it's needed (if needed). I like the design of the forks and think they compliment the rest of the bike.
I also got a chrome exhaust...it was cheap (really cheap)...so I thought, why not.
And I'm still waiting for my Felt Quick Brick tires to arrive--they've been on backorder forever...ugh! I'm told they will ship today...though I was also told they would ship on the 8th. Maybe they’ll arrive before my wheels are ready...
So when all those bits and pieces arrive and are installed, that will pretty much be the end of the "building" (aside from moving the choke cable from the handlebars elsewhere)...then it's on to the finishing. I have to clean up welds; Bondo where needed (smoothing out the tank, for example); sand blast a few parts; send a few parts out to get chromed (my buddy owns a chroming and plating company); paint the frame, tank, and faux oil tank their respective colors; and so on. But the question is...do I want to do all that finish work? It's not that I'm lazy or averse to the work...the reality is, I sorta like the bike just the way it is--bare metal and raw! Most folks I talk to (you cannot go anywhere on the bike without random people talking to you about it...I love that part) love it just the way it is...in general folks are trying to persuade me to leave it a rat bike. I dunno...I guess we'll see...
My Sturmey Archer front hub arrived, so I dropped it off at the bike shop last night to have a wheel built. While the original board track racers didn't have brakes, living in Houston requires a front and rear brake! I thought about doing a disk brake up front, but stylistically it's not appropriate for the era; hence, I went with a hub brake. I also ordered stronger rims and spokes. The 12-gauge spokes I have now look the part, but the reality is they are just old pot-metal spokes...so I'm having some double-wall downhill-racer wheels built--black rims, chrome spokes.
I also ordered a new front fork...again, something appropriate for the period. I went with a Monarch replica. And yes, I've read all the comments on the Monarch forks. I actually called the guys at Crossbow--apparently they were aware of earlier problems with the forks and have addressed the issues. The forks are now welded--not brazed--but if needed, I'll reinforce it with extra welds where it's needed (if needed). I like the design of the forks and think they compliment the rest of the bike.
I also got a chrome exhaust...it was cheap (really cheap)...so I thought, why not.
And I'm still waiting for my Felt Quick Brick tires to arrive--they've been on backorder forever...ugh! I'm told they will ship today...though I was also told they would ship on the 8th. Maybe they’ll arrive before my wheels are ready...
So when all those bits and pieces arrive and are installed, that will pretty much be the end of the "building" (aside from moving the choke cable from the handlebars elsewhere)...then it's on to the finishing. I have to clean up welds; Bondo where needed (smoothing out the tank, for example); sand blast a few parts; send a few parts out to get chromed (my buddy owns a chroming and plating company); paint the frame, tank, and faux oil tank their respective colors; and so on. But the question is...do I want to do all that finish work? It's not that I'm lazy or averse to the work...the reality is, I sorta like the bike just the way it is--bare metal and raw! Most folks I talk to (you cannot go anywhere on the bike without random people talking to you about it...I love that part) love it just the way it is...in general folks are trying to persuade me to leave it a rat bike. I dunno...I guess we'll see...
iDood said:But the question is...do I want to do all that finish work? It's not that I'm lazy or averse to the work...the reality is, I sorta like the bike just the way it is--bare metal and raw! Most folks I talk to (you cannot go anywhere on the bike without random people talking to you about it...I love that part) love it just the way it is...in general folks are trying to persuade me to leave it a rat bike. I dunno...I guess we'll see...
i think it looks great as-is. this is one of the best looking motorized builds i've seen.
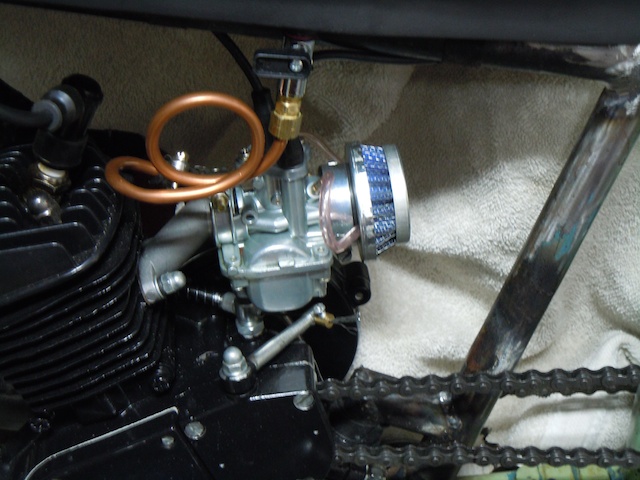
Well...I had a little time to do a little this and that on the bike tonight. I did some piddly things like adjusted the clutch arm (the way it comes from China is crap...it’s now at a right angle to the cable--much nicer), greased the gears on the right side of the engine (dry as a bone from China), and moved the choke from the handlebars elsewhere.
There wasn’t much to the clutch arm or the gear greasing, but I did have a bit more fun with relocating the choke.
I guess they (whoever they are) think the controller for the choke should go on the handlebars. It looks like crap in my opinion, so I moved it.
After searching a bit, I found a great spot--on the right side behind the tank.
I took apart the controller and welded the back metal part it to the frame...
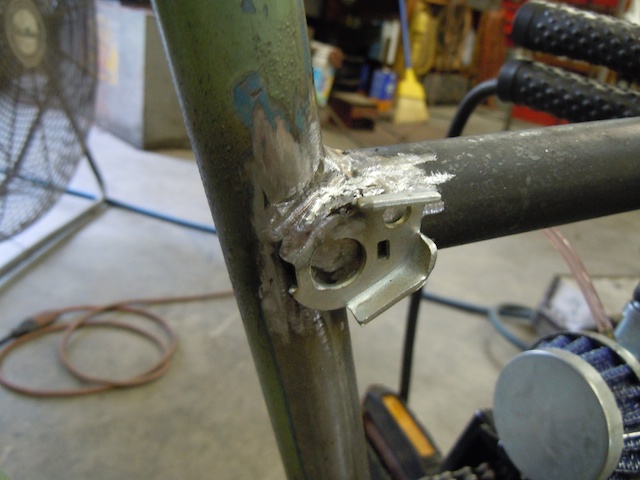
Then I drilled and tapped a hole and screwed the rest of the controller to the frame...
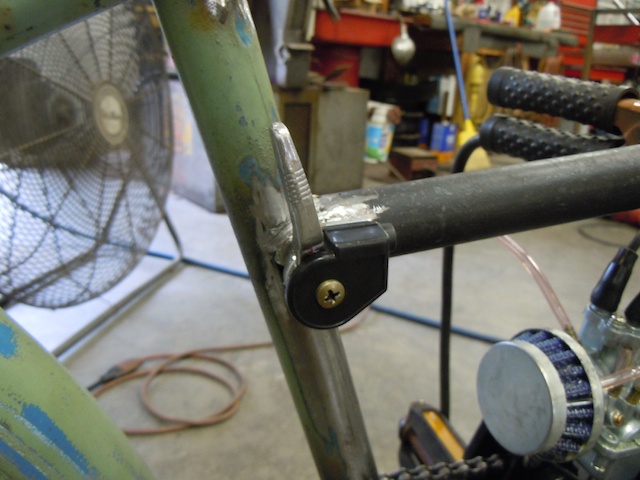
Nice, right?
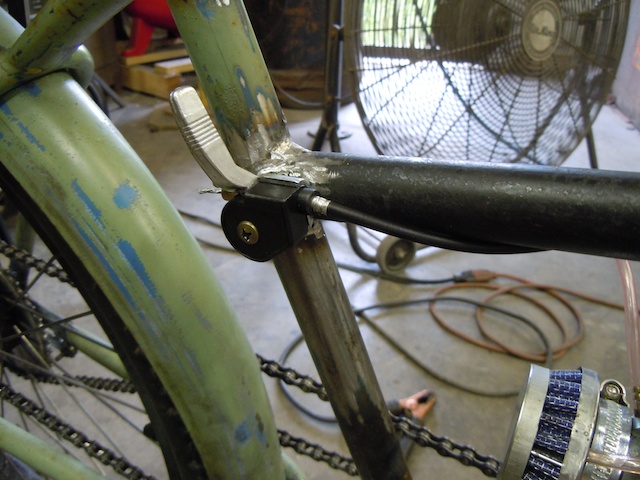
I also installed the cheap chrome pipe...though not sure I like it...
We’ll see.
So I’m still waiting on my new fork, tires, and rims...and while I do, I might figure out a cleaner way to mount the coil...just need to think about it for a bit...
That’s it for this weekend...I’ll probably find some time to piddle during the week. Hopefully the rest of my parts will show up next week!
There wasn’t much to the clutch arm or the gear greasing, but I did have a bit more fun with relocating the choke.
I guess they (whoever they are) think the controller for the choke should go on the handlebars. It looks like crap in my opinion, so I moved it.
After searching a bit, I found a great spot--on the right side behind the tank.
I took apart the controller and welded the back metal part it to the frame...
Then I drilled and tapped a hole and screwed the rest of the controller to the frame...
Nice, right?
I also installed the cheap chrome pipe...though not sure I like it...
We’ll see.
So I’m still waiting on my new fork, tires, and rims...and while I do, I might figure out a cleaner way to mount the coil...just need to think about it for a bit...
That’s it for this weekend...I’ll probably find some time to piddle during the week. Hopefully the rest of my parts will show up next week!

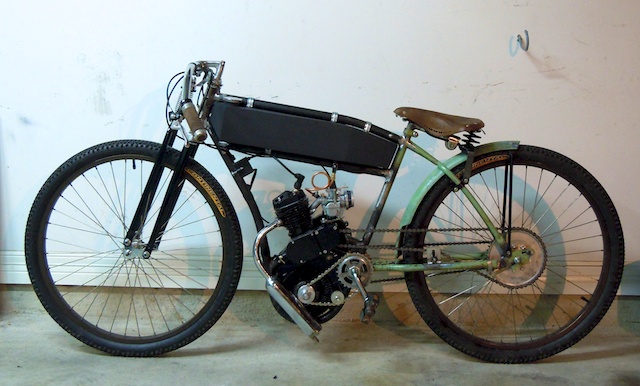
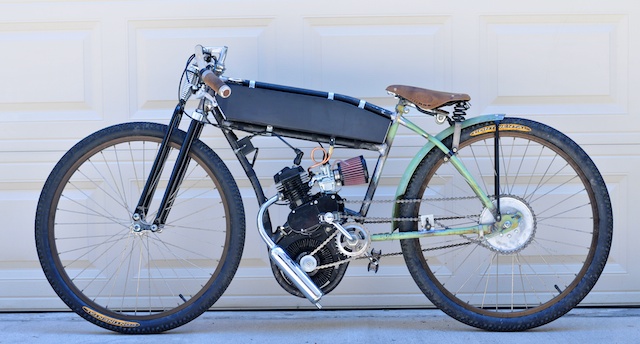
The picture from last night was obviously not too good...very dark, little camera, weak flash, etc. So I took a couple more pictures this AM at different angles to show how the new fork looks on the bike. I think it is a very nice improvement...
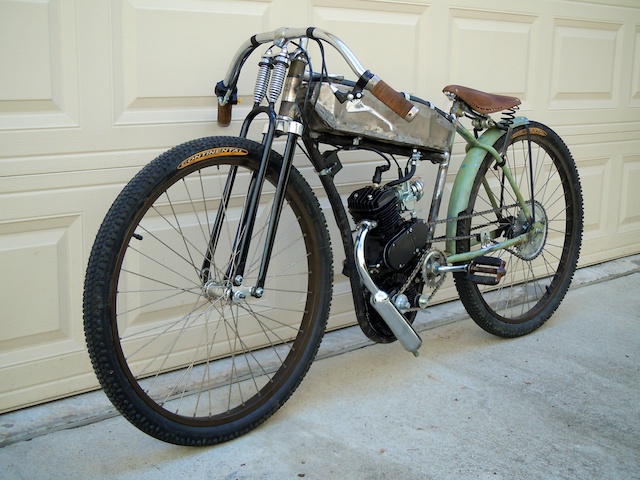
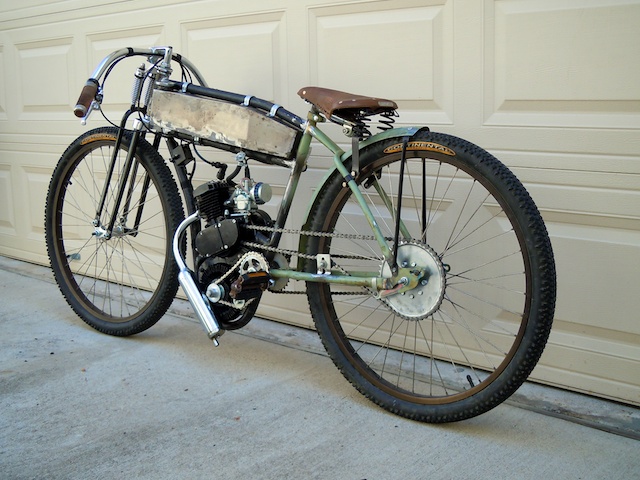
The bike rides a lot better as well. I'm happy!
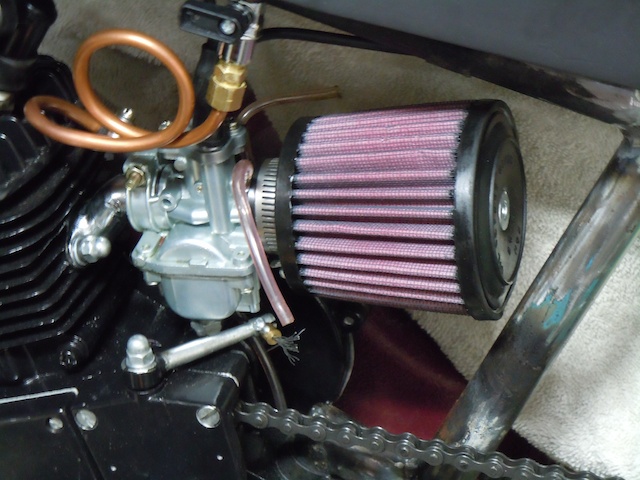
I ordered a different air filter...a different petcock (so I can run a copper fuel line easier and cleaner)...my tires have shipped (finally!)...and I have two new wheels being built (the front wheel with a Sturmey Archer brake...no brakes is a bit challenging...FUN!...but challenging).
Stay tuned...
The bike rides a lot better as well. I'm happy!
I ordered a different air filter...a different petcock (so I can run a copper fuel line easier and cleaner)...my tires have shipped (finally!)...and I have two new wheels being built (the front wheel with a Sturmey Archer brake...no brakes is a bit challenging...FUN!...but challenging).
Stay tuned...
Last night and today I worked on my fuel tank. I purchased a Kreem tank liner kit and went through all of the gyrations required thoroughly line and seal the tank. It seemed to work perfectly. Looking down into the tank, you can see the white liner….
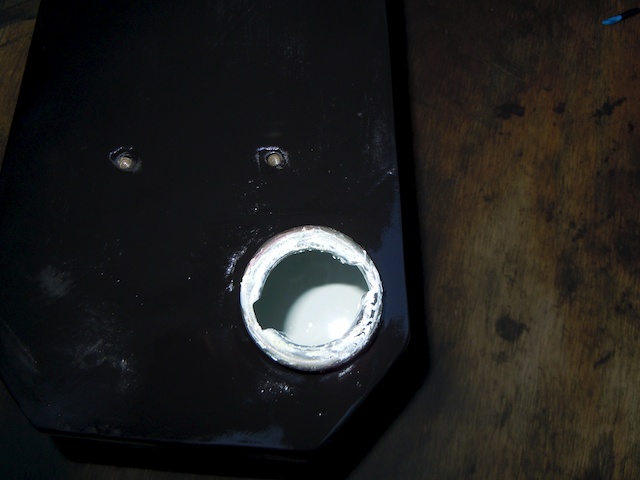
The Kreem tank liner requires 24 hours to drive before putting any fuel into the tank. I will probably give it a couple days to ensure it's completely dry given the humidity we have here.
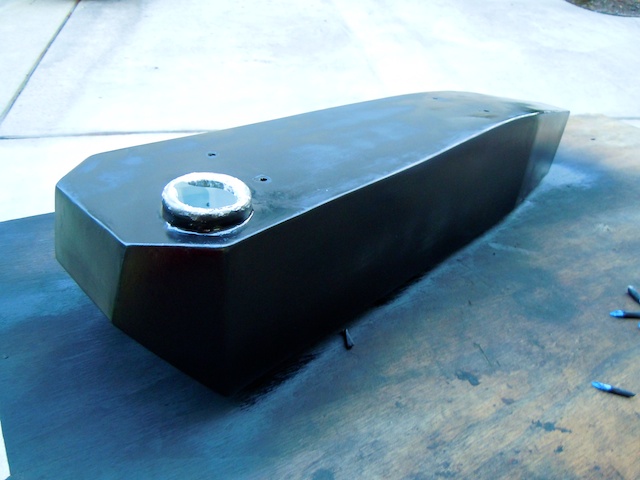
Next I worked on the exterior of the tank. Sanding…Bondo…sanding…Bondo…and so on and so forth…
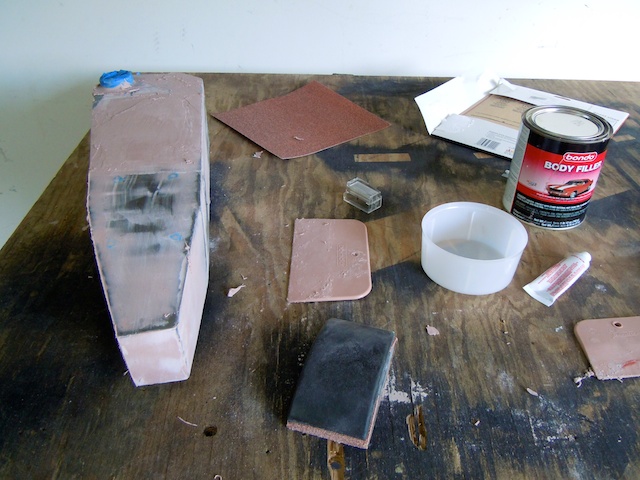
I got it close enough to give it a coat of primer. I'll work on the finish more when I'm ready to paint, etc. That'll be awhile…so the primer will protect the exterior of the tank until I'm ready…
Next it was on to the fuel line. The rubber hose looks ugly…and I wanted a copper fuel line anyway. Without a whole lot of thinking, I was able to get the fuel line installed.
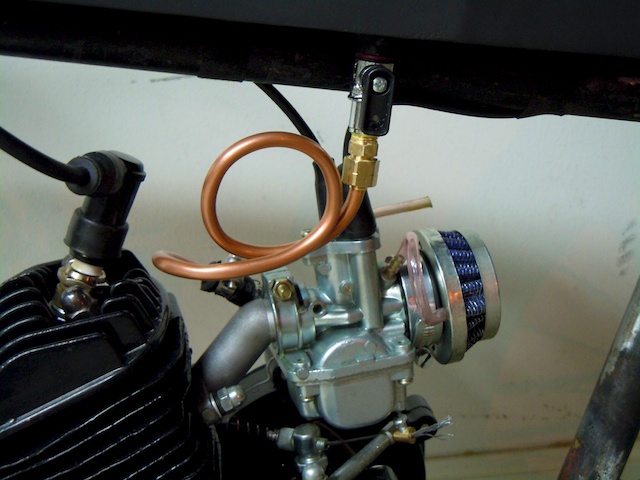
And yes…there is a filter; it's inside the petcock. Here's how everything looks so far...primered tank and copper fuel line...
The final thing I wanted to accomplish was to remove the "chain tensioner" from the chain on my faux oil pump. To accomplish this required significant amounts of pain and suffering…but it lost--I won!
Looks much better!
I also switched the pedals for a less ratty set...though the new set are still a little ratty.
Anyway, that's all for now. Tomorrow morning I get to put fuel back into the tank and go for a ride! Slowly but surely, it's taking shape.
More later...
The Kreem tank liner requires 24 hours to drive before putting any fuel into the tank. I will probably give it a couple days to ensure it's completely dry given the humidity we have here.
Next I worked on the exterior of the tank. Sanding…Bondo…sanding…Bondo…and so on and so forth…
I got it close enough to give it a coat of primer. I'll work on the finish more when I'm ready to paint, etc. That'll be awhile…so the primer will protect the exterior of the tank until I'm ready…
Next it was on to the fuel line. The rubber hose looks ugly…and I wanted a copper fuel line anyway. Without a whole lot of thinking, I was able to get the fuel line installed.
And yes…there is a filter; it's inside the petcock. Here's how everything looks so far...primered tank and copper fuel line...
The final thing I wanted to accomplish was to remove the "chain tensioner" from the chain on my faux oil pump. To accomplish this required significant amounts of pain and suffering…but it lost--I won!
Looks much better!
I also switched the pedals for a less ratty set...though the new set are still a little ratty.
Anyway, that's all for now. Tomorrow morning I get to put fuel back into the tank and go for a ride! Slowly but surely, it's taking shape.
More later...
Probably not a lot going to happen on the project today aside from gluing a piece of rubber on the outside of the clutch cover to quiet the clutch noise a little (which I already did). I read somewhere that this will significantly reduce the clutch noise…and sure enough it does. I first applied the rubber to the outside cover with spray-on adhesive and went for a test ride. Sure enough, the noise was reduced. So I removed the rubber and reapplied it with high-temperature silicon and clamped it on the case to dry…
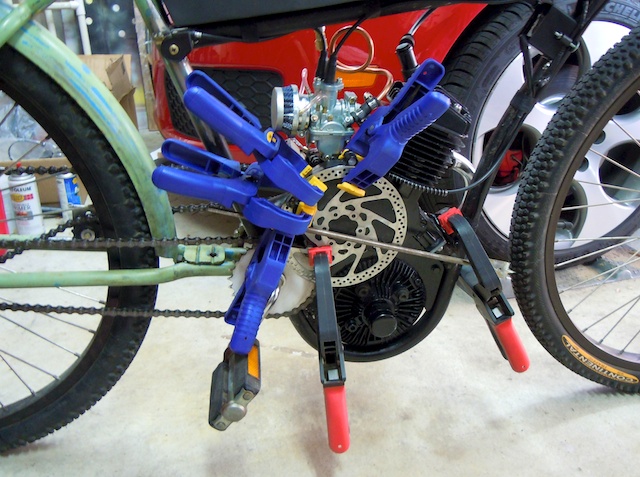
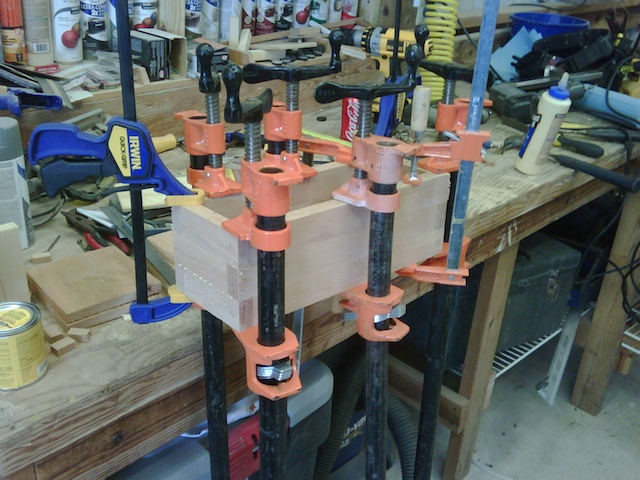
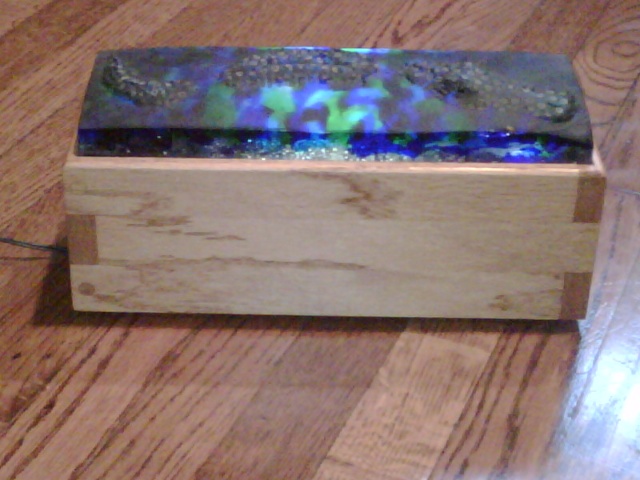
It's like I say when doing carpentry work…and in the words of Norm Abram…"You can never have enough clamps." Here's a project I built for a friend of mine...
... see...clamps good!
OK, back to this project...
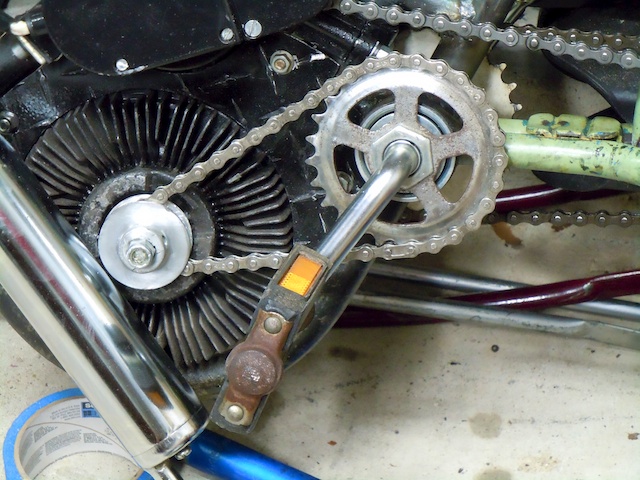
Before I glued on the rubber to the clutch cover, I did take a picture showing the bike with the modified faux-oil-pump chain…
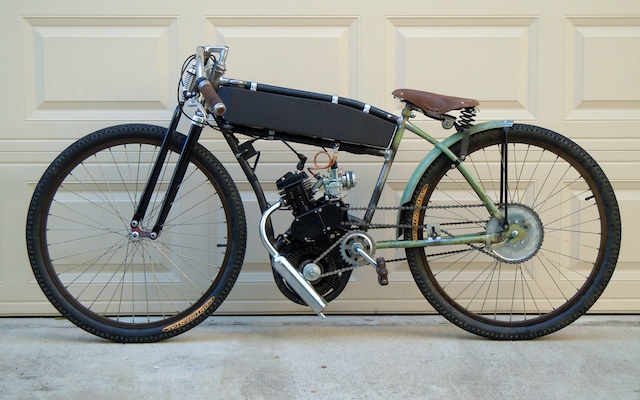
I'm much happier without the tentioner on faux oil pump...and I love the copper fuel line!
Tomorrow my retro Quick Brick tires arrive. And by the end of next week, my new wheels should be built. Then it's on to final tweaking…then all of the prep work (which is going to be significant--disassembly, sanding, grinding, cleaning up welds, Bondo, more sanding, more grinding…then eventually paint!) It'll probably be a while between getting the new wheels on the bike and paint…I'll more than likely ride it around like it is for a while (I like it). Though, maybe I will primer it and ride it around primered (like the hot-rod guys did in the 70s!).
Stay tuned...
It's like I say when doing carpentry work…and in the words of Norm Abram…"You can never have enough clamps." Here's a project I built for a friend of mine...
... see...clamps good!
OK, back to this project...
Before I glued on the rubber to the clutch cover, I did take a picture showing the bike with the modified faux-oil-pump chain…
I'm much happier without the tentioner on faux oil pump...and I love the copper fuel line!
Tomorrow my retro Quick Brick tires arrive. And by the end of next week, my new wheels should be built. Then it's on to final tweaking…then all of the prep work (which is going to be significant--disassembly, sanding, grinding, cleaning up welds, Bondo, more sanding, more grinding…then eventually paint!) It'll probably be a while between getting the new wheels on the bike and paint…I'll more than likely ride it around like it is for a while (I like it). Though, maybe I will primer it and ride it around primered (like the hot-rod guys did in the 70s!).
Stay tuned...
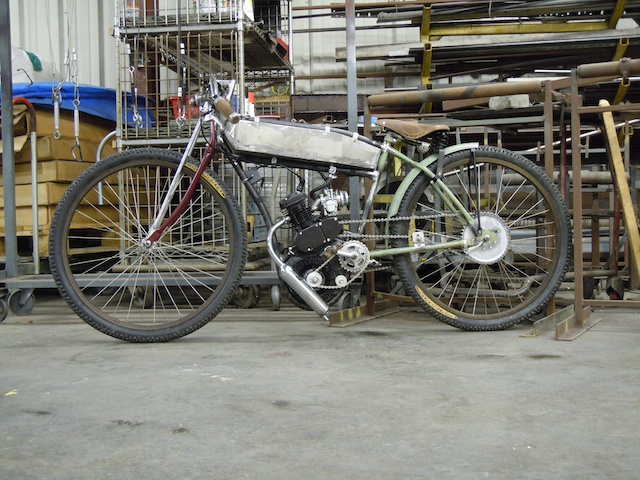
I'm to the point now where I'm ready to grind, sand, Bondo, sand, primer, sand, and paint. My new wheels will be ready on Tuesday…but that's no reason to hold up the finish work. So this is final picture as a rat bike…
After taking snapping that shot, I disassembled everything and separated the parts that need to be painted and started doing some test sanding. Here's where the project is right now…
The painted parts…
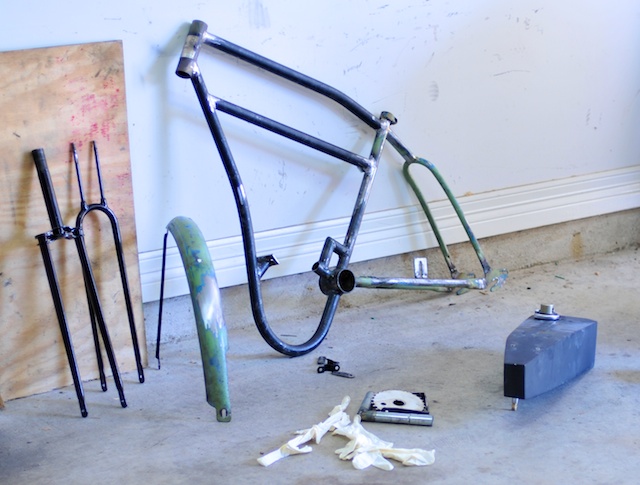
The non-painted parts…
My new tires are here too (forgot to take pictures of them). I used some MEK to get the white writing off the sidewalls…all black…they're going to look awesome on the new wheels.
Hopefully over the course of this week, I can take some time in the evenings to grind, sand, Bondo, sand, primer, sand, yada yada…
It's coming along...
After taking snapping that shot, I disassembled everything and separated the parts that need to be painted and started doing some test sanding. Here's where the project is right now…
The painted parts…
The non-painted parts…
My new tires are here too (forgot to take pictures of them). I used some MEK to get the white writing off the sidewalls…all black…they're going to look awesome on the new wheels.
Hopefully over the course of this week, I can take some time in the evenings to grind, sand, Bondo, sand, primer, sand, yada yada…
It's coming along...
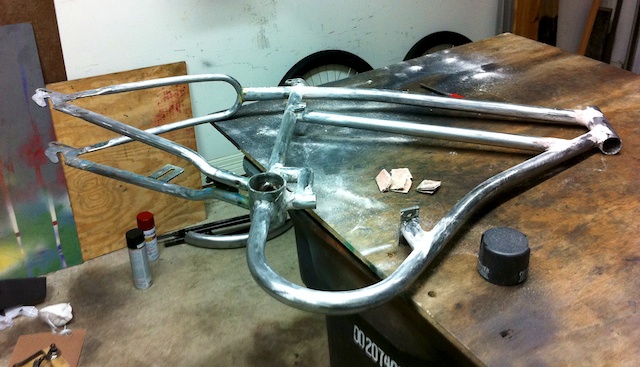
Today I got a chance to work on the bike a bit. I spent a lot of time sanding sanding sanding...then Bondo Bondo Bondo...then more sanding sanding sanding. Here's a shot of the frame at some point during the process...
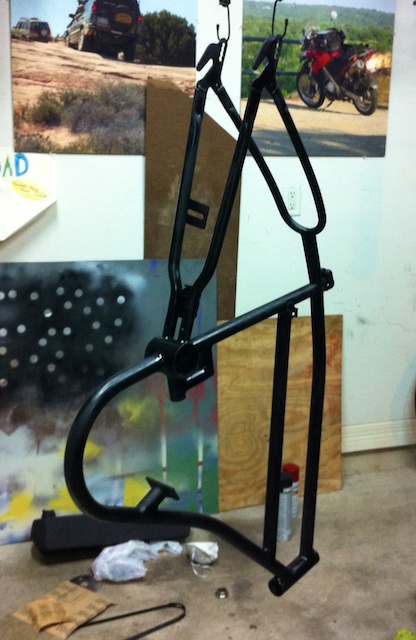
At some other point I got it to a point where I could put down a coat of primer...
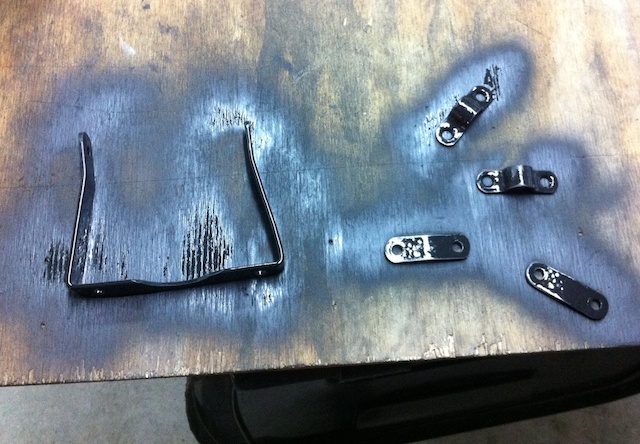
Here are some of the other bits and pieces with the first coat of primer...
Clearly everything will need to be sanded again...probably a little more Bondo...then some more sanding...then another coat of primer...then more sanding...then the first color coat...and so on...
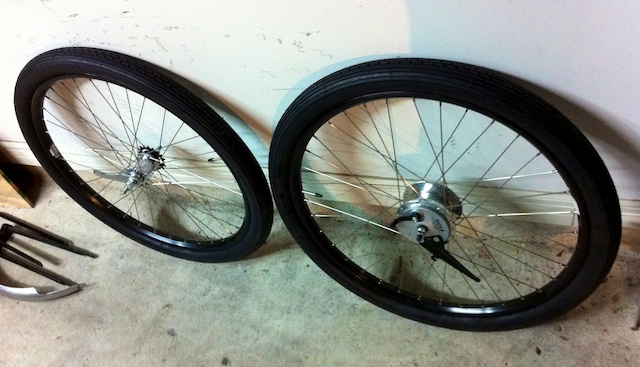
And even better...my wheels are done! I mounted the Quick Bricks on them today...NICE!
I was able to get the white letters off of the side using some MEK. Here's a close up of the tread...
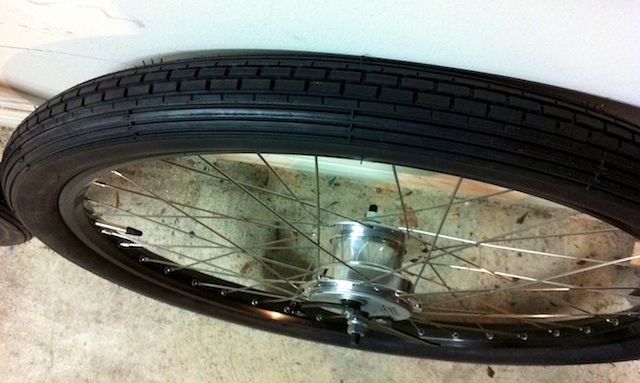
Retro!
So that's it for today. I'll probably piddle a bit tomorrow with sanding and primering...
I'm in the home stretch!
At some other point I got it to a point where I could put down a coat of primer...
Here are some of the other bits and pieces with the first coat of primer...
Clearly everything will need to be sanded again...probably a little more Bondo...then some more sanding...then another coat of primer...then more sanding...then the first color coat...and so on...
And even better...my wheels are done! I mounted the Quick Bricks on them today...NICE!
I was able to get the white letters off of the side using some MEK. Here's a close up of the tread...
Retro!
So that's it for today. I'll probably piddle a bit tomorrow with sanding and primering...
I'm in the home stretch!
Bike is looking great! Inspires me to get mine running. Lots of good info and nicely documented. Can't wait to see it finished. 8)