I don't really know WHERE to post this but wanted to share:
"Craigslist Nightmares and Dreams" because of the nightmarish comedy of errors involved with getting this bike?
"Show Me Your: Tandem into Singles" because that's what I'm planning on doing with it?
"Build Threads" as I take this thing apart and put it back together differently?
Another forum entirely because I'm new to rat roddin' and so far have only done three "bolt together" builds? (I don't have a welder, haven't used a hacksaw or angle grinder on either previous bike, and I'm hoping to do THIS project so I can completely reverse any changes and make it back to "stock" if I meet someone who wants or needs a tandem.) Obviously, this bike isn't "vintage" except in the sense that it had a previous owner for a year or three -- I've got concert t-shirts older than some RRB members, but I suspect I have some canned goods in the back of my cupboard that may be older than this bike!")
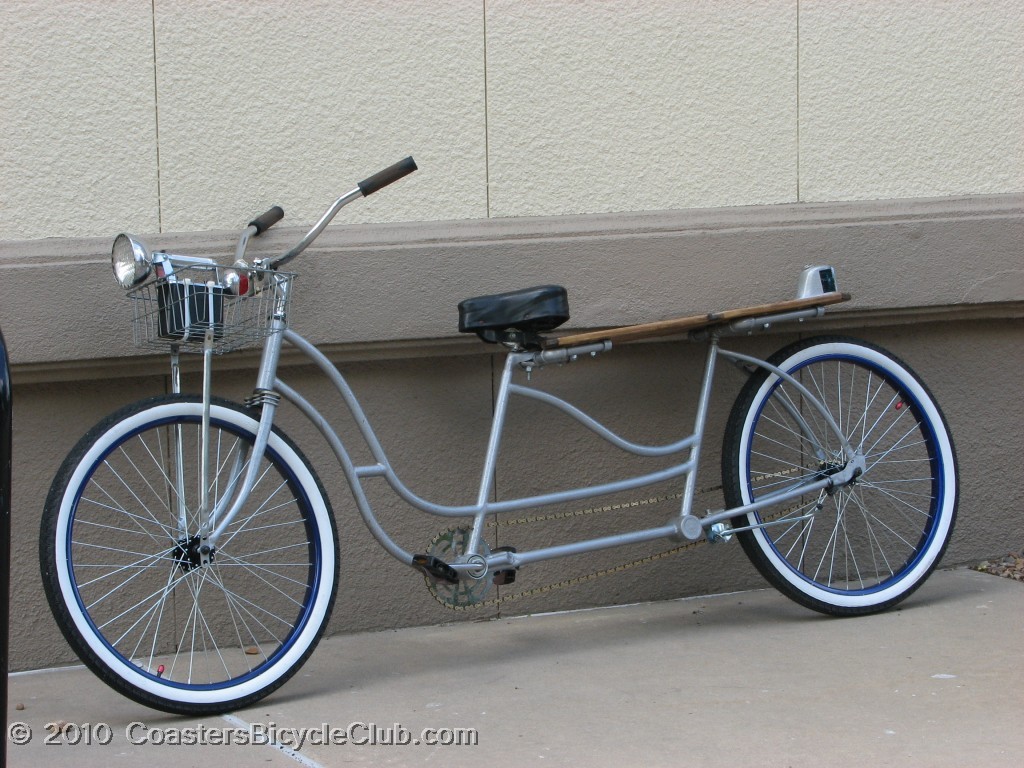
I've been wanting to try something like this since I saw my first stretch cruiser, but how often do we run across used tandems on craiglist? More importantly, how often do we run across barely-ridden multi-speed tandems on craigslist for SEVENTY-FIVE BUCKS, including delivery? (Your city might be different, but this is the first one like this that I've seen in Columbus.)

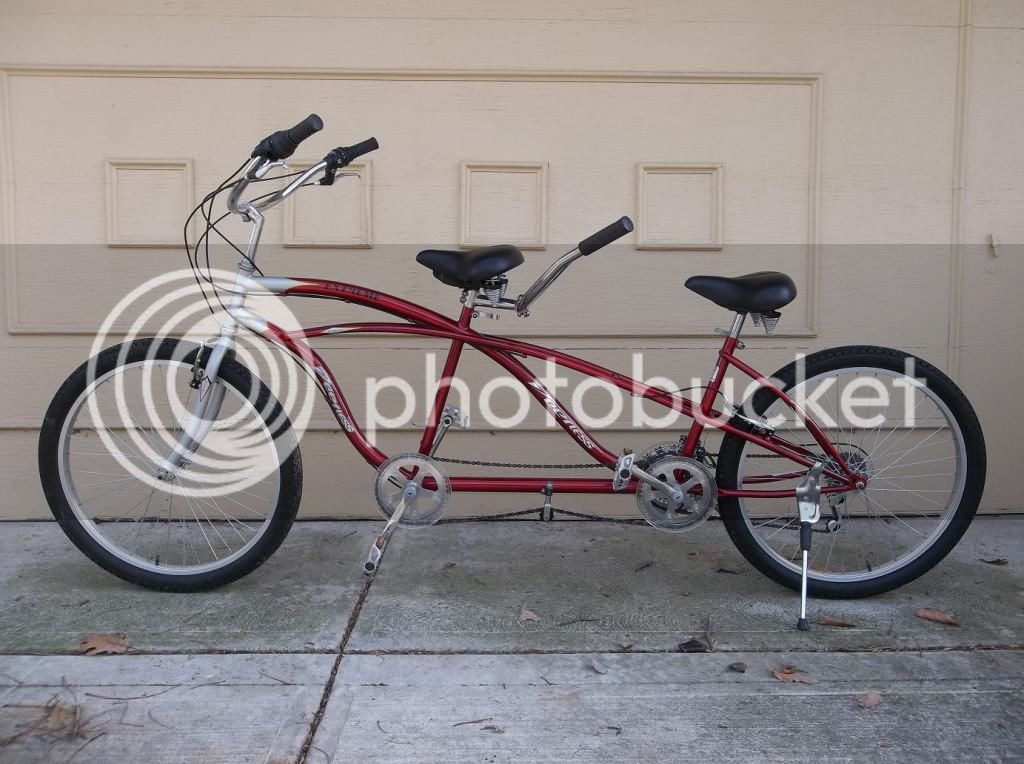
This may be the shiniest bike in "Fresh Finds" in 2014, huh? The only things wrong with this bike when I got it were miniscule: it needed one new inner tube, the front derailleur needs adjustment since it won't drop into the low chainring, the stoker seat wobbles horribly because the "nose bolt" underneath fell off somewhere, the front chain was derailed and both chains need lubed. There are a few paint nicks in the "bottom tube" that connect the bottom brackets, but they're not even through the primer. I feel like I got a great deal on it, even though it's a department store bike, probably built in the same Chinese factory where they build the Micargi and Walmart Schwinn tandems. The hubs were well greased, the bottom brackets felt smooth on my one short ride around the block, and the rims were almost perfectly straight when I got the bike. (The derailleurs and other components are pretty low-end, but I can always upgrade them with [I think] standard mountain bike parts.)
I've been joking with slowriderz via PM about the trials and tribulations involved with trying to measure this thing for one of his solid seatposts. I'm planning on moving the rear seat forward about 5" so I rode up and down my block on a balmy 50 degree December in Ohio day, sitting on a series of half-baked "seats" cobbled together from cardboard, towels, Saran Wrap and duct tape, secured to the rear twin top tubes. I can reach the front pedals okay, and it feels a LOT like my five minute test ride on a Micargi stretch tandem a few months ago.
I'm planning on some sort of apehanger handlebar angled somewhat to the rear, but I'm going to try to wait for warmer weather (and my new seatpost) before I try to decide just how much handlebar to buy. The usual 15" rise ones might be a bit too short, but the 25" ones I experimented with on another bike might be too long, and there aren't that many affordable bicycle bars in between. The good news is that I don't THINK I'll need to buy new tandem brake cables to make them fit, though I may have to route them a little differently.
Shifter cables might have been a problem, but I think I've figured that out, too. What to do about that front seatpost tube sticking up in the air? If I didn't want to preserve this as a potential tandem again, just cutting it off would make sense. Since I want to leave it there, why don't I make it useful and put the shifters back there? I can leave the stock seatpost in the seat tube, with the "stoker stem" pointing forward and away from me, and move the Grip Shifts back to a short length of handlebar mounted in the stem! (Bonus style points if I decide to build two new stick shifts and install them over the Grip Shift guts?)
A badly-Photoshopped picture, minus the new handlebars and stem:
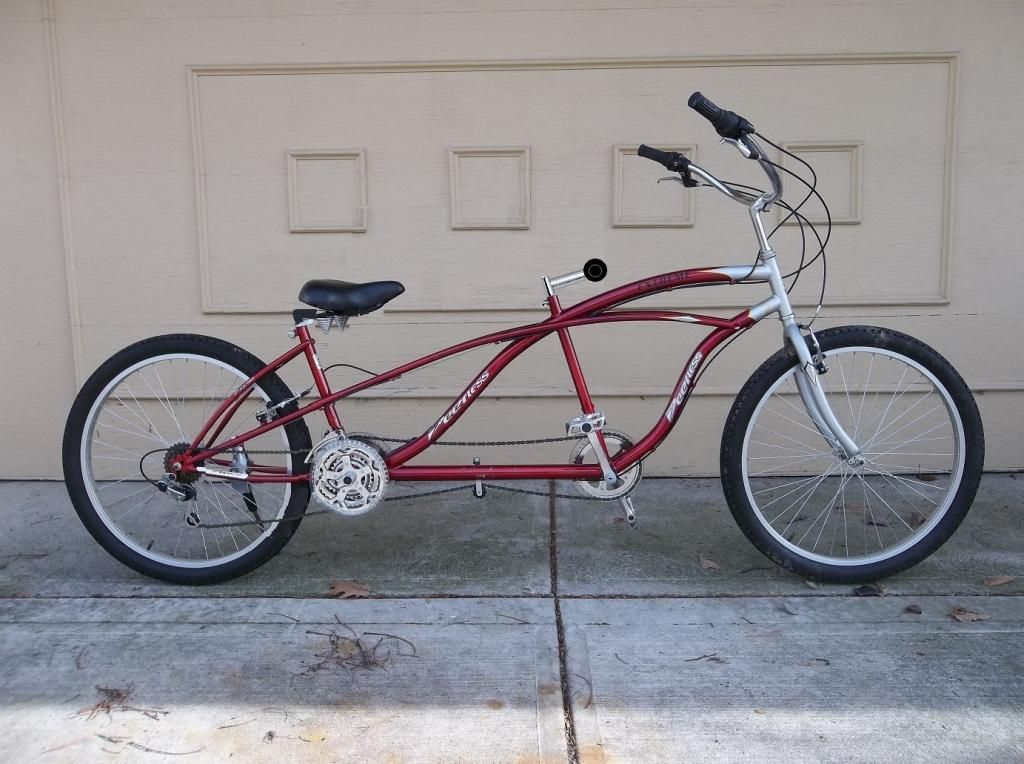
I'm not wild about all of the stickers -- there are three "Peerless" stickers on each side, and what in the world is "Extreme" about a tandem cruiser?! I'm a little worried about the shiny metallic silver-and-gold stickers covering what could be a horrible silver-to-red fade on the top and down tubes, but I'll find out when I peel the stickers back.
Then it will just be a matter of pulling the rear pedals (or the cranks) and putting some more efficient tires on there, and I'll have a totally sweet, customized stretch cruiser for less than $200, right?
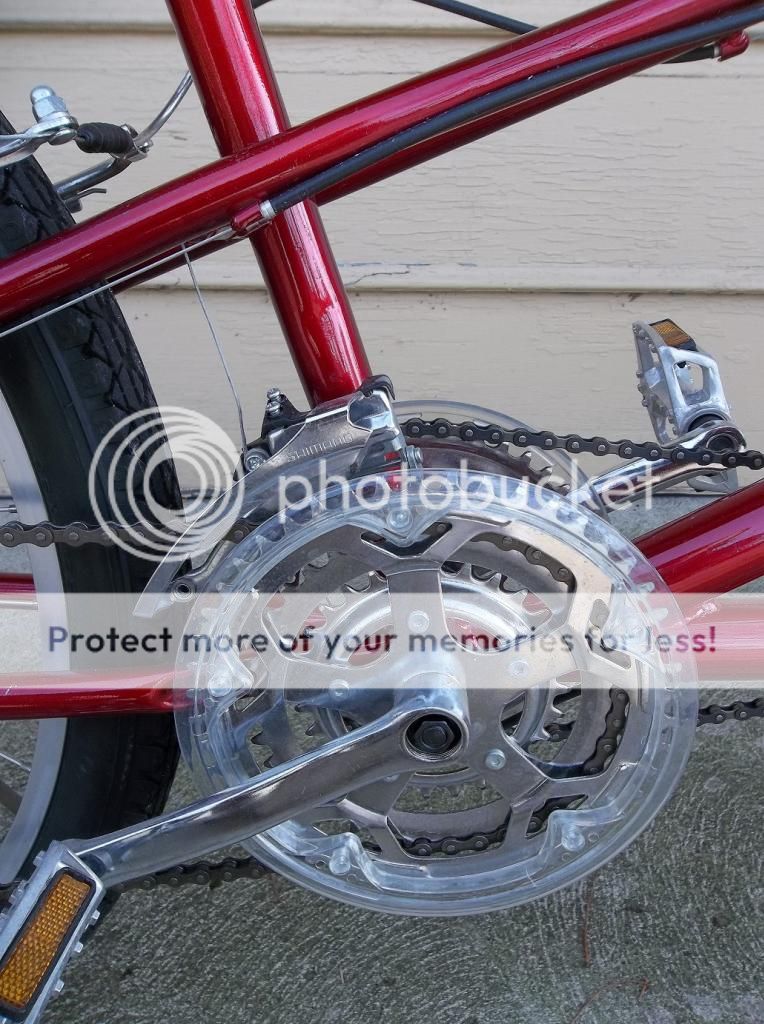
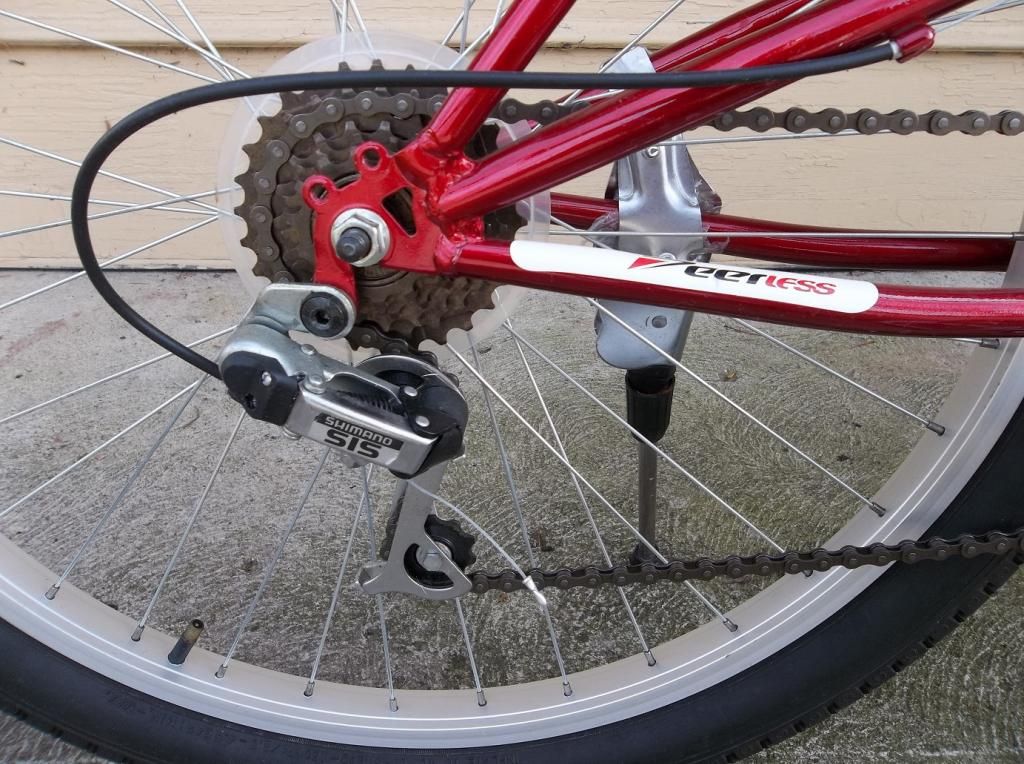
Yeah, I didn't really think so either, which is why I made this thread. I know nothing about "timing chains" or "idler pulleys," at least when it comes to bicycles. I know some of you purists and/or flatlanders are thinking "who needs a multi-speed bike anyhow?" but I like having gears to climb the hills around here. What else am I missing or do I need to know? Are the rear cranks going to come off normally, or will there be some weird reverse-threaded nuts and bolts in there, like left-side pedals? When I reseated the "timing chain" did I leave too much slack in the top part? It looks like it's sagging a little but I don't know if I can get it any more taut without taking the chain apart. Are there any secrets to adjusting that timing chain's idler pulley? It seems simple enough with only three adjustment angles -- I'm guessing it should just be there to keep the chain in line with the two chainrings.
Any information or obvious ideas I've overlooked would be welcomed!
"Craigslist Nightmares and Dreams" because of the nightmarish comedy of errors involved with getting this bike?
"Show Me Your: Tandem into Singles" because that's what I'm planning on doing with it?
"Build Threads" as I take this thing apart and put it back together differently?
Another forum entirely because I'm new to rat roddin' and so far have only done three "bolt together" builds? (I don't have a welder, haven't used a hacksaw or angle grinder on either previous bike, and I'm hoping to do THIS project so I can completely reverse any changes and make it back to "stock" if I meet someone who wants or needs a tandem.) Obviously, this bike isn't "vintage" except in the sense that it had a previous owner for a year or three -- I've got concert t-shirts older than some RRB members, but I suspect I have some canned goods in the back of my cupboard that may be older than this bike!

I've been wanting to try something like this since I saw my first stretch cruiser, but how often do we run across used tandems on craiglist? More importantly, how often do we run across barely-ridden multi-speed tandems on craigslist for SEVENTY-FIVE BUCKS, including delivery? (Your city might be different, but this is the first one like this that I've seen in Columbus.)


This may be the shiniest bike in "Fresh Finds" in 2014, huh? The only things wrong with this bike when I got it were miniscule: it needed one new inner tube, the front derailleur needs adjustment since it won't drop into the low chainring, the stoker seat wobbles horribly because the "nose bolt" underneath fell off somewhere, the front chain was derailed and both chains need lubed. There are a few paint nicks in the "bottom tube" that connect the bottom brackets, but they're not even through the primer. I feel like I got a great deal on it, even though it's a department store bike, probably built in the same Chinese factory where they build the Micargi and Walmart Schwinn tandems. The hubs were well greased, the bottom brackets felt smooth on my one short ride around the block, and the rims were almost perfectly straight when I got the bike. (The derailleurs and other components are pretty low-end, but I can always upgrade them with [I think] standard mountain bike parts.)
I've been joking with slowriderz via PM about the trials and tribulations involved with trying to measure this thing for one of his solid seatposts. I'm planning on moving the rear seat forward about 5" so I rode up and down my block on a balmy 50 degree December in Ohio day, sitting on a series of half-baked "seats" cobbled together from cardboard, towels, Saran Wrap and duct tape, secured to the rear twin top tubes. I can reach the front pedals okay, and it feels a LOT like my five minute test ride on a Micargi stretch tandem a few months ago.
I'm planning on some sort of apehanger handlebar angled somewhat to the rear, but I'm going to try to wait for warmer weather (and my new seatpost) before I try to decide just how much handlebar to buy. The usual 15" rise ones might be a bit too short, but the 25" ones I experimented with on another bike might be too long, and there aren't that many affordable bicycle bars in between. The good news is that I don't THINK I'll need to buy new tandem brake cables to make them fit, though I may have to route them a little differently.
Shifter cables might have been a problem, but I think I've figured that out, too. What to do about that front seatpost tube sticking up in the air? If I didn't want to preserve this as a potential tandem again, just cutting it off would make sense. Since I want to leave it there, why don't I make it useful and put the shifters back there? I can leave the stock seatpost in the seat tube, with the "stoker stem" pointing forward and away from me, and move the Grip Shifts back to a short length of handlebar mounted in the stem! (Bonus style points if I decide to build two new stick shifts and install them over the Grip Shift guts?)
A badly-Photoshopped picture, minus the new handlebars and stem:

I'm not wild about all of the stickers -- there are three "Peerless" stickers on each side, and what in the world is "Extreme" about a tandem cruiser?! I'm a little worried about the shiny metallic silver-and-gold stickers covering what could be a horrible silver-to-red fade on the top and down tubes, but I'll find out when I peel the stickers back.
Then it will just be a matter of pulling the rear pedals (or the cranks) and putting some more efficient tires on there, and I'll have a totally sweet, customized stretch cruiser for less than $200, right?
Yeah, I didn't really think so either, which is why I made this thread. I know nothing about "timing chains" or "idler pulleys," at least when it comes to bicycles. I know some of you purists and/or flatlanders are thinking "who needs a multi-speed bike anyhow?" but I like having gears to climb the hills around here. What else am I missing or do I need to know? Are the rear cranks going to come off normally, or will there be some weird reverse-threaded nuts and bolts in there, like left-side pedals? When I reseated the "timing chain" did I leave too much slack in the top part? It looks like it's sagging a little but I don't know if I can get it any more taut without taking the chain apart. Are there any secrets to adjusting that timing chain's idler pulley? It seems simple enough with only three adjustment angles -- I'm guessing it should just be there to keep the chain in line with the two chainrings.
Any information or obvious ideas I've overlooked would be welcomed!

 Right now it's about 30 degrees (or -1C) and the gray skies are trying to snow, which means my already-questionable bike mechanic skills become even more diminished: