Felt must've produced an immense number of Red Barons and Baron 2s. They must've sold a great many of them and the Los Angeles area and I appear to slowly be buying them all. If I was doing this at 20 years of age each one would be restored to factory spec. I would be suffering over every nut and bolt rarely making a compromise. If I was rebuilding them when I was 10 it would be much like I build now but with a rattle can instead of powder coating. At 10 I had wild ideas about mixing parts from different brands to produce a cool finished product.
Ray, a man that buys used Felt parts from me sent me a message on Easter Sunday. It was a Felt Baron 2 on the bike rack of his car. He made me a price I couldn't refuse. I was half way to his location which made the deal even sweeter. The cash was in my pocket so I boogied on down to "the L.B.C" and met him. The bike was rough. It was clearly part of the Apollo program at one point in it's life. I think it may have also been in a war and one of my favorite metaphors: it had been scratched more than a 12 year-old-cat.

There are two frames in the box along with a bunch of other small parts that were required for the two build I had going on the time. The black frame is for my klunker, "Skip" which is still under construction.
A few days later I came back to pick up the parts. Waag Automotive had carefully stripped, sprayed, and packaged everything up for me. I them could get cracking on putting "The Speedster" together. I kinda know how to build a set of wheels - I said, "kinda." I could loosely spoke something together and have a wheelwright make it actually work. I called upon a man called Jeff for this set of hoops that I got from junkyrustybikes.co. They bear a striking resemblance to 3G wheels which I used on "The Great Blue Yale." I just so happened to have left over heavy duty spokes from another build and Jeff was able to put them to use on "The Speedster" by radial lacing the Sturmey-Archer drum hubs into place.

 I went with a 5 speed internal gear rear drum and a dynamo drum hub up front. I actually didn't need a dynamo hub for this build. It's better to have it and not need than to need it and not have it.
I was lucky that I knew what I wanted and had it on hand. I've become all lusty over Firebikes.com forks and I wish they came with a disc brake bracket but I went with drums and that is worked out great. I laid a lot of the parts out to get a sense of how it might vary from my vision. It was pretty much bang-on. The orange pedals were a no-go and blue pedals were on order. To mimic "Switch-a-roo" I chose Schwinn OCC chopper handlebars. Ultimately, the drop stand couldn't be used due to a term known as "accessory collision." Better luck next time (because I still have it.) I had a set of Felt cranks that were powder coated white, but I went in a different direction with the grips, rear light and dropped the chain guard altogether.

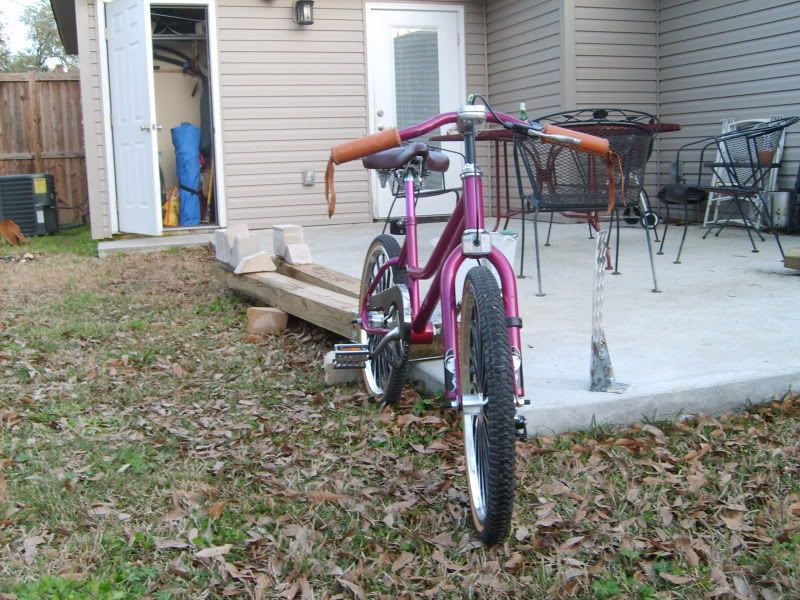
After the wheels were built I could put everything together. Here is what I came up with.

I actually liked it this way. There was something interesting about it in a spartan form. It got better though.
Once again, I sourced decals from diylettering.com for the wheel and tank logos. I am very excited about the way they turned out. I may eventually swap the tank decal for one that matches the wheel decals. I really like the look of the "Gig Mata" logo outlined. "Speedster" would look hot that way as well.

I went to Woodley park for a photo shoot after the 5 speed was tuned for me by NoHo Cycles. The bike was basically done at that point. I wanted to add something other than zip ties to keep the cables in place but I was waiting on my order of toe clips to arrive. I did use what I had on hand though and they turned out great.

The bike came met my expectations completely. Instead of grips I went with handlebar tape. I like inverse brake levers but I also like stopping therefore I just flipped around my conventional Sturmey-Archer levers. I even ran the cables beneath the grip tape. That had the benefits of looking trick and it gave me a contour for my hands. You'll notice the electrical tape. I was shocked to learn you can buy a $5000 road bike that has electrical tape holding down the grip tape. If it is good enough for them it's good enough for me. The headlight is from a motorcycle or scooter - I don't even remember. Again, taking a page from "Switch-a-roo's" book I used a helmet's face shield as a number plate but no numbers this time.

The numbers on the number plates are reflective vinyl pieces that disappear in bright sun but shine brightly when light hits them in darkness. I am not sure if I want to add a detail around them to make them stand out. I kinda like the way it becomes something else to be notice once the viewer approaches the bike.

That's all for now. Thank you for reading. This sure is a great one to look at. I think it's the best one yet. Great color, 26" wheels, 5 speeds, and an office that it is two miles from the beach, and an SUV to leave it in until I get off work before sunset. Nice.


Ray, a man that buys used Felt parts from me sent me a message on Easter Sunday. It was a Felt Baron 2 on the bike rack of his car. He made me a price I couldn't refuse. I was half way to his location which made the deal even sweeter. The cash was in my pocket so I boogied on down to "the L.B.C" and met him. The bike was rough. It was clearly part of the Apollo program at one point in it's life. I think it may have also been in a war and one of my favorite metaphors: it had been scratched more than a 12 year-old-cat.
Here it is in it's rough form. I saw nothing but potential because I had a look in my parts closet where lots of cool stuff was waiting to be bolted on.

I loved the way that "Switch-a-roo" turned out and it was received well publicly. I wanted to do a chymera of "Switch-a-roo" and "The Great Blue Yale." This Baron 2 turned out to be a suitable chassis. In the end, anything bolted to this frame was set aside for another project, given away, or sold. Without question blue was going to be the color of choice and WAAG Automotive in Vany Nuys, CA was going to strip the old scratchety red away to show the aluminum beneath. Lately, I've been doing multiple project at a time so I actually dropped off parts for two bikes. The rims were 57mm units that I sourced from junkyrustybikes.co.
There are two frames in the box along with a bunch of other small parts that were required for the two build I had going on the time. The black frame is for my klunker, "Skip" which is still under construction.
I was lucky that I knew what I wanted and had it on hand. I've become all lusty over Firebikes.com forks and I wish they came with a disc brake bracket but I went with drums and that is worked out great. I laid a lot of the parts out to get a sense of how it might vary from my vision. It was pretty much bang-on. The orange pedals were a no-go and blue pedals were on order. To mimic "Switch-a-roo" I chose Schwinn OCC chopper handlebars. Ultimately, the drop stand couldn't be used due to a term known as "accessory collision." Better luck next time (because I still have it.) I had a set of Felt cranks that were powder coated white, but I went in a different direction with the grips, rear light and dropped the chain guard altogether.
After the wheels were built I could put everything together. Here is what I came up with.
I actually liked it this way. There was something interesting about it in a spartan form. It got better though.
I went to Woodley park for a photo shoot after the 5 speed was tuned for me by NoHo Cycles. The bike was basically done at that point. I wanted to add something other than zip ties to keep the cables in place but I was waiting on my order of toe clips to arrive. I did use what I had on hand though and they turned out great.