A Long Tale - Final Build Update

Rat Rod Bikes Bicycle Forum

Help Support Rat Rod Bikes Bicycle Forum:

This site may earn a commission from merchant affiliate links, including eBay, Amazon, and others.
When I used an old tractor light for my Beer Boy Delivery build last year, the lamp came with a metal housing around the bulb. I ended up drilling a hole like you did, it cracked, then I used a pliers and removed the back of the bulb piece by piece. Then for a reflective surface for my light (mine was an LED closet light with pull) I lined the metal housing with foil from the inside of an Australian licorice bag. Here's a link to a video I posted of the progress....the first section you will see the headlight build.
IMG_20150515_103840.jpg

 
Had bad experiences drilling backs of lights too , i usually just start with lights that already have a hole at the back now . for example , this dollar store light , The reflective cone looks pretty much the size of your light ,plus there is already a 9v bulb in it if you don't like LED , And you get the batterie for free almost at the price they sell it
6v.jpg
 
Last edited:
When I used an old tractor light for my Beer Boy Delivery build last year, the lamp came with a metal housing around the bulb. I ended up drilling a hole like you did, it cracked, then I used a pliers and removed the back of the bulb piece by piece. Then for a reflective surface for my light (mine was an LED closet light with pull) I lined the metal housing with foil from the inside of an Australian licorice bag. Here's a link to a video I posted of the progress....the first section you will see the headlight build.
View attachment 27859

so if it chips , use a bag of chips ! :giggle: :thumbsup:
 
Thank you guys
L
ooks like the dollar store lamp, large flashlight would do it
I liked the clear lens and shiny back of this one
Wouldn't you know it was all fused together, no way to separate it.
I saw these cool lamps already wired with LED for less than 10 bucks, Ebay, China based outfit, so that means they'd arrive around end of August..not good

I actually have some pretty cool old bulbs, or lights in my collection of "Art Glass", as I call it, ('Junk" as my gal calls it)...colored glass that would work for markers or RED for the back, gotta find a way...eventually to master this ancient Chinese secret of drilling perfect hole like this....possibly ....in glass.

27404324803_ae1c6160b9_o.jpg


It's all good, luckily, this guy flew in, stuck around to help the other day. :happy:
27848726375_a5208b8060_o.jpg


franco
 
Love the rear deck and the paint choice too.
Nice looking longtail so far.
 
Sweet looking bike, love the color and the pallet board rack, are you going to do some custom bags to hang on there, 'cause that would be pretty cool.

@Missing Link HI...
I was going to go for some tan /brown bags, but found a nice Targus computer bag at thrift for 1 dollar, it's black leather look, full foldover flap and seems like a good size. So I'll go with that..going to match it with another and just go with two bags for now.
:happy:
 
When I used an old tractor light for my Beer Boy Delivery build last year, the lamp came with a metal housing around the bulb. I ended up drilling a hole like you did, it cracked, then I used a pliers and removed the back of the bulb piece by piece. Then for a reflective surface for my light (mine was an LED closet light with pull) I lined the metal housing with foil from the inside of an Australian licorice bag. Here's a link to a video I posted of the progress....the first section you will see the headlight build.
View attachment 27859


Odd Job, That monster beer cap.... toooo much..
gotta check on that build and see how you fabricated that...brilliant.
:rofl:
I was messin' today with headlight, rear light, led lights, chain ring cover find... I was all set up, spread out and then , of course like clockwork come the torrential Florida afternoon downpours, since my 'workshop is the carport. the sideways driven rain drove me inside..
Found some cool parts for the bike today.. post later...
franco
 
@Missing Link HI...
I was going to go for some tan /brown bags, but found a nice Targus computer bag at thrift for 1 dollar, it's black leather look, full foldover flap and seems like a good size. So I'll go with that..going to match it with another and just go with two bags for now.
:happy:
Gonna look cool, and you can't beat the price.
I was thinking about your light, and although you're unsure of the voltage, I've used vintage tractor and fog lights in the past connected to 9 volt batteries with quite a bit of success. If you have one laying around you might want to give that a shot before cutting/drilling/ breaking that sealed beam.
thumb-hammer.jpe

Well, I already mangled that sealed beam..BUT, i did get the back together with glue, and have the tip of an LED flashlight glued on to the open hole in the back. (well, it's not really a hole, it's a broken off area that looks like a badger chewed through it).

I did find a regular large 'flashlight' as One Horse Power suggested, that's a good idea I'm tucking away for a future build, the one I found is the right diameter, but too deep to fit in the housing I have,

So, I'm back to that old sealed beam......I like the look of it better.
and, you're right, I had it hooked up to a 9 Volt and the old bulb was working fine, should have left it like that.

franco
 
A lot of tandem bikes keep slack out of the synch chains with a simple slotted tab with a derailleur guide wheel welded halfway along the lower run.
IMG_8500.jpg

Pic from member Rickpaulos.
 
A lot of tandem bikes keep slack out of the synch chains with a simple slotted tab with a derailleur guide wheel welded halfway along the lower run.
IMG_8500.jpg

Pic from member Rickpaulos.

I might try that Doorman..thanks for the pic
I got that dérailleur put back on for now
gotta wrap this up this week, heading up to Pa from Florida
not taking the bike.
:happy:
 
9:54 PM 7/4/2016
Soldering Mayhem.
Well, yesterday I spent most of the damm day trying to do a simple solder job on that front light.
I haven't soldered in like, I don't know 10 years or so, first thing I did was run out to Horror Freight (open on Sundays) got a 30 watt iron and some solder.

Come home, ready to do the LED conversion, I remember OK..let's tin the tip...well, the solder is balling up and running off like mercury out of a broken thermometer.

I stick to it...and hours go by....solder ain't sticking..no way Jose....I got it 'kinda ok' and called it a day
(There's about 5 hours of my life I'll never get back.)
so, i research a little and find it's Lead Free Solder...that's all that HF sells, Apparently, it's a bit (ummm)..."difficult" to work with...so today, I go and get some 60/40 reg'lar lead electrical solder at Walmart...ended up redoing the whole light. Solder flowing like it should now.

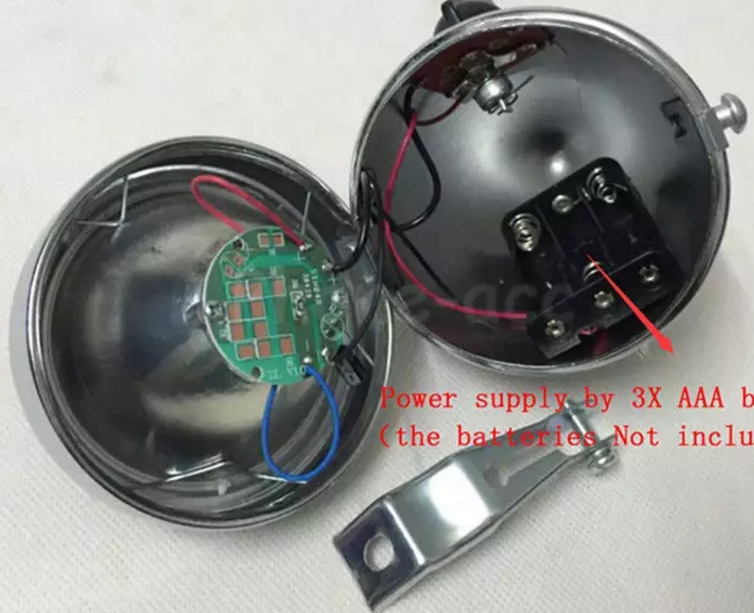
Anyhow, I got the guts from a much flatter light, a toggle switch on top wired in.. everything fit in the light, battery pack and all. it's a very shallow lamp case..so all in all...it ended on a good note.
headlight.jpg


I found this cool little light at Thrift for the rear...this one went together easy...and quickly.
rearLight.jpg
 
OH, I also want to show you something else I got at Thrift.
I got two of these actually...old Stanley Clamp on vises. horizontal and vertical clamping in one tool..quite a chunk of Iron, you could use these as a boat anchor if you wanted to.
$4.00 apiece
Life is so much easier with a vise. :happy:
StanleyVise.jpg
 
Took the bottom bracket apart, for the final time, I HOPE...because what else are you going to do with an aluminum trivet? (.25 cents)
LTchainRing.png


And a couple of other little touch ups...getting close now.
Rear deck fastened down instead of just placed on there.
LTdeckFastened.jpg


The spray painted rear 'whitewall". Yes, the paint is stretched and cracking a bit...but, it's all in flavor of the build...sortof....
LTwhitewall.jpg


A wee bit of straightening on the truss rod setup, and some brass caps to spiff it up a bit
LTtruss0.jpg


And...loose test of one of the side panniers...I don't know yet on this...I like it...it might be a tad too big. I'll have to stare at it for a couple of days....lol....

LTPannierTest.jpg


OK that's it for today...more later
:happy:
Franco
 
That bag is very classy !!

Yes, I love these bags OHP...I always search for them when I'm out on my 'hunts'. Black leather bag , made by Amerileather....these are expensive bags...I buy them right, and they always fetch a good profit on Ebay...or my Etsy shop if I find the older vintage ones, (which I prefer because they're broken in and have that old, beat leather patina)...this one I found is in like new condition.
:happy:
 

Latest posts

Back
Top