Gang Green

Rat Rod Bikes Bicycle Forum

Help Support Rat Rod Bikes Bicycle Forum:

This site may earn a commission from merchant affiliate links, including eBay, Amazon, and others.
Started making the custom seat & chassis. Cut up a newer electra seat that had a broken pan. Cut up another 80's cruiser seat because I liked the idea of the long springs. Pulled out some metalic green leather that I have been holding on to. All will be distressed to fit the part.
image.jpeg


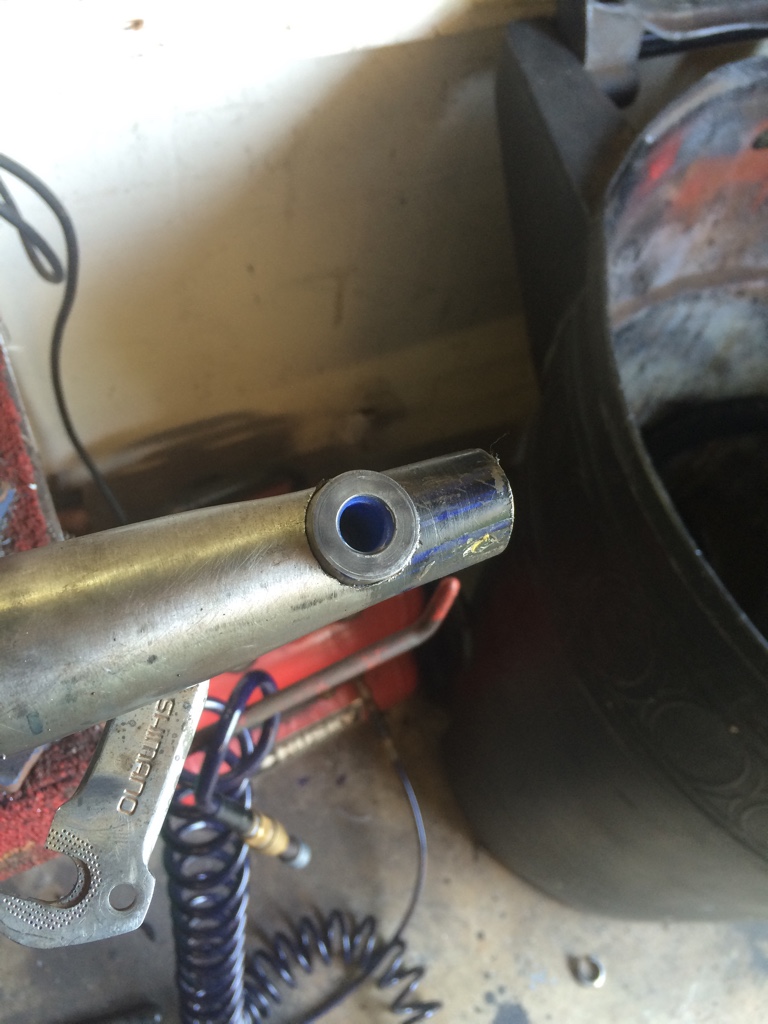
Cut the springs from the chassis. Made spacer rings out the old chassis to fit the new one.
image.jpeg


image.jpeg


image.jpeg


image.jpeg


image.jpeg


I don't know why some pictures are uploading sideways, tilt your head I guess :wondering:

Just sat the pan on top of the chassis for a quick idea of the look. I really like the way that it's going to be tucked into the pan.
image.jpeg


image.jpeg

Hopefully have some time tomorrow to do some more work.
-B.J. -
 
Thanks everyone!

If you haven't noticed, this build will be quite random. As I'm trying to do what I csn, when I can. Also, making sure all the pieces will eventually work.

Started to cut up the Phantom frame to start the transformation process. One of the cantilever bars fell apart due to being made entirely of rust! :bigsmile: That will be fixed and still maintain the rust.
image.jpeg

image.jpeg

image.jpeg

More next week!
-B.J.-
 
Busy as heck over the weekend, but made some time to get some stuff done. Hopefully I can recap it all.
Firstly, I noticed that the donor frame is the exact same year and month as the 52' phantom frame.
b4aa22890548faeca78bb3b9acf657db.jpg

139a7e1d05481f401875a79f3d82f062.jpg

Started cutting the pieces from the donor frame and filling the Phantom holes
bcd860139ccef16e1bf6e94ddca742de.jpg

e5ffe9acfdf61895c172c0b057a15f1e.jpg

04ad9f1a22780b16797d24df11cdca57.jpg

5b605b5baf5e84c0f895c4c740661723.jpg

f4c5cd5e7664dbf2a54dfbbbb47b6074.jpg

f2aa059216fbe8d96f37c0e0f7953a0b.jpg


Started to do some more work on the derailleur peice. Now ready to go as the actuator lever for the gas shock.
a03c69d8b610b456ca8c440c09160033.jpg

8ae81e1726c79e8a7e529d86c7bbee67.jpg

Hand filling the "C" clip groove beacuse I don't trust myself with any other tool for this job.
3dcf4324599aba4df56fa9e53d25ce01.jpg

dff6da1b5b67f6a73f6eb670228cb776.jpg

Final piece for the shock actuator made out of 4 derailleurs
51cc7f753f037789cb03cc072acf049d.jpg


Took a break and did something different. Got the wheels ready to go.
They were so crusty I thought the grease fitting had been broken off. Not the case.
4f8fafec7d85053dcdacc607c1e392b3.jpg

5226e98ad5de916cb3bba56ba7ab1262.jpg


Fully pulled apart and rebuilt.
e38b6544af69acf547e5b7943133b417.jpg

341d1ca2c66e7d7153bdf99711d3a5e4.jpg

Luckily everything was in good shape minus the transfer spring ....
17826f126c581c5b03369bbced7da23a.jpg

But I had a few more on hand.
badf7f5847ee31e7881d035a96995067.jpg

Fully built and ready to go!
6cd2d1deb15a692191db0709bc2224ee.jpg


Worked a bit more on the offi e chair. I didn't like the plastic button & niether did my welder. So I cut it out and made a new shaft/ button head.

bfa76a445542d09a65ccc4124b3fcf0f.jpg

Had to cut and thread a piece of rod and tap a piece of steel stock to make the release.
4452502dfd539840a8ea2c87065bd5bb.jpg

6172caeae3927d1a99039499061f326a.jpg

62324713f3dc40773926422e472fb2b8.jpg

cc5edb6886c57c64572bfd7b8a347de6.jpg

e120038cfc37aa7eb87a4bb8042045e0.jpg

Welded the lever into the shock tube... And forgot to take pictures. But did also get the the shock tube and base tacked together to make sure it works.
 
Nice ejector seat mechanism. ;)
 
Looking great man , lots cool ideas & fabrication going into your bike. And of course plenty rust & crust . Hope to see it complete & in person next year at r
Rat Rides show [emoji1303]


Sent from my iPhone using Tapatalk
 
More work on the gas shock piece. Put the pivot tube in.
bfa5e9b0b081999a61aeaac16a6b03c2.jpg

9a2dab4fe5083e99efa178d706d1da55.jpg

544cb01240fd1447ceb7400e3512c478.jpg

Needed a piece to go on the end of the shock shaft. Couldn't find one in my stock, so cut a crappy socket in half and welded it to the end.
9da5f67cf964722bd54539652b87853d.jpg

723e70ffd31098b8401ef41ab274de73.jpg

Cut some rubber from an old seat to make a rubber cushion for when the shock is compressed.
d824dea2e418ac87d836c892d27ec47b.jpg

8e2f9c818b88325901a5c6cddd353db1.jpg


Then plug welded a sleeve onto the socket. The sleeve will now slide down over the base of the shock when it's compressed
f7237f3879c0db3f39d2431f72b63c55.jpg

e4cff2c2f223bca172e6a0218bc9ae17.jpg

a9c14d64c8b7429a59ed9a982fcdd1f6.jpg

cb63115f48324abfc39b2b97d3245704.jpg


Hoping to have the entire piece finished up tomorrow and ready to be installed. Then you should be able to see my diabolical plan come into light.
-B.J. -


Sent from my iPhone using Tapatalk
 
This looks like it will be a interesting bike . Keepen in under the radar ....


Sent from my iPhone using Tapatalk
 
Worked on the fork. Started with a ladies Hornet fork that I stripped to bare metal.
Painted and did the patina. Started with the green, then painted the black and trimed with white.
Tried to mimic the orginal Phantom fork but obviously not a springer...
While the paint was still wet, I hit it with the torch. Afterwards, tossed it in the creek behind my shop over the weekend.
a1b18b85ed15075d94bc521e9ec669fa.jpg

864cb152435d974bf0a04820927c3ae3.jpg

Then decided that I wanted to lower the fork. Put it in the pipe bender and got about 2" lower. And the fender still fits fine.
Other green fork for comparison
ea6229547f84cf706ae3e653d08e1fcb.jpg

Had to touch up some paint/ patina
62041381476588430ec959e0d7bd452d.jpg

60535252c70b61d89296d76f15ba4ab2.jpg

Will be making new truss rods soon.

Then addressed the issue of getting cylinder tube ready and installed.
Coated the inside of the downtube with plasti-dip so that it's a snug fit and it's not metal on metal when it moves.
9296e05907a336fd3a15426185aa460d.jpg

Then tacked the bottom bracket pivot piece in place.
9a43615646b2002d2ed894feccd4aae6.jpg

Put the tube in place and got it tacked to the headtube.
5e5c0c528803c731f885ff7a7cd75ba9.jpg

Forgot to take pictures of the stationary tube being weled to the end of the gas shock. But did get the overall idea buttoned up.
541f9ec52ca2fc75bea3046f15ba7f9c.jpg

More frame mods to come, but this is the general idea / geometry, minus the cantilever tubes not being there yet.
More next week! Hopefully with a video soon. Thanks for looking and all the comments!
-B.J. -


Sent from my iPhone using Tapatalk
 
Looking good man starting to take shape . Will be staying tuned . [emoji1303]


Sent from my iPhone using Tapatalk
 

Latest posts

Back
Top