Crank Removal HELLLPPP!!

Rat Rod Bikes Bicycle Forum

Help Support Rat Rod Bikes Bicycle Forum:

This site may earn a commission from merchant affiliate links, including eBay, Amazon, and others.
Joined
Oct 29, 2011
Messages
135
Reaction score
48
Rating - 0%
0   0   0
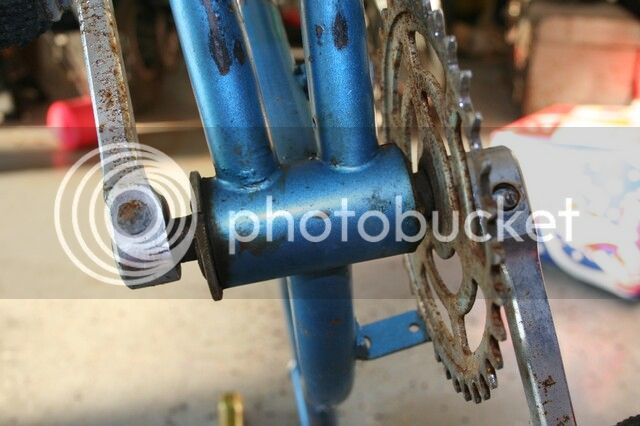
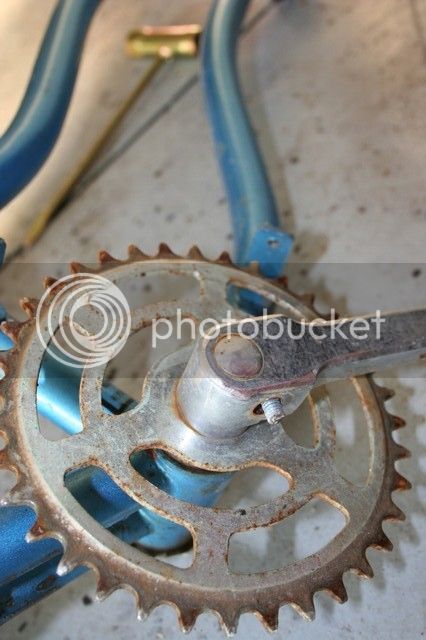
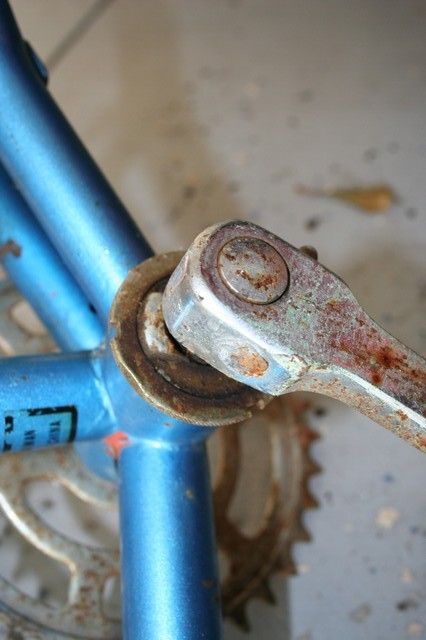
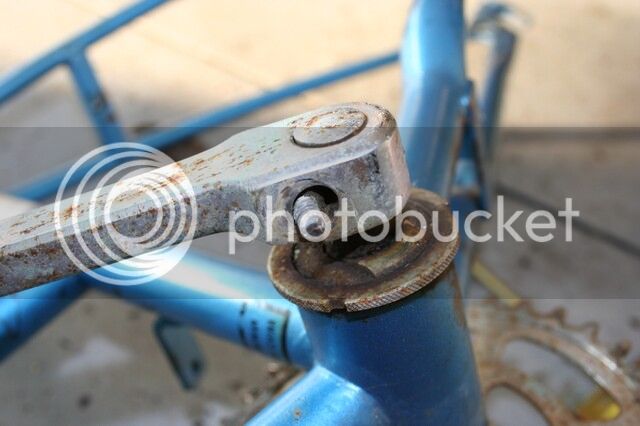
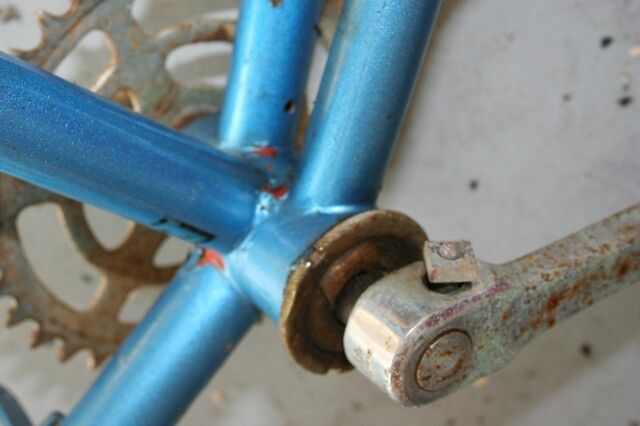
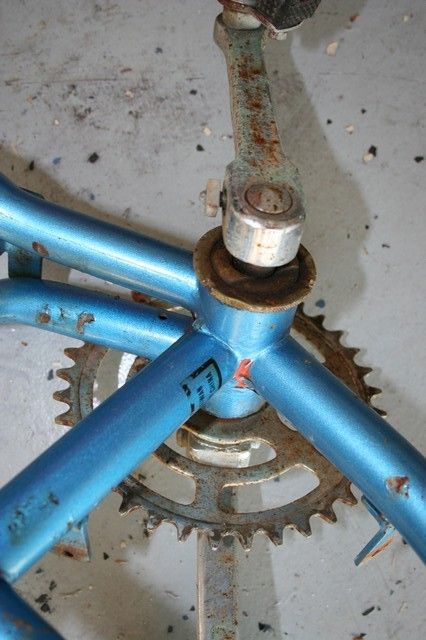
Hiya! This is off my Purple Nurple project. I am brand new to tearing down and building bikes and this is my first. I have a build thread, but I've hit a road block. I'm betting it's super easy and I'm just dumb, but how do I remove this crank (and pedals)? It's an early to mid 60's Royce Union. I'm planning on powder coating the frame and crank.

Thank you for any advice or instructions! :D

crank_7.jpg


crank_6.jpg


crank_5.jpg


crank_4.jpg


crank_3.jpg


crank_2.jpg


crank_1.jpg
 
thats a cottered crank. you typically loosen the nuts so the threads are protected and hit them with a hammer to back out the cotter pins. Then the crank arms slide off the bottom bracket spindle. Then you proceed to remove the bottom bracket lockrings etc.

you may find the cotters rusted in there. plan on finding replacment pins anyway. good luck
 
Walker said:
thats a cottered crank. you typically loosen the nuts so the threads are protected and hit them with a hammer to back out the cotter pins. Then the crank arms slide off the bottom bracket spindle. Then you proceed to remove the bottom bracket lockrings etc.

you may find the cotters rusted in there. plan on finding replacment pins anyway. good luck


Or maybe I'd be better off changing the crank out completely. I actually tried hammering the threaded ends sticking out, but they didn't budge. My have to pb blast them and try hitting them harder.
 
First off, soak a bit with penetrating oil.
If you go bashing you must back up the blow with something rather solid; even a good chunk of wood is fine. Use a piece that sits on the floor/ground and holds the bike up off a bit. Hit them a good bash, dont just use little blows as that just tends to peen the ends.
I prefer to use my big old bench vise that is not on a bench. I flop the frame on the bench and use a socket on the head side of the cotter (for it to slide within once free) and loosly nut the threaded side, press in the jaws tight and give a bash on one jaw with my big old bronze hammer. Ping! and they bust loose.
The crank arms will come off pretty readily then, maybe only need a little persuasion. The large notched lockring should be std. right hand thread and a proper spanner is nice, but if you cant find or make one a drift that fits the notch (I like brass) can be used under a hammer blow to get it loose, then the bearing adjuster will spin out (my largish adjustable wrench fits those flats decently with a little care). Likely you will have 11 loose 1/4" balls in each side so toss a large grease rag under the bottom bracket BEFORE you start loosening. Dont reuse them. You can get grade 25 balls (I buy them by the bag at Fastenal) but maybe try your local bike shop first.
 
gcrank1 said:
First off, soak a bit with penetrating oil.
If you go bashing you must back up the blow with something rather solid; even a good chunk of wood is fine. Use a piece that sits on the floor/ground and holds the bike up off a bit. Hit them a good bash, dont just use little blows as that just tends to peen the ends.
I prefer to use my big old bench vise that is not on a bench. I flop the frame on the bench and use a socket on the head side of the cotter (for it to slide within once free) and loosly nut the threaded side, press in the jaws tight and give a bash on one jaw with my big old bronze hammer. Ping! and they bust loose.
The crank arms will come off pretty readily then, maybe only need a little persuasion. The large notched lockring should be std. right hand thread and a proper spanner is nice, but if you cant find or make one a drift that fits the notch (I like brass) can be used under a hammer blow to get it loose, then the bearing adjuster will spin out (my largish adjustable wrench fits those flats decently with a little care). Likely you will have 11 loose 1/4" balls in each side so toss a large grease rag under the bottom bracket BEFORE you start loosening. Dont reuse them. You can get grade 25 balls (I buy them by the bag at Fastenal) but maybe try your local bike shop first.


Ha ha! Okay. Mind blown. I have never done this before so you just dropped my jaw. Once I get the one crank arm off, and start pulling it apart, this should make more sense.

I'll try the penetrating oil and hammer version first. If that fails after enough tries, I may look for another crank and get the sawzall out. I'd rather NOT, but If I'm going to powder coat this bike, it all has to come out.
 
Here's what you need to know, all in one place. I don't know how Sheldon Brown did it but everything about bicycles is in here somewhere. Unless they're too new to be interesting! :lol:

This is his article on cottered cranks, I just did it on my Raleigh, it's easy enough once you get going. You will probably ruin the old cotters, replacements are available for like $2 a piece. http://sheldonbrown.com/cotters.html

Good luck!! Keep us posted.
 
If the bike is held in a repair stand the crank arms should be horizontal to the ground (I know that is redundant). The threaded section of the cotter on the top side. A long length of pipe is placed between the crank arm and the ground, the head off the cotter inside the pipe. Not only does this focus the hammer blow into the cotter and not just move the bike it also eliminates the damage done to the bearings from the hammer blows. That or find the rare and expensive VAR Tools "07" cotter pin remover tool.
 
I deal with these on Schwinn Air-Dynes a lot. In fact cotters (and crank arms) from an Air-Dyne might work on your bike! People sweat down into the Air-Dyne cranks and the saltwater can make them extremely stubborn. I wouldn't sweat trying to save those cotters, as a matter of fact I would use a small chisel or punch to try to break off the threads so that you can get to the meat of the cotter with a punch and BFH (small sledge). If you get the cotter to move try spraying more PB Blaster or equivalent in and try to move the crank arms on the crank axle to keep tension off the cotter while trying to smack it out with the hammer.
 
Well, thanks to everybody's replies, I now have a game plan. Support the crank, BFH (my favoriter tool besides zip ties) and a big WHAM. I have two Raleighs. I'm going to part them out, but I'm going to check compatability and see if they have better cranks. They're late 70's BMX bikes.

downsized950613121228a.jpg


RaleighMX.jpg
 
gcrank1 said:
I can see a gravity bike in one of those frames....... :wink:

:D

The black one would make an excellent gravity bike. It would also make a killer extended - fork style chopper! But, neither bike is my 'style' so they need new homes. In fact - the front forks on the black one are shocks.

I haven't even been able to find any info on them.
 

Latest posts

Back
Top