Re: My first "cut and weld" ratrod... Needs just eye candy

Rat Rod Bikes Bicycle Forum

Help Support Rat Rod Bikes Bicycle Forum:

This site may earn a commission from merchant affiliate links, including eBay, Amazon, and others.
Joined
Aug 8, 2011
Messages
70
Reaction score
5
Rating - 0%
0   0   0
Been a lurker (and enjoying it) but I'm gonna start giving now, not just taking!

I've done my share of "find-parts-and-screw-them-together-wherever-they-fit" ratrods. So I was due for a "cut-up-the-frame-and-weld-pieces-together" ratrod.

I'm a proud Youtube-trained welder with nearly 1 whole hour of welding time under my belt. So I think this should go very smoothly, don't you think? I recently bought a stick welder (I know that's not the best option, so we'll leave that for another thread) and I suppose I'll be posting more about mistakes and lessons learned, than about successes. Should be fun!

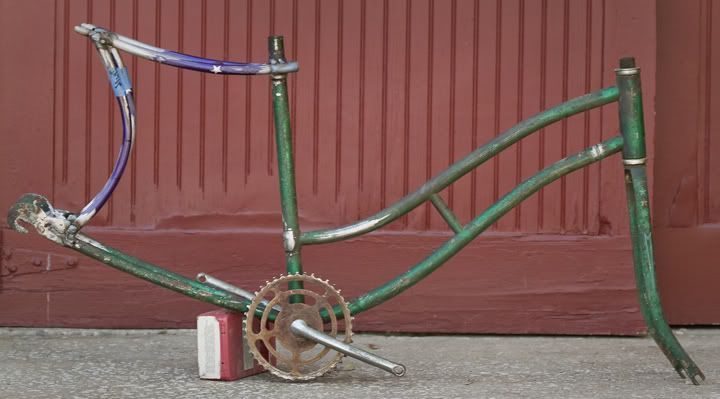
For now, the bike. I figured a chopper might be the biggest bang for the buck with the fewest cuts, grinds, welds, extra pieces, but still looking unique enough that it will look like a custom job. I got this frame for free from the trash heap of our local non-profit bike shop. Now that I'm looking at frames with the perspective of "how would that frame look cut up", I'm gravitating towards these lady frames because of the more elegant curves...

100_2410.jpg


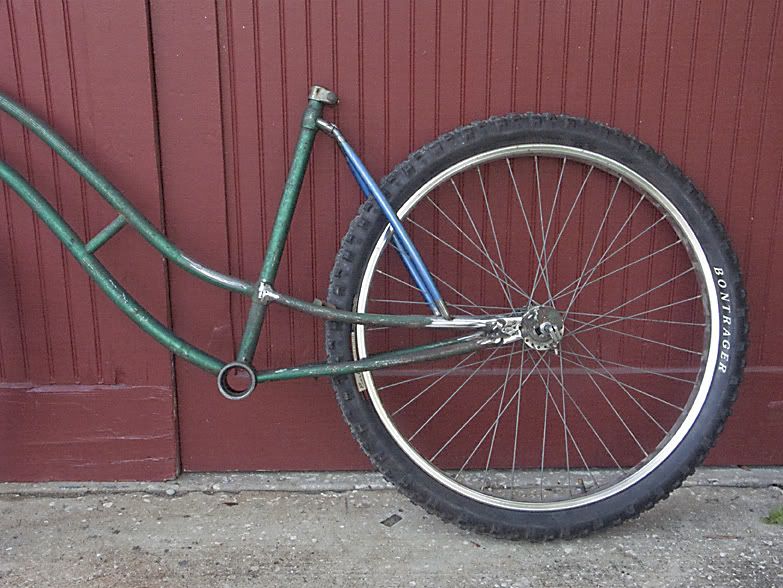
So I cut off the seat stays...

100_2411.jpg


And the plan is to turn them upside down and weld it as such...

100_2412.jpg


The other cut-and-welds will be:
  • - fork (extend)
    - head tube (soften angle to allow for extended fork)
    - seat tube (shorten)
    - handlebar (I dunno, maybe too ambitious)

I'll throw on a banana seat, 20" wheel in the rear, and a larger one in the front. I'll hopefully have enough energy for some painting and cosmetics. And voila! Easy, right?

Advice, encouragement, slaps in the head appreciated. Otherwise, I'll slowly post my progress, if there is any!
 
Re: My first "cut and weld" ratrod

... and I also found this being dumped out at my kids' preschool. It's the legs to a coffee table and I have two of these. I nabbed em before they went into the dumpster, thinking it might be nice decoration on a bike. Ideas welcome.

100_2413.jpg
 
Re: My first "cut and weld" ratrod

That's cool how you did that. No, I did not think about moving the top tube because I'm trying to get away with doing the least work! But that is definitely an idea to keep in the toolbag. Thx.
 
Re: My first "cut and weld" ratrod

make sure you check chain clearance on the rear stay flip. I had trouble when I tried it on my wife's bike. Ended up redesigning back end.
Original concept
Bstar_framedetail.jpg


redesign
redesignedframe.jpg
 
Re: My first "cut and weld" ratrod

g-ratter said:
make sure you check chain clearance on the rear stay flip.

Ah, thx for the tip! Details, details. I need to find a rear wheel and sprocket first (and I suppose the crankset too) and then will make sure the chain and stays don't interfere... before I get out the welder. I'd like to think I would have thought of that myself but I'd be giving myself too much credit :)
 
Re: My first "cut and weld" ratrod

People often rake the angle of the head tube, as you mentioned is in your plans. My personal rule makes that a no-no. When you mess with the geometry of the trail, it just makes it an uncomfortable ride. Too much trail (too much rake), and the wheel wants to flop to one side or the other. as low as I make mine, and as much as I stretch them, I now don't mess with the original rake of the forks. An engineer designed that angle for a reason.

But this is one of those things where you may want to try it, and form your own opinion through trail and error, as I did.
 
Re: My first "cut and weld" ratrod

deven_science said:
When you mess with the geometry of the trail, it just makes it an uncomfortable ride. Too much trail (too much rake), and the wheel wants to flop to one side or the other.

Thx! I ratrodded a lowrider recently and I totally understand the floppiness of the ride. I've seen multiple kids nearly crash and burn. This ratrod will be more about looks than function so I think I'll push the trail envelope just a tiny bit. This will be more about cruising the hood, than getting to point A quickly and safely! And I'd like to experiment working with the head tube.
 
Re: My first "cut and weld" ratrod

Looks good man, the ladies frames are great starting points. I'm getting a stick welder soon, I figure any welder will be better than me, at this point. I took a welding class in college uh, 20ish years ago. I'll pick it right back up right!? :lol:

I look forward to following your build.
 
Re: My first "cut and weld" ratrod

Today I learned that practicing welding beads and basic lap joints is nothing like welding odd joints on bike tubes. My first attempt resulted in random blobs that may hold slightly better than a tack weld. Well, I still consider this a success since I don't have massive burn throughs and the frame stayed together as I moved it around. I'll do a second pass later and there's nothing the grinder can't fix!

I had to do a little pinching, straightening, and cutting of the seat stays in order for it to fit and form a more continuous line. For my first frame mod, I'm gonna pat myself on the back. On to the head tube.

100_2414.jpg
 
Re: My first "cut and weld" ratrod

In today's quick session, I learned that using a grinder WELL is not as easy as it looks. Cutting cylindrical things at angles, grinding excess metal, while holding something that wants to gyroscope out of your hands takes some thinking, coordination, and patience. But in the end, I got the head tube off, cleaned it up, and shaped the top and down tubes...

100_2419.jpg


On the welding front, I'm painfully learning how to angle and place the electrode so that the beads go where I want them to. That is probably my biggest problem... the beads sometimes end up only on one side of the joint so I end up with gaps and really ugly welds. If there are any stick welders out there with any tips specifically for bike frames, I'd appreciate it!

But the frame is holding together and I chopped the seat tube a little, so it's starting to look more like the chopper I am envisoning!

100_2422.jpg
 
Re: My first "cut and weld" ratrod

Jawon said:
In today's quick session, I learned that using a grinder WELL is not as easy as it looks. Cutting cylindrical things at angles, grinding excess metal, while holding something that wants to gyroscope out of your hands takes some thinking, coordination, and patience. But in the end, I got the head tube off, cleaned it up, and shaped the top and down tubes..

On the welding front, I'm painfully learning how to angle and place the electrode so that the beads go where I want them to. That is probably my biggest problem... the beads sometimes end up only on one side of the joint so I end up with gaps and really ugly welds. If there are any stick welders out there with any tips specifically for bike frames, I'd appreciate it!

But the frame is holding together and I chopped the seat tube a little, so it's starting to look more like the chopper I am envisoning!

100_2422.jpg
Your frame design has a cool flow to it nice job!! I learned to respect the grinder building the Dirty devil stretch, the grinder slipped and ground my finger down to the bone faster than the blink of an eye. As far as welding tips clean metal welds smoother try not to weld over paint..I use a flap disk on the grinder cleans paint right off. 8) 8)
 
Re: My first "cut and weld" ratrod

Bigdaddy772 said:
Your frame design has a cool flow to it nice job!! I learned to respect the grinder building the Dirty devil stretch, the grinder slipped and ground my finger down to the bone faster than the blink of an eye. As far as welding tips clean metal welds smoother try not to weld over paint..I use a flap disk on the grinder cleans paint right off. 8) 8)

Thx for the encouragement. I need it. Ouch, yes, I will be careful with the grinder! And as for taking off the paint before welding, I thought one pro of stick welders is that you can weld over paint and a little crud. I'm sure it doesn't hurt to take the paint off so I suppose I'll do that in the future.

Another question to welders... with my first pass being so bad, I'd like to do another pass. Do I have to clean up the flux or can I just weld over it? And why is the flux so hard to take off? I tried wire brushing it soon after welding, as well as after it has completely cooled off. Both times seemed equally a PITA. Any flux tips, please? Have I demonstrated my welding newbie-ness yet?!!
 
Re: My first "cut and weld" ratrod

Hey, cool flow on that frame. I don't know, let me just say that up front, but I think that the welds will be much better on clean metal. I also think a welding hammer is the way to go to get the flux off. Then you finish with the wire brush. I think you do have to clean the flux off before you weld over. Cleanliness is key, I believe. I'm glad that you are showing this, it will be that much less I have to learn when I start welding :lol: , also with a stick welder.

Here's a couple things I found helpful, you may have already seen them http://www.atomiczombie.com/Tutorial%20 ... e%201.aspx

I found this guys stuff on YouTube helpful, he has several videos on different topics http://www.youtube.com/watch?v=ecIhcIP1QGQ

Keep showing me how to weld OK? :lol:
 
Re: My first "cut and weld" ratrod

You must clean the slag off before making another pass. The slag will create viods in your weld, weakening the joint. When your weld is off to one side of the joint, the medal may be different thicknesses. If they are the same thickness, you are not positioning the rod correctly, or you need to weave the bead across the joint. If one is thicker than the other, you want to place the rod colser to the thicker medal side. If is like a blob on top of the medal you need to turn up the heat a bit. The weld should melt (penetrate) into the medal.
Hope that helps.
 
Re: My first "cut and weld" ratrod

chimichanga said:
cool build so far man. Your design with that color on the bike is reminding me of the twitter bird. lol

Good to hear from you, chimi. Yes, it reminded me of a dove, but you're right about twitter. I'm not much of a fan of that color so I think a new paintjob is in order and I'll stay away from a twitter theme!

jackdaw said:
Here's a couple things I found helpful, you may have already seen them http://www.atomiczombie.com/Tutorial%20 ... e%201.aspx

Yes, have seen atomic zombie before, thx for the reminder. As I reread, it seems all my questions are answered there. Their tips are great and exactly what I'm experiencing.

Nightrider said:
You must clean the slag off before making another pass. The slag will create viods in your weld, weakening the joint. When your weld is off to one side of the joint, the medal may be different thicknesses. If they are the same thickness, you are not positioning the rod correctly, or you need to weave the bead across the joint. If one is thicker than the other, you want to place the rod colser to the thicker medal side. If is like a blob on top of the medal you need to turn up the heat a bit. The weld should melt (penetrate) into the medal.

Thank you for this confirmation. I will definitely play around with your welding tips.

For now, I was able to find some more parts for free, from my stash and other donor bikes, and get a first glimpse of what this rat will look like. The main thing I'm missing is a banana seat and sissy bar and we'll be good to go on the parts!

100_2423.jpg
 
Back
Top