1960's Öglaend Strada

Rat Rod Bikes Bicycle Forum

Help Support Rat Rod Bikes Bicycle Forum:

This site may earn a commission from merchant affiliate links, including eBay, Amazon, and others.
And just imagine how much love you will have for this machine when it finally all comes together. What you are doing is investing, putting "sweat equity" into your bike.

Oh boy, can't agree more! That's the thing about bikes, more you tinker with them, more you'll fall in love with them. Goes both ways, its hard to sell/give away/scrap them, dealing with broken parts is pain in the .... I guess its part and parcel with this hobby. Reminds me that I have to do a thorough maintenance to my previous build next year. Its got a lazy break, probably the whole back hub needs to be changed, new tires, the paint needs some fixing and so on.

I have been thinking how to clean everything when assembling it and I got a great idea! I have two bottles of Paiste brand cymbal cleaner which is designed for cleaning bell bronze, its quite gentle, not abrasive at all when used correctly and cleans up everything. I haven't tested it on steel, aluminum or chrome plated stuff, but it should work well. Its almost like metal cleaner combined with car wax in the way it works. I thought to try it out for cleaning all the chrome/brass parts when I put the bike together. Specially the horn I bought, its so cool. I'm yet to even test it. :D
 
Yep, you know the drill Matti. ;)

Some good news, I got the new headset yesterday, along with crazy looking circular reflectors. :D This headset is awesomely slim, takes maybe an inch with all parts included. I also found some nice stuff at work which gave me some ideas. I'll get on it on the weekend, expect photos and a lot of whining about things being difficult and not working. Business as usual.

I'm still looking for the best possible paint for all the decals, probably the same brand I used for the base I guess, I'm waiting for my payday to get those. I may have to order the gold paint as that's not usual on the shelf stuff.
 
That feeling when you look at the bike and see all the work you put into it that nobody else knows about... They know it is cool, can't explain why
Ha, I feel like that when adjusting bearing play. Too tight then too loose after futzing 6 times - perfect. Who cares? I do. :)
 
Hahaha, the struggle is real. :21: I'm horrible with adjusting bearings for eternity... Back and forth until its perfect.

Now that we're on the subject, this time I'm going to try to install free bearings to the crank hub. I've tried it before but I probably put too many balls in there, (sixteen per side) the typical bearing has eleven from what I've seen. I thought to try 12-13 per side and see how it goes. Front hub also has it like this. I would love to do this to the back hub also, but those bearings are rather nasty to put back if I need to open it.

Btw, I love my job(On days like this.), yesterday I checked the metal recycling bin, there were bunch of bike wrecks again and I got another 3-speed Sachs Torpedo from one of them. Its just missing the shifter chain, at least it rolls and the break works. This means a pile of spare parts. :D Its different model than the one I'm using, but Sachs seems notorious for using standardized parts, so that's a lot of spares.
 
It's great when you can salvage cool parts from junk bikes! I have not come across a 3-speed Sachs Torpedo myself, but have several Komet coasters and love them.
 
It's great when you can salvage cool parts from junk bikes! I have not come across a 3-speed Sachs Torpedo myself, but have several Komet coasters and love them.

Completely unknown brand here, at least to me. Here its almost entirely Sachs Torpedo or its copies, specially with single speed hubs. Favorits are all over the place. On newer bikes there's also a lot of 3-speed Shimano. And even newer ones, god forbid, have the horrible Shimano Nexus on them quite often. So far from what I have seen and heard, that hub is the worst piece of junk there is, that is once it breaks and it always seems to. Older ones are way more reliable. I think the German made hubs became fashionable here around 1930's or possibly even earlier.

The city metal collection is a gold mine, that's where they dump all the bike wrecks they come across. Seems that the pace is 1-3 bikes a month, more in the spring and summer ofc. I'll keep an eye out for what ever I can salvage. Its not really allowed but nobody at work cares if I go digging. :D My contract extends to late may next year so I'll have plenty of time to go scavenging.
 
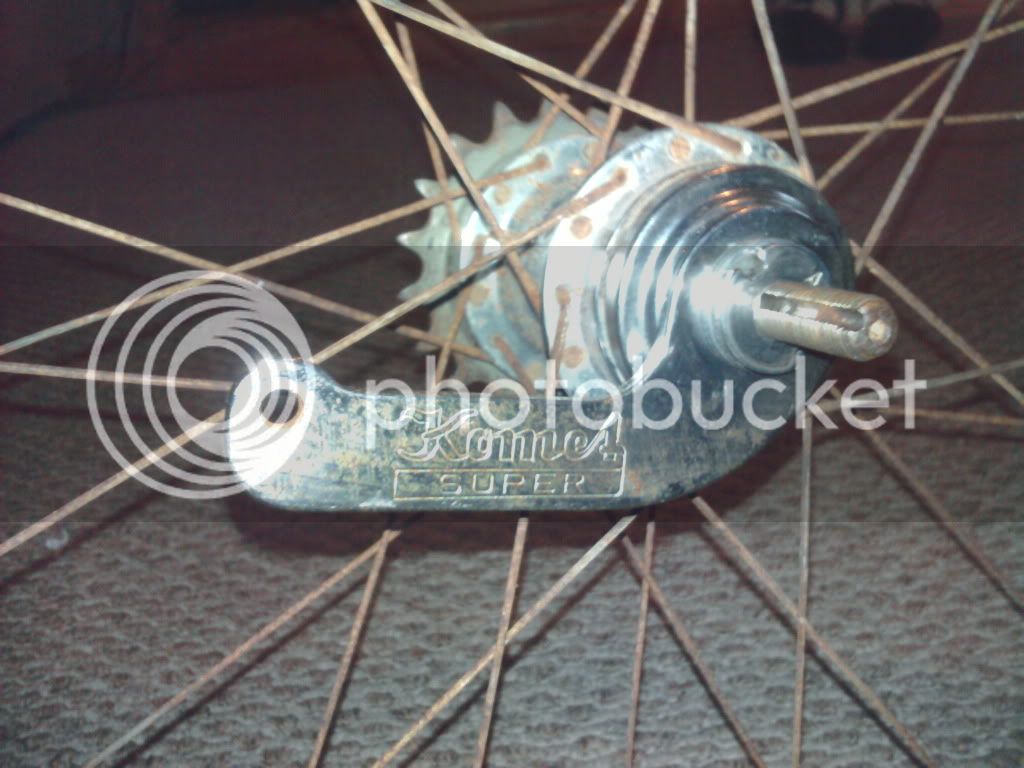
Maybe I should of said Komet Super.
2010-11-23015215.jpg

Pretty common on 1960's Murray and Sears bikes.

http://www.ratrodbikes.com/forum/index.php?threads/komet-super-hub-rebuild.33551/
 
Usual wisdom it to put loose balls in the race until it is full/tightly packed and then take one ball out.

I tried it back in the day putting sixteen of them per side, on a typical Fauber hub, that's five more than there usually is, there was still some space, it rolled well, but made a weird rattling sound and kind of stuttered a bit so I presume sixteen was probably one too many. I've seen sixteen balls in a newer version of the Fauber hub, the one which is slightly smaller but with bearing cups punched in place instead of screwed, the one from which the crank comes out without touching the cups. The older models have bigger bearings so makes sense. I think 13-15 per side must be optimal amount.

There's only one way to find out. :D If I would get completely crazy, I would do this to the rear hub also, but that experiment shall wait. Maybe I'll try that with one of the single speed hubs first, they bearings are nearly identical anyway.
 
Hello, long time no see. :) Its been a long winter in between and I have been very busy and tired and just plain busy with life.... And I let my project sit and wait for the new season and more time on my hands as my job contract ends in a week.

I decided to grab the bull by the horn and continue my build and its coming out nicely. I finally solved the issue with the fork spring, simple 20mm x 60mm x 5mm piece of pot iron with two holes + bolt and few lug nuts and that did it. Then I made a spacer from some old steel washer to make the lower part of the bearing sit nicely as I couldn't balance it otherwise. The axle still needs to be changed though, it either is so tight it wont pivot at all or stuff comes loose, so I will replace it with some heavy duty screw bar instead. I can get those from work so I think I'll get that dealt with tomorrow. I don't understand how in heck they dare to sell stuff like this, feels like the fork was only half way done and I had to improvise to make it work, but I guess its just part and parcel with the territory.

At this time, the idea of adding springs to the saddle is on hold and I just used the saddle as it is. Likely the Big Apple tires and the springer fork will give enough suspension for smooth ride anyway. And I had some fun dealing with the sissy bar, never done that before and it works like a charm. I made a fun little addition behind the back rest and its a blank space calling for some art. Also nice for hiding the seams on the back and just looks bad ....

I had some tough time testing out if I could have open bearings on the crank hub but that's just too much of a hassle. I think I'll give up on it and just use the disk bearings on Fauber hubs, works fine enough and its easier to put together. I got more pictures taken, but those will be for a later post. Anyway, there's a nice bank space here for something fun. What should it be? ;)

I'm finally finishing the paintjob. Spray paint on the glossy black I used didn't work out so its gonna be brush work all the way, I decided the colors too, cream white and reddish brown. Quite classic stuff. I can't wait to get to show the chain I bought, its a heavy duty half link chain, gold colored.
Backrest_1.jpgbackrest_2.jpg
 
More stuff from yesterday. The adapter piece to the spring attachment ended up being as simple as it gets. Check out these pedals. :)
20210422_213116.jpg20210425_165503.jpg
 
The last problem with the fork is now solved.... Makes me wonder, who the hell is designing these things? Replicas are sold half finished?

I'm talking about the axle. The bolt and the nut are different size, they require 13mm and 17mm keys which make no sense. The axle was too slim, leaving way too much tolerance in between, does this part need it? I don't think so. Also it was too short, the nut barely had enough screw to attach and the only way it would work would be to tighten it so much the parts can't 'live' at all...

So screw that part! I replaced it with a piece of screw bar which is a snug fit but allows movement, all I need now is few plastic spacers. Two nylock nuts on the ends should allow me to adjust it just right to allow the parts to pivot so the spring can actually do its job and they will likely lock on really tight so no worries about them coming loose during a ride.

Pictures coming later. I'm just wondering wth are they thinking? The manufacturer and the companies selling these things? The craft quality is good enough, welds are good, parts are sturdy but then they come up with some bs like axles that can not work without replacing or customizing something? To make them cheaper? Another of these is attachments for fenders, saddles and so on... Some are so tiny and frail that it makes no sense what so ever. This time I'm going for all that stuff being way lighter than last time, but still not tiny. I want my bike to stay in one piece if I decide to go for a rougher ride.
 
Ohkay, I dealt with some more fork stuff today. I think I will replace the stock bolts on the 'horseshoe' to match the pivot axle and so on. Oh and I remade the custom part to fit the spring, its way better balanced now and I filed it down to look neat.

I really like those gold hue nuts I used, will match the horn, chain and seat having the same color.. Its quite neat. I've never messed up black, chrome and gold/brass colors together before. 20210430_125447.jpg20210430_125541.jpg
20210430_125541.jpg
 
Last additions to my bike.... This one is going to easily be the most expensive bicycle project I've ever had going. But I have the feeling its money well spent on something I will enjoy for years.

I got two plastic cased Sachs torpedo shifters, both I think are 80's to early 90's vintage and I have never liked them for anything else except for the compact size. Something about that tiny black plastic box pisses me off. It already did so when I was kid, I liked the old Shimano shifter for being more sturdy. But then I thought, why not mate the newer hub with older shifter and I found this on UK ebay, 31€ for a shifter, I have no idea if that's cheap or expensive as I don't usually need to buy old parts like that, I just find entire bike for few dozen €uro and get a pile of parts in one go. Finns are quite oblivious to what kind of gems they're letting off their hands really cheap some times. The bikes might not be anything special but they can have really top quality parts on them.

Anyway, I think I'll get one more cable holder and some fancy colored cable housing too. Then mate this hub with this shifter. By the looks of it, the shifter is in nice condition too, some careful cleaning and love will likely make it even better.
Torpedo_shifter.jpg
6-11-2020 (9).jpg
 
I have a question about the above shifter, can it be opened and disassembled + put back together without breaking anything? I see two rivets and no way to open the whole thing? Is that even necessary? I have never had to open a Sachs torpedo shifter as they don't seem to need that kind of attention, but I'm curious...
 
Ohkay, got some more stuff done, not that much to show yet, but there is something. Little more custom stuff on the fork, now I got all the attachments replaced with heavier stuff and got to love those gold hue nuts. Definitely going to use these for other projects too. I would take a wild guess that 10mm diameter bolts are sturdy enough for the fork to stay in one piece. :D

I grabbed an ink pen today and finished the sign thingie behind the sissybar cushion. I didn't have the time to get working on the saddle yet, painting the faux tank, front fender, tool box and so on takes ages. So far the decals are coming out ok. I did some stripes today, hoping they turn out fine. I wish I could use ink pens for all that or had some tools to do decent stripes. Its old school tape + thin brush this time.
1.jpg2.jpg
 
It is a good shifter. I find it nice. But the plastic one is hideous, I agree. It seems expensive to me, but when you consider that it is no longer made it makes sense. I've had to pay more for a shifter. I don'tknow if you can open it, I would rather think not.
 
It is a good shifter. I find it nice. But the plastic one is hideous, I agree. It seems expensive to me, but when you consider that it is no longer made it makes sense. I've had to pay more for a shifter. I don'tknow if you can open it, I would rather think not.

I did some digging, the old shifter can not be opened, but it doesn't need to. The right/upper side is open, unlike the newer model with the plastic covers. The inner workings are nearly identical. I tinkered a bit with a newer shifter to see how to remove/install the cable and that one has a screw inside one of the rivets which keeps the whole package in place. The older metallic one does not have that screw, but it wont matter as it has the open side... Easy cleaning + lubing and installing the cable. From what I found out, the cable attachment and all the parts inside are pretty much the same.

The other ones I found for sale were at similar prices and most were in worse condition. Then there were some NOS ones which sold for way more. Located in US and Canada which likely bumps the price. Anything by Sachs is all over the place in Europe and also in Finland so its no wonder they're a bit cheaper. But I can't ever recall seeing these old school all metal built ones here, the plastic 80's - 90's Torpedo's are very common here. (And not respected for their quality either as people see them as yesteryear's ordinary junk.)

I have been reading about the springer forks a lot, seems to be one of the things that keeps dividing opinions. Learned a lot of neat new things about how to make them better, specially good to know as the one I have is a cheap repop one. Knowing enough of these, I think it was a great idea to replace all the bolts etc. and tinker with fitting the parts. I'm just concerned about the spring being strong enough as I'm not light as a feather. Looked into perhaps getting a Whizzer spring for it in case it bottoms out all the time or just feels too flimsy. Or perhaps I may add another spring inside the stock one. I can't wait to get to try it out and see how it works. I've went through quite a lot of work with this thing already so it better be nice on me. I was already concerned about the spring being enough, looks like I might be into burning some more money on this and getting that heavy duty spring.
 
Back
Top