So here it is, the Rat Rod Welder. There's not much to it, you can see lot of used parts here that can
be upgraded from the get go or later. The mad scientist thing is appealing to me because I just like
to see how things work so this may be to some a little crude.
House business first. I like mine and I'd like to keep it. This is not a toy and there are dangers you
could encounter that could really mess up your day or your life. It won't help to say I told you so
when your stretched out on your shop floor. If this makes you a bit nervous or don't think you have
the skills then stop here and buy a welder. These are not intructions to build one of these welders
but a diary of how I built mine. Many people have built them differently. If you have confidence in
your abilities then continue. OK
FIGURE ONE
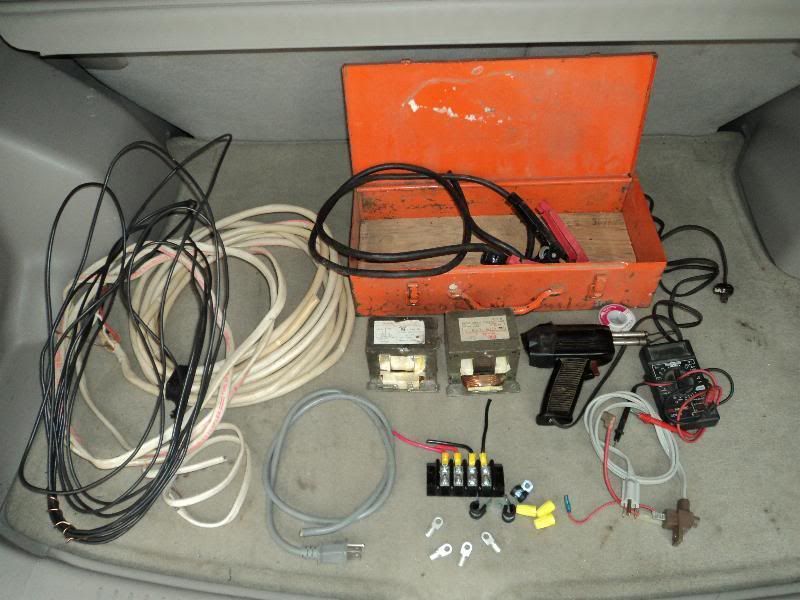
These are the parts I started out with and some tools I used. On the left I used #10 wire that an
electrician had taken from a house. I think it came from a stove. You need about 20 to 25 feet of it for each transformer.
I stripped the outer casing to find a black, a white, and a bare ground wire. I also had some smaller
lengths that I will use on the transformer with the taps coming out of it. The black wire I will use
on the other transformer in one long wrap.
The gray cord was from a computer. The orange box was from a Sawzall tool that was thrown out. The
black wire inside is a jumper cable for a car. The battery terminal clamps can be used but it's much
better to go to Harbor Freight and get a set of cheap ground clamps and stick holder.
On the bottom of figure one there is a terminal strip that I got from a discarded hot tub. It was
beefier than a store bought one I had. This strip should be rated to handle the load. Also shown are
some terminal ends I had along with the wire nuts and clamps.
Far right in figure one is a soldering iron and a volt meter. The gray cord is from an appliance that
had push on terminal connectors on it so that I could quickly and easily test my transformers with it.
Lets get wrapping.
First you have to get two transformers from microwave ovens. Inside is a capacitor that could kill you
or harm you, not a good thing to mess with. It may have a charge in it when you remove the
transformers so don't mess with either of the it's terminals. Some people discharge it by grounding it out but
I never learned those skills so I take a nonconducting wooden stick and pop the leads off and stay
away from it. If this is something your not sure of find someone who is to help you or forget it and
buy a welder. Be safe. Once you have the transformers in your hand your good to go.
So here is what you work with at your bench. You are removing the secondary coils which are the thin
wires with a gazillion winds. Do not harm the primary windings, About 150 winds more or less, made
from thicker gauge wire. Also there is another wire in there only a few wraps and sheathed in a
covering. This would be the filiament winding and it gets taken out. I sometimes clamp the transformer
down and take a chisel to the wire being careful not to harm the other coil. Then you take a punch
like that sawed off crank from a cottered bottom bracket and punch the wire out.
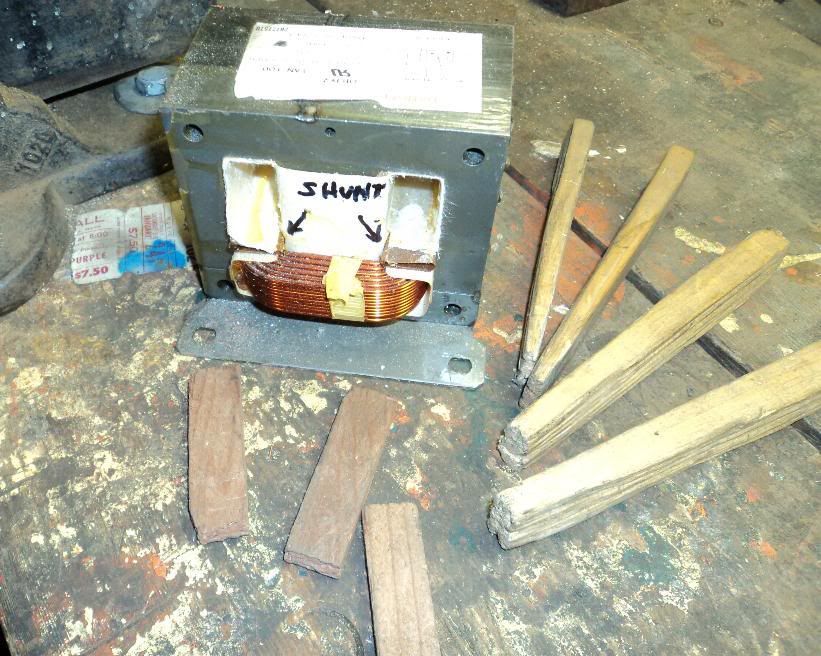
This is what you end up with. This thing marked shunt are to be left in and is important to the
electromagnetic thing that goes on. It needs to be there so leave it in. Also you can see the wooden
wedges I have ready to hold the wire while I pulled it through.
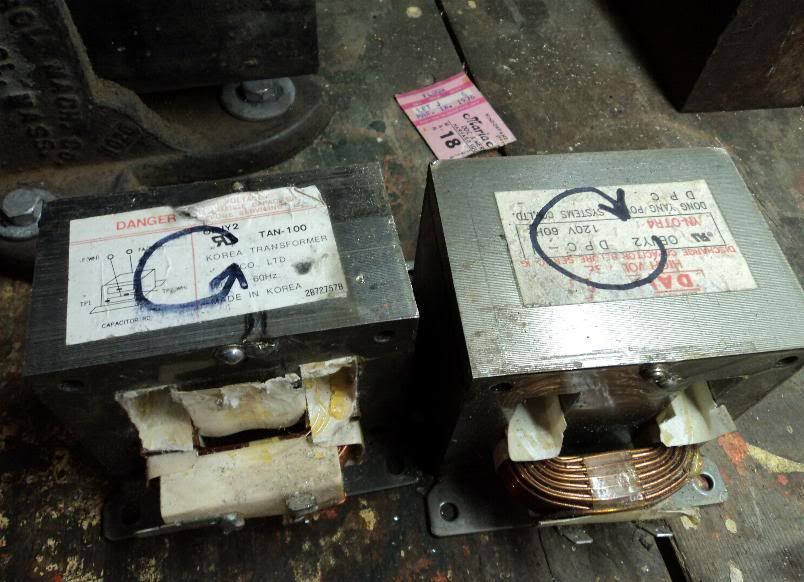
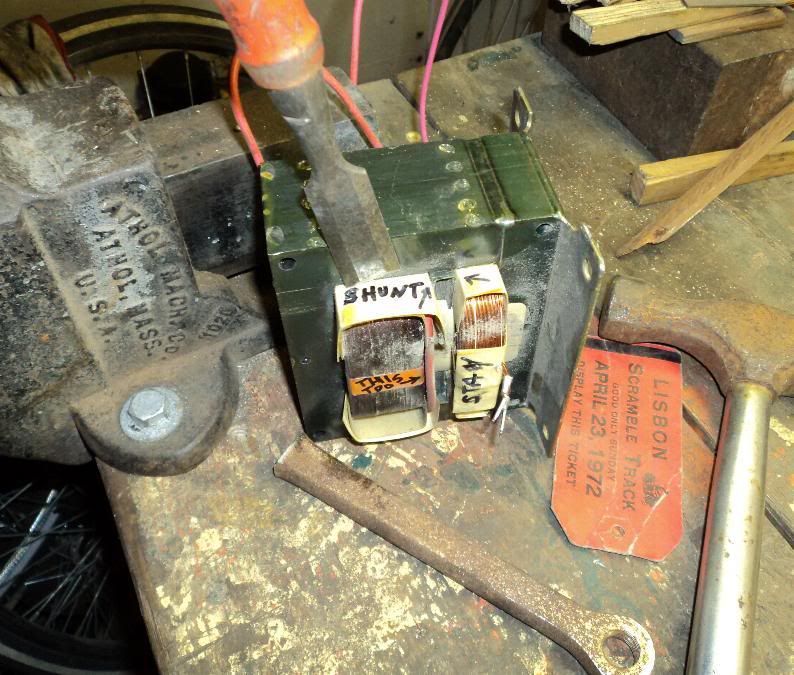
Here are the transformers that have been eyeballed and marked to show which direction the windings
will go. What I did is look at the primary windings to see which way they were wound starting at the
bottom so that the wire I wound goes the same way. Not all the transformers are wound the same
direction or are the same size for that matter.
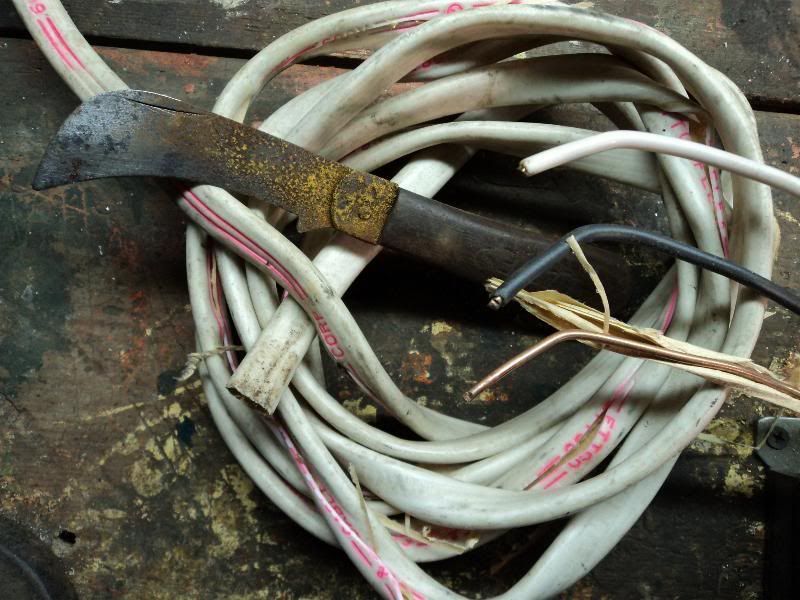
I stripped the wire with this electrician type knife. This worked well and better than a razor knife.
Don't cut yourself if you do this.
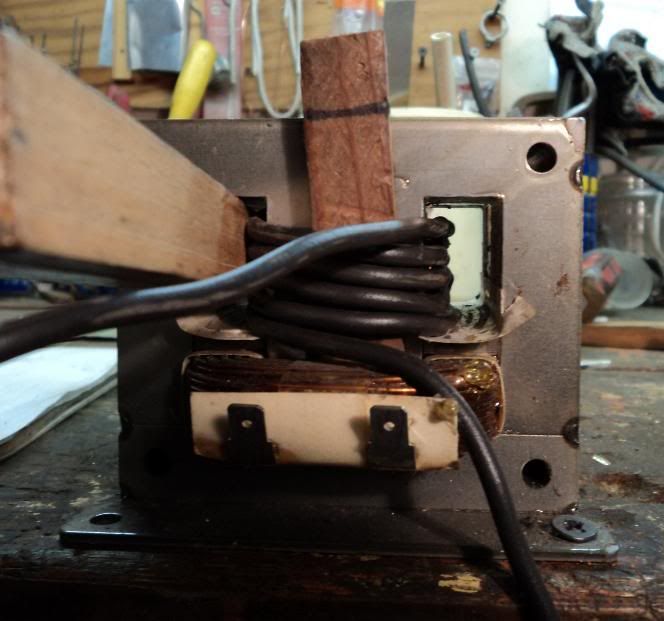
This is the begining of my windings and shows a neat job of it. Using the wooden wedges to hold the
wire and an old screwdriver with worn edges I packed it in there nice and tight.The vertical piece of
wood is to hold the wire away from the sharp edges as you pull the wire around. You have to be
carefull not to cut the wire on the corners, there will be a little skuffing scrapes put don't cut
into the wire.

When I wind I like to keep a tally going or I'll lose track. They say to wind 20 wraps but of all the
ones I have wound I have gotten about 16 to 18 in there. The list also shows at what winding I left a
little out to solder on a wire to extend the tap away from the coil.The wires in the foreground are
the first in red. The second and last are white. The black is the begining of the wind.

When I fired up the primary coil these were my readings. Not too shabby and I'm pleased with it.
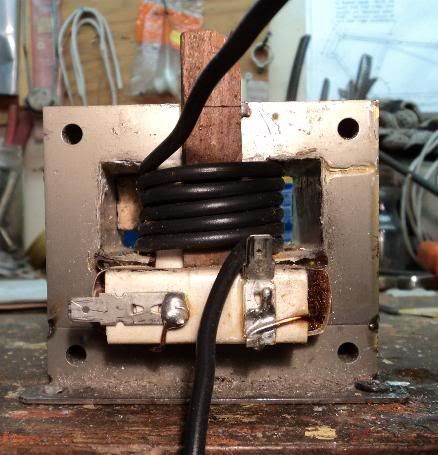
This is my second transformer and was wound counter clockwise to match the primary coil. You can see
the wood wedge that was pounded in from the back. This also was winding tight and in a neat wind for
17 turns.
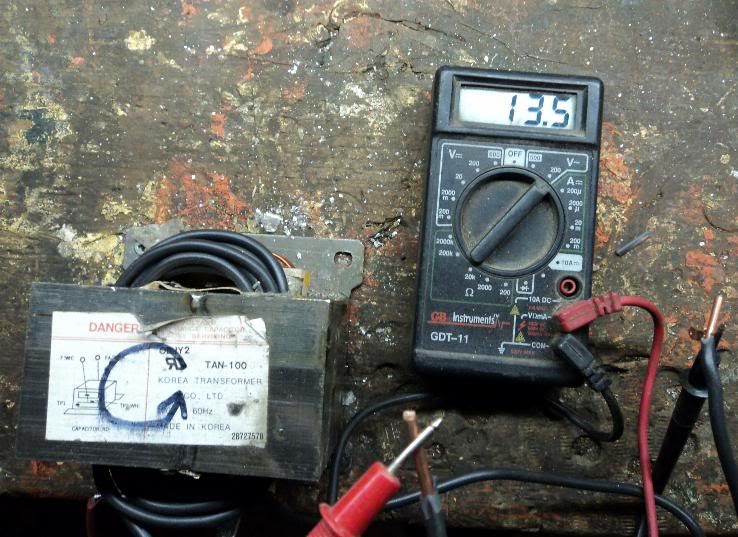
This was my reading and I'm not happy with it. It should be more but the primary coil winding may
cause this, to many or not enough winds. It was from a small Microwave oven. This still maybe OK for
now and I can always exchange it later.
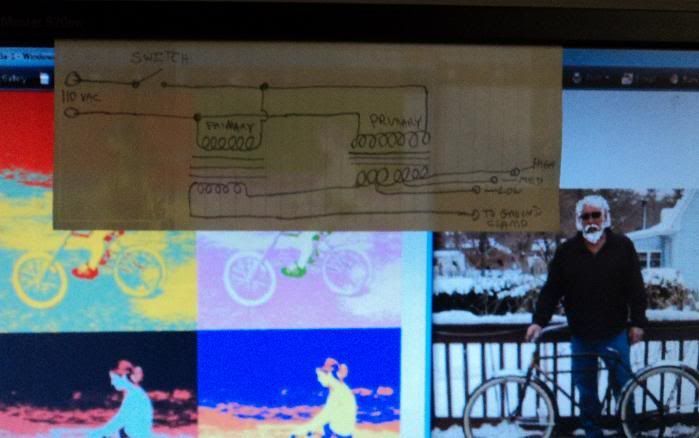
This is a bare bones schematic of whats going on. The primarys are wired in parallel and the secondary
are wired in series.
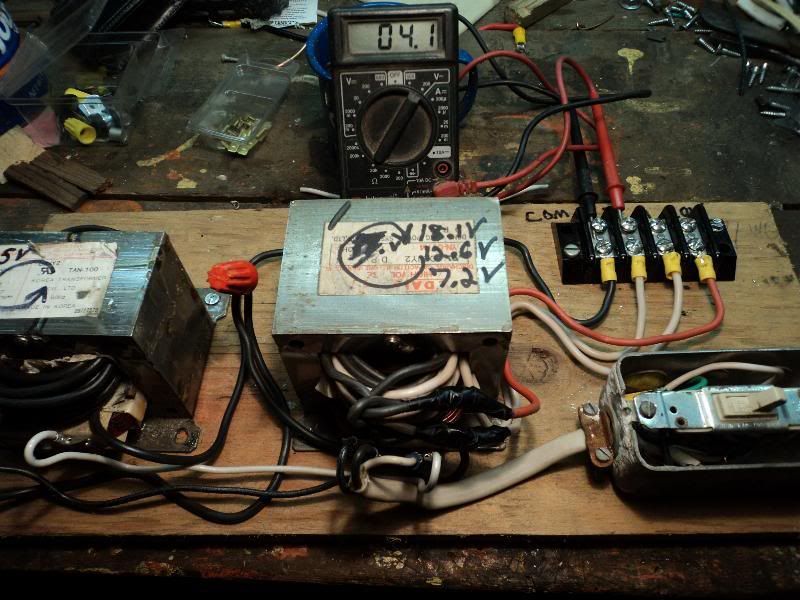
So whats up with this reading, I should be getting about 30 volts and not 4. Perfect, now I'll show you
how to fix this. It's a 50-50 chance that this will happen to you. This is called phasing, easy to fix
by switching over two primary leads.
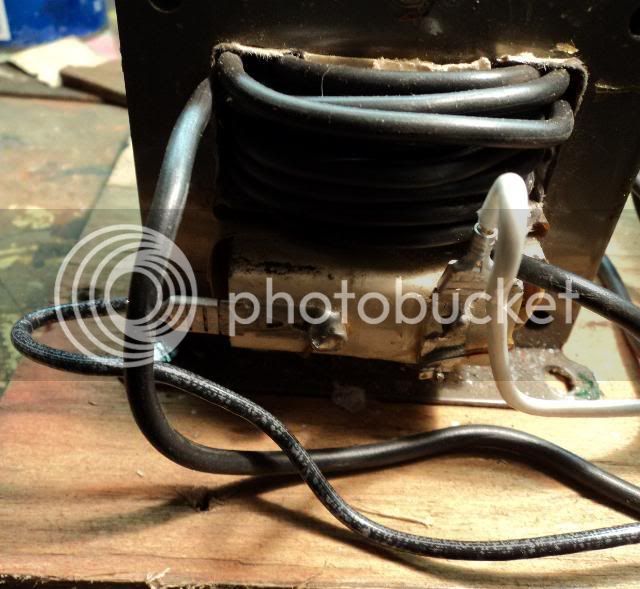
This black and white leads will be reversed .....
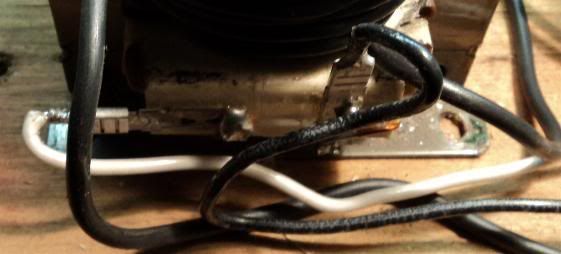
.....to this.
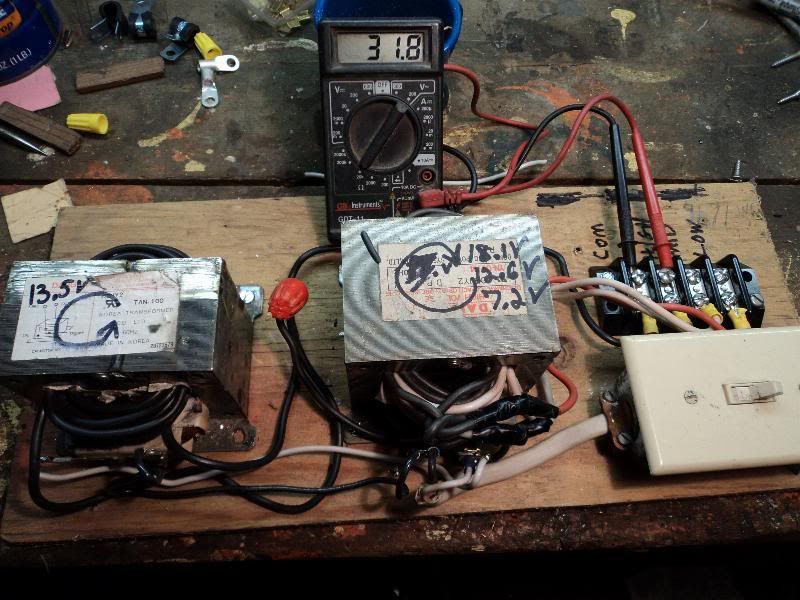
Much better! I clamped the meter leads down and got 31.8 volts. When I just touched the meter leads I
got a little less.
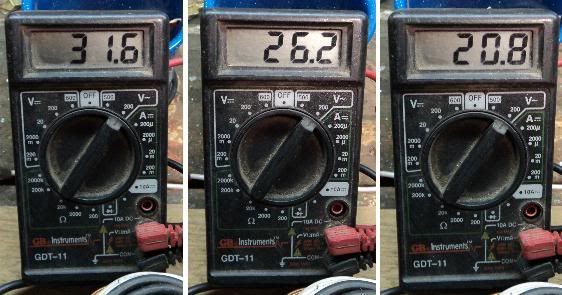
These are the readings I got from the different taps. I don't think its all that bad and it's got a
decent spread. This should be fine.
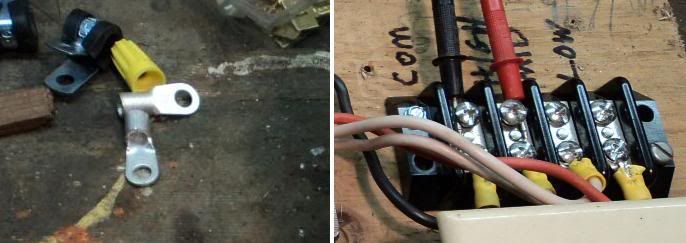
I used these heavy duty terminals to fit on th heavy gage car battery jumper cables and screwed them
tight to the terminal strip.
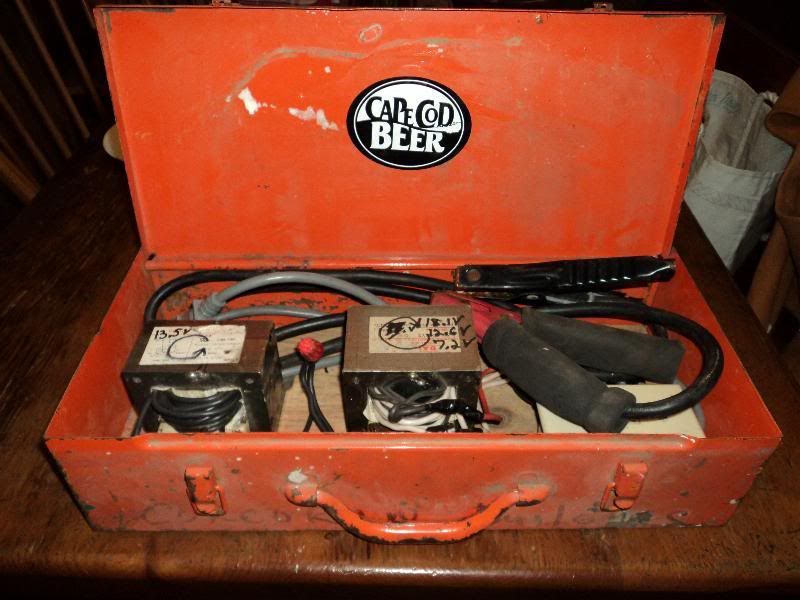
So this is it crammed in an old Sawzall boxed tucked in, Waiting to be pluged in and used. Hope you
like it and I'll update later to show how it works.
Graylock
be upgraded from the get go or later. The mad scientist thing is appealing to me because I just like
to see how things work so this may be to some a little crude.
House business first. I like mine and I'd like to keep it. This is not a toy and there are dangers you
could encounter that could really mess up your day or your life. It won't help to say I told you so
when your stretched out on your shop floor. If this makes you a bit nervous or don't think you have
the skills then stop here and buy a welder. These are not intructions to build one of these welders
but a diary of how I built mine. Many people have built them differently. If you have confidence in
your abilities then continue. OK
FIGURE ONE
These are the parts I started out with and some tools I used. On the left I used #10 wire that an
electrician had taken from a house. I think it came from a stove. You need about 20 to 25 feet of it for each transformer.
I stripped the outer casing to find a black, a white, and a bare ground wire. I also had some smaller
lengths that I will use on the transformer with the taps coming out of it. The black wire I will use
on the other transformer in one long wrap.
The gray cord was from a computer. The orange box was from a Sawzall tool that was thrown out. The
black wire inside is a jumper cable for a car. The battery terminal clamps can be used but it's much
better to go to Harbor Freight and get a set of cheap ground clamps and stick holder.
On the bottom of figure one there is a terminal strip that I got from a discarded hot tub. It was
beefier than a store bought one I had. This strip should be rated to handle the load. Also shown are
some terminal ends I had along with the wire nuts and clamps.
Far right in figure one is a soldering iron and a volt meter. The gray cord is from an appliance that
had push on terminal connectors on it so that I could quickly and easily test my transformers with it.
Lets get wrapping.
First you have to get two transformers from microwave ovens. Inside is a capacitor that could kill you
or harm you, not a good thing to mess with. It may have a charge in it when you remove the
transformers so don't mess with either of the it's terminals. Some people discharge it by grounding it out but
I never learned those skills so I take a nonconducting wooden stick and pop the leads off and stay
away from it. If this is something your not sure of find someone who is to help you or forget it and
buy a welder. Be safe. Once you have the transformers in your hand your good to go.
So here is what you work with at your bench. You are removing the secondary coils which are the thin
wires with a gazillion winds. Do not harm the primary windings, About 150 winds more or less, made
from thicker gauge wire. Also there is another wire in there only a few wraps and sheathed in a
covering. This would be the filiament winding and it gets taken out. I sometimes clamp the transformer
down and take a chisel to the wire being careful not to harm the other coil. Then you take a punch
like that sawed off crank from a cottered bottom bracket and punch the wire out.
This is what you end up with. This thing marked shunt are to be left in and is important to the
electromagnetic thing that goes on. It needs to be there so leave it in. Also you can see the wooden
wedges I have ready to hold the wire while I pulled it through.
Here are the transformers that have been eyeballed and marked to show which direction the windings
will go. What I did is look at the primary windings to see which way they were wound starting at the
bottom so that the wire I wound goes the same way. Not all the transformers are wound the same
direction or are the same size for that matter.
I stripped the wire with this electrician type knife. This worked well and better than a razor knife.
Don't cut yourself if you do this.
This is the begining of my windings and shows a neat job of it. Using the wooden wedges to hold the
wire and an old screwdriver with worn edges I packed it in there nice and tight.The vertical piece of
wood is to hold the wire away from the sharp edges as you pull the wire around. You have to be
carefull not to cut the wire on the corners, there will be a little skuffing scrapes put don't cut
into the wire.
When I wind I like to keep a tally going or I'll lose track. They say to wind 20 wraps but of all the
ones I have wound I have gotten about 16 to 18 in there. The list also shows at what winding I left a
little out to solder on a wire to extend the tap away from the coil.The wires in the foreground are
the first in red. The second and last are white. The black is the begining of the wind.
When I fired up the primary coil these were my readings. Not too shabby and I'm pleased with it.
This is my second transformer and was wound counter clockwise to match the primary coil. You can see
the wood wedge that was pounded in from the back. This also was winding tight and in a neat wind for
17 turns.
This was my reading and I'm not happy with it. It should be more but the primary coil winding may
cause this, to many or not enough winds. It was from a small Microwave oven. This still maybe OK for
now and I can always exchange it later.
This is a bare bones schematic of whats going on. The primarys are wired in parallel and the secondary
are wired in series.
So whats up with this reading, I should be getting about 30 volts and not 4. Perfect, now I'll show you
how to fix this. It's a 50-50 chance that this will happen to you. This is called phasing, easy to fix
by switching over two primary leads.
This black and white leads will be reversed .....
.....to this.
Much better! I clamped the meter leads down and got 31.8 volts. When I just touched the meter leads I
got a little less.
These are the readings I got from the different taps. I don't think its all that bad and it's got a
decent spread. This should be fine.
I used these heavy duty terminals to fit on th heavy gage car battery jumper cables and screwed them
tight to the terminal strip.
So this is it crammed in an old Sawzall boxed tucked in, Waiting to be pluged in and used. Hope you
like it and I'll update later to show how it works.
Graylock

 Anyway... what's with the picture of Larry :? :lol: :lol: :?