post-war Manton & Smith

Rat Rod Bikes Bicycle Forum

Help Support Rat Rod Bikes Bicycle Forum:

This site may earn a commission from merchant affiliate links, including eBay, Amazon, and others.
Joined
Feb 20, 2013
Messages
15
Reaction score
0
Rating - 0%
0   0   0
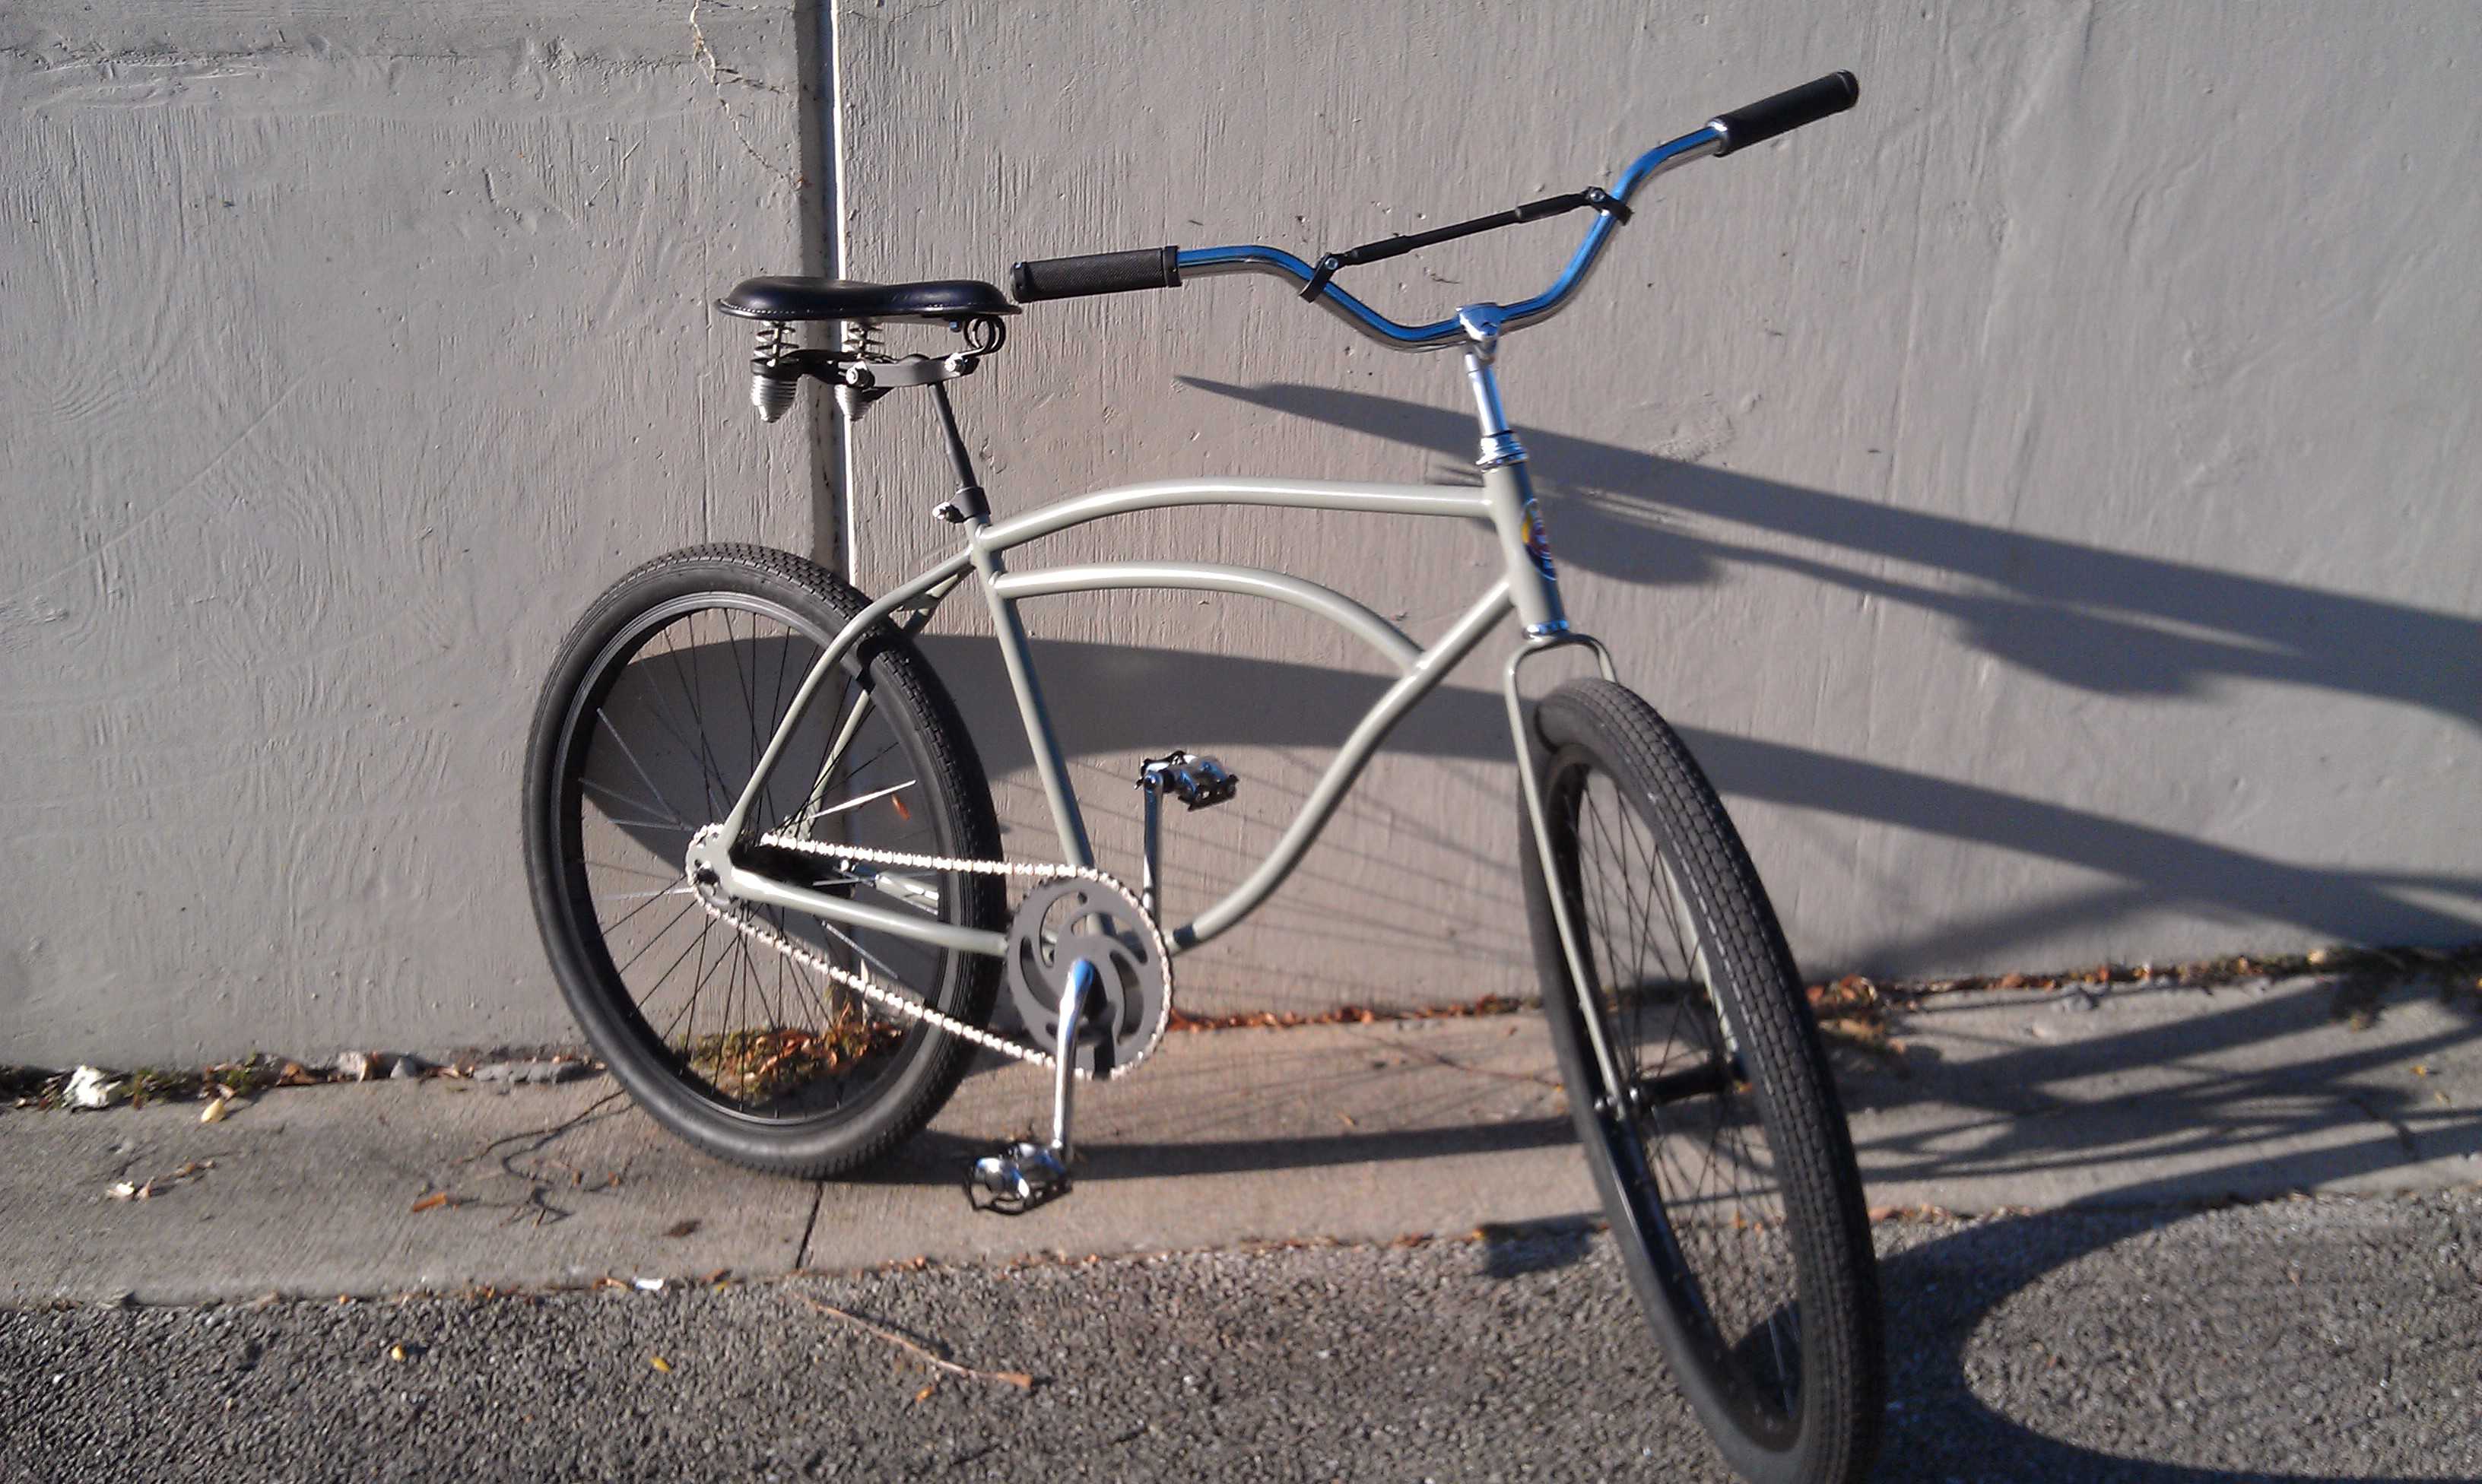
hi all, newbie here; Manton & Smith I finished last summer, have put a ton of miles on it so far with no problems at all except some rear hub tweaking.

Started with a beat-up frame my bro gave me in '95 I think, it hung on my various apartment walls for years until I worked up the mojo to tackle it.
P1040456_zps3d830974.jpg

P1040461_zps424ab14e.jpg


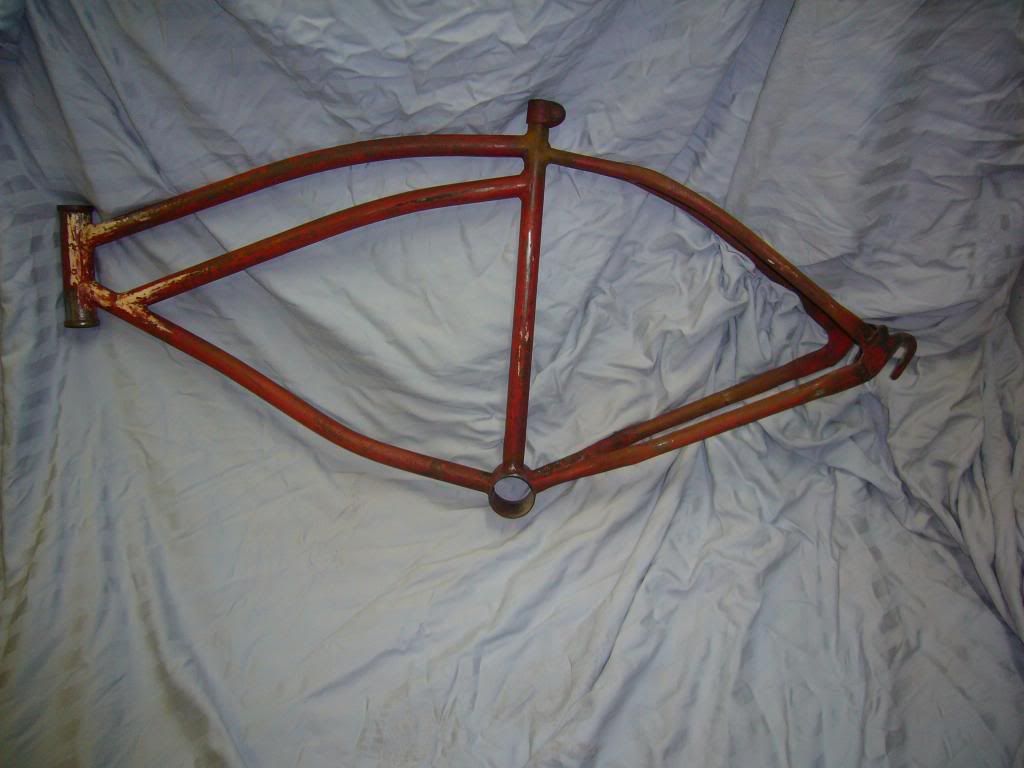
The chain stays were badly crushed on both sides from repeated kick stand over tightenings
P1040464_zps0386160a.jpg

P1040465_zpsaedecfb4.jpg

P1040564_zps285c09b0.jpg


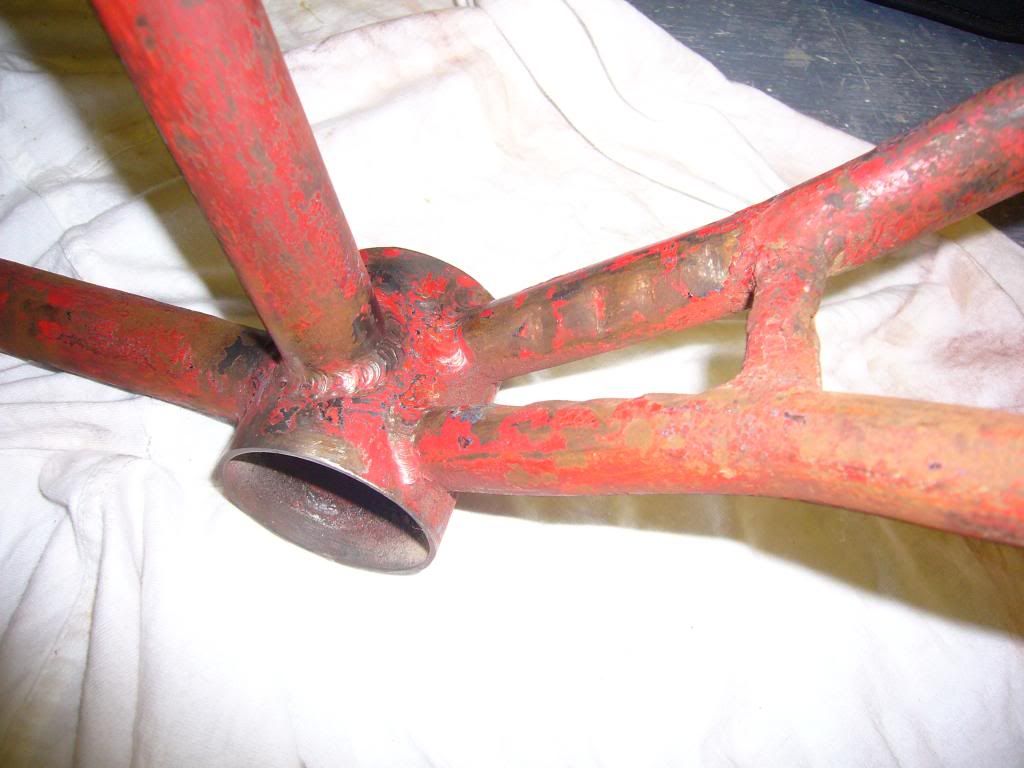
but some metal work got that area patched pretty nicely, the cross-brace/lower fender mount was attended to after this pic was taken.
P1040681_zps74c4b676.jpg


Frame was twisted on almost every axis, took a lot of jigging to get it straight; the seat stays are still not totally evenly centred, but it it is straight and rides perfectly without any crabbing.

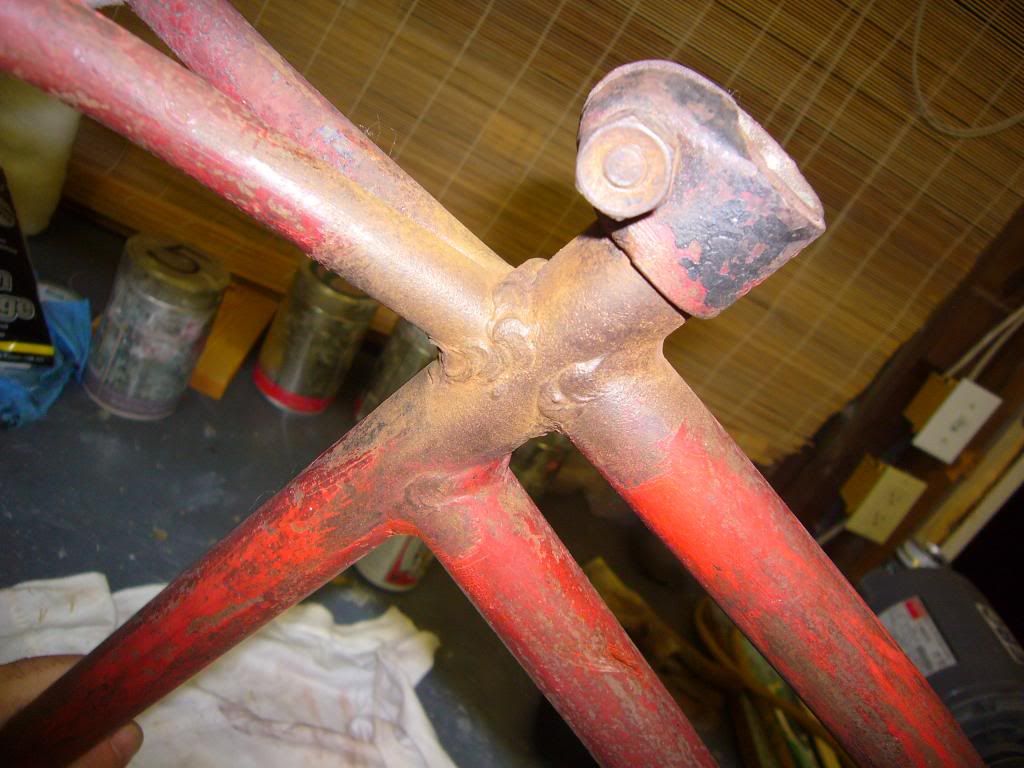
Here after blasting, lots of JB Weld slathered on
IMG_2201_zps6a476c6a.jpg


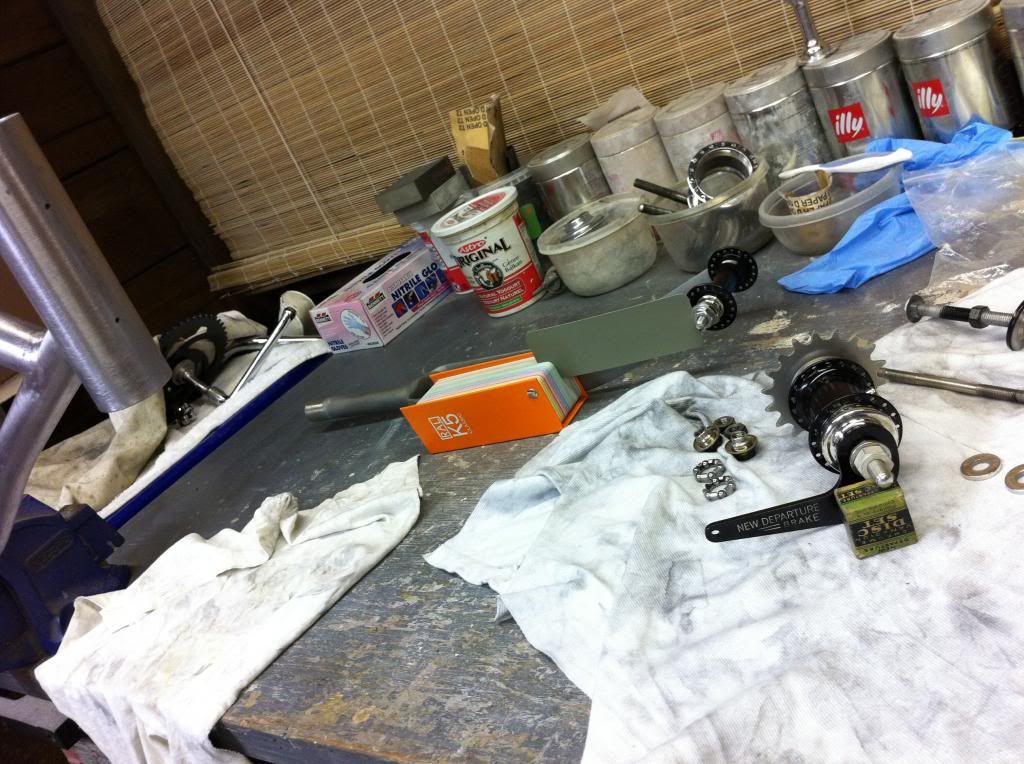
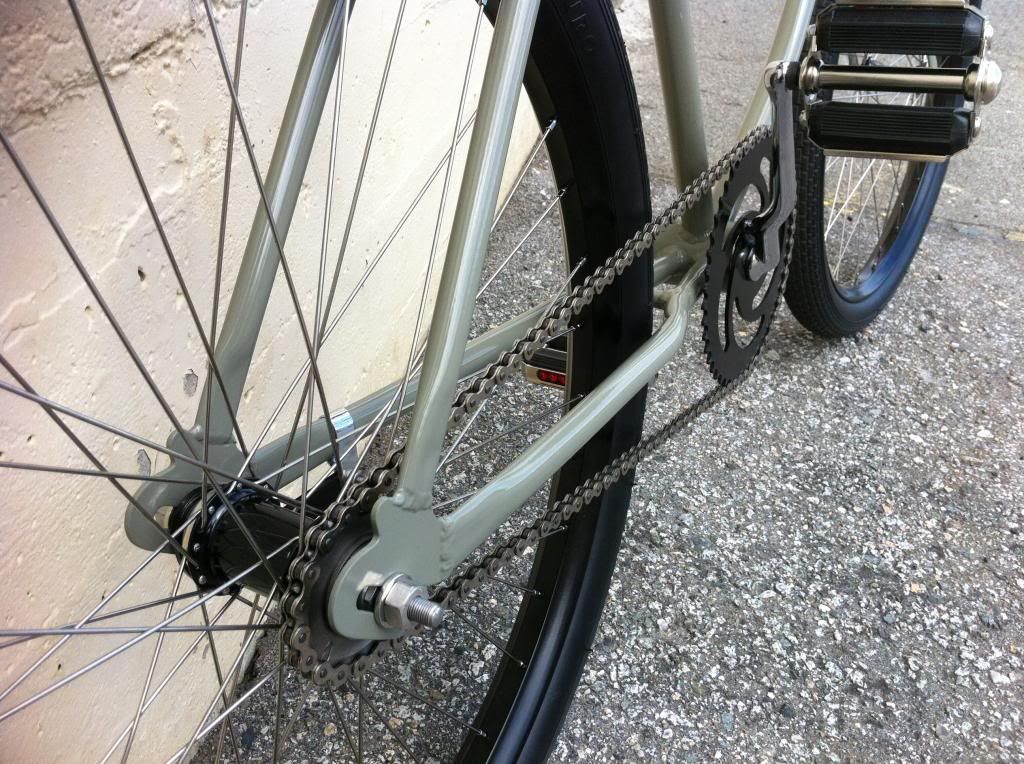
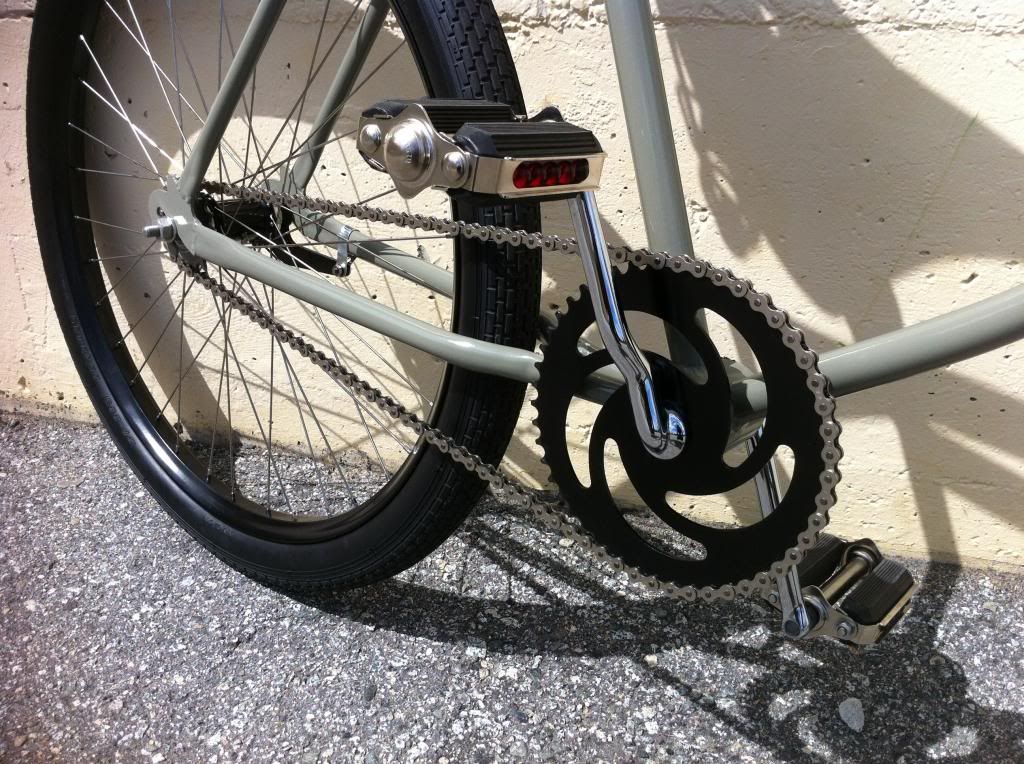
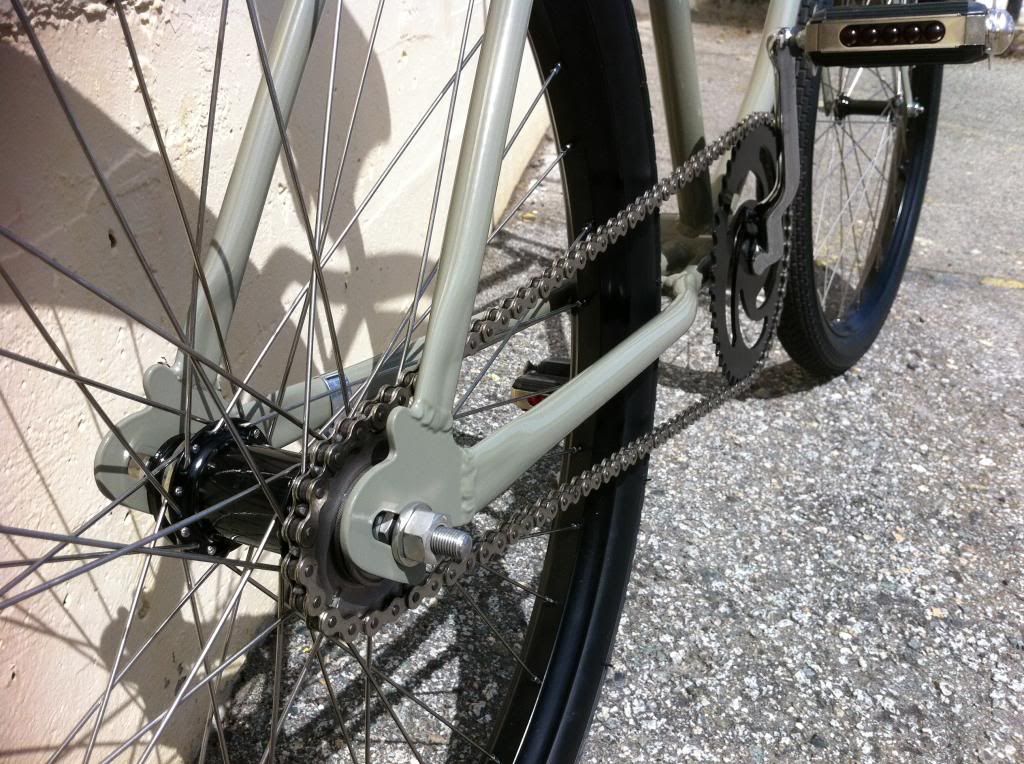
Bought a set of pre-war drop centre rims with ND hubs; the rims were quite rusty so I went repro, bead blasted and powder coated semi-gloss black. The hubs had lots of rust so I bead blasted them, cleaned them up on my poor mans lathe (drill in the vice with a long bolt as a mandrel) until they were good enough for a baked-on Rustoleum black finish, this to emulate "war time" black-out chrome. Brake arm is NOS war-time production. Saw-blade sprocket also blasted & painted. Swapped out the skip tooth sprocket on the rear hub for a regular one. NOS bearings and disc set, all parts zinc plated with a home Eastwood kit and buffed.
IMG_2211_zpse68daf82.jpg


And the finished product, powder coated RAL 7003 Moss Grey, good match for RLM 02 (Luftwaffe aircraft interior colour & early war exterior camo colour). Crank is rechromed from a Monark, but I have since sourced an orig M&S unit that will eventually go in. Headset pieced together from rusty crap, again de-rusted, poor man lathed, zinc plated & buffed (except the top nut, that was rechromed). Torrington neck, also rechromed, started with the rustiest pos I've ever seen that had been rattle-canned silver... NOS headbadge from eBay, took some very small stainless machine screws that had tall heads on them, then filed the heads down until the slots were gone; then gave them a bit of a round over and used those instead of rivets. Lock-tighted the nuts inside the head tube after suitably shortening the screws. Used a set of Schwinn forks from a '61 Hollywood I rebuilt 20 years ago and swapped a front brake set onto, suitably neck shortened:
IMG_2327_zps35e848dd.jpg

IMG_2326_zpsf80ad220.jpg

IMG_2328_zps169acef1.jpg

IMG_2331_zps2000fea0.jpg

IMG_2334_zpsa4984a6c.jpg


Left the welds as they were (although the one at the top of the seat stays had to be touched-up) as this seems to be a Manton & Smith trademark feature....
IMG_2339_zpsd5d4c229.jpg

IMG_2340_zpsa0b868c6.jpg

IMG_2341_zps751d1731.jpg


It's a blast to ride, although the 48 tooth front sprocket takes a bit of muscle compared to the 46 tooth Schwinns I'm used to, and the pre-war frame geometry took a while to adapt to...it's literally painful.

cheers

greg v.
 
Great job! I like the color choice.

How did you repair the chain stays? Did you cut away the damaged metal or just go over it? Also, I've never seen JB Weld used for filler. Is that something specific for powder coating? By the way, I'm also a fan of those Eastwood kits.
 
hi guys

glad you like it! Have to admit I almost gave up on it a few times, it was so bent out of shape everywhere. Yes, the JB Weld is one of the only options to use as filler when powder coating (that I know of), as it doesn't seem to melt during the process and it also resists (to a certain degree) any further media blasting seen fit by the coaters.

We (my metal guy & I) considered cutting the chain stays out & replacing them, but it seemed pretty drastic. Instead we borrowed a page from the body shop guys, and tacked some rods onto the affected areas, then slid a weight onto the rod and bent an L into the end; voila, body-shop style dent puller. Heat the area up good and red hot, then gently pull the dents out. It actually worked fairly well. The rest of the areas that wouldn't go back into shape were simply filled with weld and metal shaped.

P1040568_zpsf6d6075c.jpg

P1040567_zps2b6f450c.jpg

P1040569_zps697cb8e1.jpg

P1040570_zps8761c471.jpg

P1040667_zps89be5fa5.jpg

P1040666_zps262a912e.jpg

There was more filling done after this stage, but this was the basic shaping & filling done.


Love the Eastwood zinc plating kit, being using them for years. It's amazing what you can do in your own workshop with basic tools using this system!

Headset parts & bb cups before plating:
IMG_1485_zps8faa01ed.jpg


Hub shells and sprocket after painting, before being baked:
IMG_2176_zpse2dab6a7.jpg

IMG_2177_zpsb451d652.jpg


And here's the bike after I dry-built it; figured I'd put it together and ride it to make sure it actually rode straight, and the frame didn't come apart, before investing any further time money & effort into it. The rainbow of colours is me trying to figure out what colour to go with.
IMG_1350_zps4f3fbf3c.jpg

First ride for this bike in probably decades maybe? Refreshment stop......my bro posing with his '62 Schwinn American in the b/g, also a "rescue" bike that came with many dents, he's now running it with all vintage alloy components (except for the Bendix RB2 in the back) and cool bmx bars
IMG_1348_zps0199dc8e.jpg


And my favorite pic of the build; one winter night when it was below freezing I wiped the frame with some wax & grease remover and shot it with a coat of clear from a 25 year old can of cheap paint; it looked great! I would have left it like this, but the subsequent heating during the rest of the straightening process left almost none of the original finish.
IMG_0186_zps430ee900.jpg

I did document the original stripes etc. with lots of photos, sketches and dimensions, just in case I ever want to go back to the red & cream livery.

As far as I can tell this bike was probably made sometime 1948 - '53; thoughts?

cheers

greg v.
 
Man that bike is beautiful.i am a welder/ metal fabricator by trade and I can totally appreciate those gas welded joints,please never cover those up.awesome job.im in the process of saving a 52 spitfire that served 40 + years in a shipyard as a runner.your bike is a true inspiration.
 
That's really amazing work - I wouldn't have the guts to tackle that project. Excellent finished bike!
 
hi guys

thanks for the kind words, much credit goes to my friend Troy who handled all the metal work and managed to get this thing straight. He also marveled at the original welds....

That shipyard runner Spitfire sounds like an interesting and challenging project, are you doing a build thread? Be interested to see that!

cheers

greg v.
 
That turned out awesome ! I have the rat version and it makes me want to do a redo. the frame was powder coated ? I keep trying for that badge -m ebay I always miss out on the bid then the same group of 3 show up a few months later are they NOR( new old repops)? Here's mine my frame is in perfect shape the house paint must have protected it!


Uploaded with ImageShack.us
 
hey Gary, great looking bike! I think I came across pictures of yours when I was doing research on mine, if it's the same bike.

Yup, my frame was powder coated, I didn't want to deal with paint chipping off the dropouts etc., and I also didn't feel like dealing with trying to get someone to $pray the frame for me. Plus I was pretty fixated on matching RLM 02, and the RAL powder coating fan deck has a very close if not exact match.

Is your bike pre-war or post-war? Which headbadge are you looking for? Pacer? Winton? Seneca? I think yours is a Pacer correct? Lemme look through my stash, I might have another one, not too sure. I can tell you I was glad to get the "Special", that's for sure! Not sure if the headbadges that come up on ebay are repro or not, seems like a very limited market if they are; I'm betting they are NOS.

I've had really good results with a 3-step cleaner/polishing/wax treatment on my frames, if you're interested in keeping your paint; I'll track down the products and get back to you.

cheers

greg v.
 
hey Gary

does this interest you?

photo1_zpse9006ac5.jpg


And here's the 3-step paint system I use; picked up the tip from a great guy on a Schwinn forum.

photo2_zpscbfab7a3.jpg


lmk about the headbadge, it is surplus to my needs. I also have one that says "Winton" on it.

cheers

greg v.
 
Greg it is the Pacer pm me a price if you want to let it go. I think my frame is the same as yours I'm going to look at it closer later I don't Remember the weld at the dropouts though. I need to get out and find a powder coaster that's reasonable. My last build was done in this style Street Rod I call it as opposed to rat rod. Here's the link to my CWC Roadmaster I'm working on an AMF Roadmaster Westpiont now.http://www.ratrodbikes.com/forum/vi ... 21&t=61993
 
hi Gary

pm sent on the headbadge.

Your M&S frame looks very similar to mine, but your middle tube curves downwards towards the front where it meets the bottom tube. I have looked and looked but have not seen a frame exactly like mine; lots similar, but nothing exact. Not that it really matters, but I'd be curious to know what mine was originally badged as; it could have been a Nonpareil for all I know, although those seem to have "M & S Co." stamped on one of the rear dropouts.

Checked your build thread on your CWC Roadmaster, that's an amazing build! Beautiful! Love the flat black with the tasty bits.

cheers

greg v.
 
went through the photos I'd collected while researching my build, and I came across these that I'd forgotten about. I think I grabbed these from eBay but I can't be sure, so I'm posting them without consent from the rightful owner; if he/she sees these and wants me to remove please let me know.

So looks like this is exactly like mine, so maybe it was a Seneca?

Screenshot2011-04-06at10230PM_zpsaea73591.png

Screenshot2011-04-06at10241PM_zpsad4878c4.png

Screenshot2011-04-06at10235PM_zps07e583a4.png

Screenshot2011-04-06at10246PM_zps80da158d.png


Although when I documented the original paint on my frame, the details looked to be a perfect match to this straight bar; this is the bike I basically used as inspiration for parts & finishes (except the paint obviously). Also taken from eBay, ditto for the legalese comment above on the photos:
Nonpareil_Manton___Smith_140598_zpsbd5bee88.jpg

Nonpareil_Manton___Smith_140598_12_zps7875391f.jpg

Nonpareil_Manton___Smith_140598_11_zps096a1ad3.jpg

Nonpareil_Manton___Smith_140598_10_zps787a75a1.jpg

Nonpareil_Manton___Smith_140598_13_zps49554017.jpg

Nonpareil_Manton___Smith_140598_14_zps338f401c.jpg

Nonpareil_Manton___Smith_140598_20_zps9c46357b.jpg

Nonpareil_Manton___Smith_140598_9_zps901c3ec2.jpg

Nonpareil_Manton___Smith_140598_21_zpsed4e6082.jpg

Nonpareil_Manton___Smith_140598_8_zps257fb8b1.jpg

Nonpareil_Manton___Smith_140598_1_zpsb7097300.jpg

Nonpareil_Manton___Smith_140598_2_zps5bb3fb60.jpg

Nonpareil_Manton___Smith_140598_3_zpsfc1620e6.jpg

Nonpareil_Manton___Smith_140598_6_zps5728e1c0.jpg

Nonpareil_Manton___Smith_140598_5_zps5205acb2.jpg

Nonpareil_Manton___Smith_140598_4_zps90bf14f9.jpg
 
And a well deserved Bike of the Day yesterday! I was so taken by the job you did that i did not notice that the middle bar hits the down tube straight and mine curves in :oops:
 
Going to do a sibling build to this with my M&S same color maybe a 2spd kickback alum rims and headbadge from Gregv. Greg's bike is one of the cleanest builds I have seen!
 
There sure isn't much on Manton and Smith bikes out there. I have a frame that is supposed to be one.
 
hi guys

got the bike broken apart down right now for maintenance; riding it in the winter did a number on some of the metal parts, and I wanted to put a new set of rubber on it as well as a few other small details to attend to. Overall it's held up really well, but I noticed that the rechromed Monark crank is quite bent; when viewed from the side the arms are no longer 180˚ apart, one arm is about 5˚ out. Not sure if it was like this when I got it (I think I would have noticed) or if it has been bending during riding; I'll post some pics later. At any rate I've got a genuine M&S crank to go in, I'm seriously considering getting it Magnafluxed before having it chromed. I really do not want to experience a crank failure on a bike with no front brake and just a coaster in back, especially on some of the hills around here....

Kingfish254, you got any pics of your frame? There's a couple of tell-tales of an M&S frame that might be visible.

cheers

greg v.
 
small update, got the gennie M&S crank rechromed. With the prices for chroming being what they are, I decided to have the crank Magnafluxed beforehand, got it done for $30 at a local high-performance engine machine shop. It came through with flying colors.


Not really visible in the photos but as with the frame the M&S manufacturing finish leaves a little to be desired; there were some quite obvious seam depressions from the forging process that I asked the chromers to leave in, both to keep the character of the piece and to keep as much meat on it as possible.

Just have to finish re-finishing some of the other metal parts (almost done, the previous chrome shop's work was a bit on the low side....) and I can get the bike back together.

cheers

greg v.
 
Older?younger brother almost done.

ykjg.jpg
 
Back
Top