Ten Turing - Tales from the Coalshed: Coming of the Coalshed Racer

Rat Rod Bikes Bicycle Forum

Help Support Rat Rod Bikes Bicycle Forum:

This site may earn a commission from merchant affiliate links, including eBay, Amazon, and others.
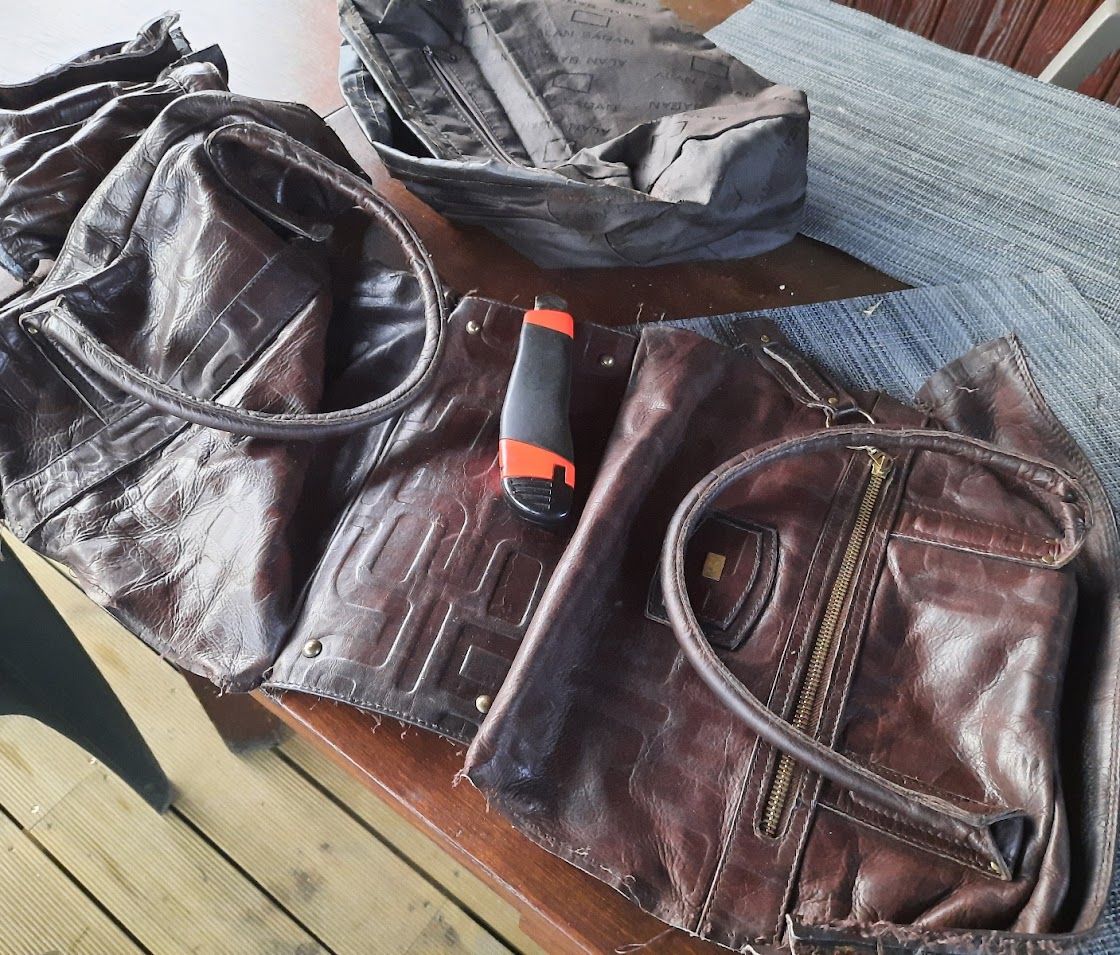
I found the leather, under the sink-to-be in the coalshed.
AM-JKLX0CTQpvALZoQqzuEub9QjfI11wNlHttqEkmMjlVc63-zy6z406A1_BE65wDrG_Ip5QtqgklU1EI3zURcHyrL0VZqghnszybOlU_iT5njf5v2WAbIB2mVr_YGTmXMkH4Nbxq4lJq52CHDgmkijm7YQkEg=w1120-h955-no


As you can see it once-was-a-handbag, that I found lying beside the dumpster outside our block in the city, in that place reserved for items which the former owner considered to have value, just not to them. I just need to remove the handle from the non-zipped side and I should have a piece big enough to cover my saddle, with enough left over for other projects - like a saddlebag. Even the ends of the bag might prove useful, as they were like small pockets.

I have a number of big needles and some pointy tools I found here in the kitchen and the attic, from the times when they used to repair their own saddlery and stuff. They might prove useful in the near future.

See how I have even reused the liner - turned inside out as a bag to store the bits of leather and lining!

#romet #turing
Cool! Yet another case of a smart recycling! :)
 
Success!

AM-JKLWy5GSs-_9vV_wc-4i_PTFqaBg-9c1km7_3prm2H5wjbXL6_GkE7qXcqPdS0p6X0kMjXftKeWqxehwYeCobM34U93FAxtrrRUTjfhpV_V6OzS_9UFLa0p_U-iV2Dxa6VhEXOGGaSq1Xzwr0zSRu9cXztg=w939-h955-no

While this might at first glance appear to be some plumbing, it is actually my new derailleur gear removal tool. After breaking my vice trying to remove the derailleur gear set from the wheel intended for Ten Turing I had to come up with a new plan, one that avoided any use of power to mount a new vice (if I had one) on my bench (if it were finished enough). I already had some of the pipe as a lever bar, so all I had to do was buy a T-piece, a half-inch drive T-bar that I could take apart and a 21mm socket. I filed down the ball at one end of the T-bar handle to allow it to be removed, then reassembled it inside the pipe T-connector - and fitted the socket.

Fit the derailleur gearset removal tool into the gearset, insert the other end into the 21mm socket, put one end of the pipe on the ground, get a good grip on the tire and heave on the wheel until the gearset releases from the wheel.

Which it did!

Now I am just one frozen nipple away from stripping the wheel down, and then after fixing the light rust on the spokes I am all set for the next round of painting.

And the 6-peed derailleur gearset - I already plan to fit it to Zenit to replace the original 3-speed derailleur.
 
I am trying to get some paying work done, but they are rewiring the house today and sometimes the old aluminium wiring crackles and blows the fuse. Aluminium wire wrapped in cloth and running through steel pipes - what could be wrong with that? The police were also around earlier because we bought a field along with the farm (well, you would), and they wanted to check that we were actually growing something there as that was one of the conditions. I think they also wanted to see whether we were growing illegal things, being close to the borders with Belarus and Ukraine. The electrician was worried that the police had come to check whether the two Ukrainians he has are employed legally... ;)

I don't know when they will get around to finishing off wiring the coalshed and connecting it up, there are so many things in an old house that can delay things. Still, here is the current state of play with my coalshed, with its 'new' but unfinished workbench.
AM-JKLVzFY2QNd1Y5tp63THZHksaol73ymF4N-2i0te0ybo3jTNr0JN6YFROC9jGxShv6QlRvFrnFOnolizff1UOXnqSmRl5OFzvD9mzmeH8aZEaI0sqUvT4s_fDvD-tK-fui7P_a3GpC8bmw4OdIXkGNHjDLg=w972-h955-no

Last night Ten Turing was back in there, but now it has returned to the barn as my coalshed is also used to store the electrician's goods.

If you look closely (and even I have to look closely sometimes to see progress on this project) you can see a cable and gear lever attached to the frame. I thought about putting the lever on the upper downtube, but the clamp was not big enough and so now it is on the handlebars. I was also going to use the cable mounts from the Dutch bike, complete with little nylon wheel, but decided that was too trad. Instead I taped the gear cable housing all the way down to the rear stays - before realizing that modern housing is smaller diameter than traditional stuff and was loose in the lever and whatever I had to fix the rear end - the adjuster off a brake calliper as it happens.

The plan is to use my handlebar wrap to wrap the cable on the downtube, then black duct tape on the rear stays. All I need now is a little bracket to mount the brake calliper adjuster, so a trip to the rusty bits box in the attic is called for. The alternative is to put my farmer's cap on and hammer a nail flat to make the bracket, because every bike I have ever had from a farmer here has used nails in some form to keep it running.
 
...and two weeks later.

I have been on vacation, and because I work as an editor on my computer all day - when I vacation my computer sits and gathers dust.

So what amazing things have I done on my bike you may ask.

Less than I could have. We had the whole house rewiring project to see to completion, the laying of concrete to keep the front of the cottage from sliding off, the picking of cherries, the riding of bikes, the sleeping in the afternoons when it was too hot to do anything.

Now, though, I must upload pictures.
 
I did get something done, I got my coalshed into some kind of working order.

See the light!
See the power sockets!
See the space!

See the painted cranks for Ten Turing!

AM-JKLXw-bRIaB_pu6Zt0WKPtoaALdVoTMr5r6NvuO0yj5Dpp2Ee9c5qUJY2unRAY-WSIerNP7CX27mCRHy5j0M8KLfUkgNdpa8G99mDHVQpAXRPKAzwRGiP64CNak1wESNYSRiP6Rt5VEFBK_QNVx4cCfPrfQ=w795-h955-no


See the aluminium rims for Ten Turing, hiding behind the original Romet rims I took off the Turing - sanded, derusted, undercoated and, since the picture was taken, painted.
 
The weather has been good for riding, and it is so easy to put a folder in the back of a car and go somewhere interesting for a ride. My favourite ride is Tigger, my unbranded Romet Jubilat 2, and in terms of mods it is the direct predecessor of Ten Turing. I need to lift the rear fender slightly to prevent the knobbles on the tire lightly tapping it - ting, ting, ting.... Originally it had street tires, and I would be very happy if I could find another tire to match the rear. I have a pair of the Btwins on my Jubilat field bike, and they are fine to ride and look good from the riding position, but not so good from the side.

For Ten Turing I have a mudguard to cut up and fit - once I get the wheels rebuilt and installed to get the alignment right.

el4CRBL3MRj8eNFAVzC_fYtHeEwhAxjgfsro7QpfHqKpage9l8NRgwxBXJ4-8bkCf45fvICsPV8-MFaeM1UMFBBTdhJyj8l3jb_Hmxc_USCE64SpFTut3vCbJD5Ex52sBW8tVfgCMdRmyhcr8S8skuEk1ws56tGqL93jI4ULL6UfppZ94Lj0PtkPxW_rlcEDWXDoYrxl8pv0ru_cFnRbzzI0NA2Sa8LenbVmsMQ10Aavv4OT5EeX8MqrKIDjNyY-BLn094DME3zL42mm1HqvppeWZjT7cdhti_kZOvN6azKAuHOHGeElnmRCsxoKoZxsHoLDeO5OzckmsuBeqskyaopu2pzCPnE4N19C8gzVEENM7njLp3upaeh1AJNi1yHr8Uok9BrP0vEpkngyk6QvdcsuUZGyYoChuk1-UkibP4c1u-2qhATZMufb0ZvZh4pJ--atGfu-unZu_Dfo5xEuXKj6HfyAPpMVPYk16FFljLPVabqTHAIiTZVLXihhNuWAdQKyKit8QFDCfPZ3N16Htdlt-2fYlOvHtWlYe-nw02GeJU8D-CmxqbI18ctWp8ZoeE9xBAyZ8tDnqj7q48gSFDIkd9yYOs08JColQ3ThCSOSTutDDEcR2xMkJaVcDKWUsZDjgRE8Eo9IsJ2a54Oa8yhddJzOicneLQdpt6WyDewKhkGzI6ODKVn-A4y-62Myf4OR8pLpPUxhFmeaYtKn14C7ng=w941-h955-no
 
The front sprocket and the spokes are officially green.

I was not sure how they were going to come out as the green was a bit bright straight from the can, so I sprayed everything satin black first, then sprayed the green over it. I have since applied a gloss transparent layer over the top, but I am not sure whether I have finished there. I don't want all the colour to be matt as I have chrome hubs and bars plus satin aluminium wheel rims.

Lurking in the box is also a chrome mudguard, original equipment for the Jubilat in my previous post. I know I am going to cut it, how I plan to cut it, but not whether I should paint it. It could end up the same green, which I like to think of as British Racing Green, and which on a race car would normally be gloss.

Now I want to rebuild the wheels so that I can start making decisions on colour and, of course, where everything is going to fit.
AM-JKLVd20MCbYxG5ztSgF7IrLhHCqWk7mc6j0xuw_JgJzTMTzx1fNweG-VYZVEQmoNHu5kqiiBC29EUS3c2gYPALX_eduv1WcxfhNjIMMFbRnZF24R-abz6ZwDYU75ZiPx_snHOMP51lO536444zcpFlM1yYQ=w827-h955-no


Does anyone have any good advice on how to clean up a pair of tires? I only have the now cracked and stained but original 26" Stomil Zebra's for it as most of my tires are 24". I would like to replace them, but I can't find a decent used pair at a decent price that fit the look. I am tempted to buy a cheap Bike Shaped Object to harvest for the tires and other parts.
 
Let's play Spot What's Missing:

AM-JKLUMAByOTaTX8M5hJM8E1xMQuQOY0BJihKQlmvHUGC6LRDuTA_-6VFpgGZujC8PBM_83bAGOiWwQn4J1j3FLYTmSY0-3U72rwTdcOYFDTjfe571buVFuwqHw5wu93ZFeIWrFj1EBoWpColkqTR4yZH0VJA=w914-h955-no


I have indeed lost a spoke somewhere in my coalshed, and it could even have ended up in the electricians' gear as they were a bit messy. To be honest I really need a new set as my neighbour, whose bike the rims and spokes came from, is an expert with pigeons but less so when it comes to looking after cats and bikes. How does one measure a spoke?

Anyway, it is at least assembled enough to progress on other things, including an overhaul of that fat hub. Now to put a tire on it.
 
Meet my lovely assistant, the fair Krówka!

OK, so her name means 'little cow', but in an affectionate way. She is my neighbours cat, and visits regularly for some companionship (and she is dozing on my lap as I type). She never used to come into my workshop all the time it looked and smelt like a coalshed, but now it is somewhere a girl like her feels she can hang out.

AM-JKLUEy-DcIQ2oQZs-CNOrApKl60na7DW3q2f7KSghGWmtGVoqsHRDS3GyhkET_-ycbmQt1HH_WqLNY-3YUbPGKIhBHX3AA8Flc8Ok7lV5K31Tp_ERKHOq5fywDtbJ4jB_DYm6MnsBxd7nGTElN9SnpcWVBw=w879-h955-no


As you can see, the tubes are out.
 
My neighbor's cat always swings by the BACK40 if I'm out there in the mornings. She makes another pass just before dusk, those are her hunting times. I'll try to get a photo. She's not the 'cuddly' type!

Really like how the coal shed is shaping up! It will be a great place to hang out and 'get away' from life for a bit if the need arises.
 
It is certainly somewhere to go when I have had enough of working on the computer, a mere stroll away up the yard.

I find that cats can be surprisingly communal. Our other regular visitor, although 'visitor' is a loose term as he can hang out on our back porch for days, is like the James Bond of the village, think Sean Connery in a white dinner jacket - and we have regular visits from his girlfriends, who come slinking in looking for him, even when he is not there.
 
IT LIVES!

AM-JKLX7BDcI3TV8-T5j4Ti-pmU9TyCSnZs8ziKggqbz7tlviXta_JVionmAdfa-5132UpHoc1XdHaQc6rtEeHpimMg_nliZKx6RNQwDdemS4JUAMEwDp2bojrqfYKIi1AwUerQTjwVCeYJlCAo6AAPLIpFs9Q=w1118-h955-no


After spending the last month or so on its back, being moved back and forth between the coalshed and the brick barn, and waiting while I devised some method of removing the hardest-to-shift derailleur hub I have ever had, it is again right side up.

And I am pleased with the replacement aluminium rims from the neighbour's Kross, instead of the stock steel Romet ones it came with, and the original tires seem to sit well on them. Can you see the green on the spokes? Neither can I in this photo.

The doors are the entrance to our wooden barn - everyone loves it, but not so much the traditional aroma inside.
 
After making a temporary bike stand to get everything the right way up to work on, I went back to work on the gear lever. First I tried mounting the lever as a kind of bar end lever, which I liked a lot but would have to live with an awkward cable entry angle unless I modify the internals with a file.

AM-JKLV5wnfRZJXfgHIDNmoctQRuZ8OXmsGnbAuZarTWgpfNDY7bXC7Ea3tSdqf2xSrTUhozIDzBg51UfppdBaRUHy1LFI05HEjnDb_JgG4B2WOdDp1LOdpOb3seGp0R-szZYnrPe9iWiUZPoCdfcF1IUFKIpQ=w934-h955-no


The second attempt was better for the cable, but will need some careful adjustment to make it work as a lever without it interfering with me hanging onto the handlebars for dear life while I ride it.

AM-JKLWaqmkkO1lrpmg60OZpOfBbsbfbeBBrSyJURfP4fr3tkj76gQwx4SNoLHhw2WcaDCRKFmYk5DpGENyujge3jJ0fvjMvgJv_zMSezv0PwE4vFW02ywK-CwsHlffTFvbi4rfganHo-lbhj-hP4_E5i_cesQ=w890-h955-no


This weekend I will explore some other options, such as incorporating the lever into a different switch base, but time is now running and I have a ton of other things to work on.

I wish that the ends of my handlebars did flare out like that in reality...
 
At the other end of the cable I now have all the bits to mount it properly, I just need to drill a new hole in the bracket closer to the tube and then shorten the bracket. That just leaves how to run the cable over the frame. Next week we should be making a short trip back to the city, where I plan to remove the plastic brake cable clamp from under the BB from one of my frames.

AM-JKLWn328tsK7zhfJFpusIHOURuPxgem5vWqiZo0WauU0btTMvAuar1PlS8ynDJmKE6hSRnsw2jS2oS3CIbQslmUUbk8hon7y3hmP-Svjkx259M4zcKZAyG1YYtNJ7T0LkG_53vdAZ78NSfXo9N5h2tdE28A=w939-h955-no


Since those clamps are designed to hold two cables I can use the second as part of my wiring plan. Originally the front to rear wire on these bikes runs through the frames, which while being a reasonable idea you are always left with what to do with the wire that has to remain outside. I cannot say that I am fond of wrapping thin electrical wire around the frame and so my plan is to run it down a length of brake housing, from the dynamo to the light.

In this way the electrics will look like brake cables, and should not be too messy as the only brake is in the hub. If I happen to come across a suitably sized hydraulic Y connector then one bit of brake housing would leave the dynamo, then split to head to the front and rear lights. In te meantime I just need to scavenge my stock of calliper brakes for enough fittings.
 
What about a ‘suicide’ mount on the flat section of the upper frame tube?
Without knowing your riding conditions/terrain, how often do you see yourself needing to shift gears?

I did seriously consider mounting it there at one stage, but then I decided to put the controls in one area so that the grim rider, hanging onto the handlebars on a dark, wet and cold night, would have to expend the least effort.

I think I read too many books and comics from the 1950s when I was growing up ;)
 
I finally had some real time to get on with the project on sunday, and I could no longer put off taking the saw to the last of my lightweight chrome mudguards that came with a pair of folders we purchased some 15 years ago. Before that I spent some time faffing about how to align the mudguard support - I was going to have it parallel to the ground until I tied some string between the front and rear axle and noticed that the chain stays were angled down because the centreline of the BB was lower than that of the rear wheel.

More time was wast... spent sorting through a box of mudguard supports for 24", 26" and 27" wheels, testing how they looked, before settling on the one from the same bike that had donated the front and rear hubs. Rather than shamefully hiding away the intricacies of the wire bending art within the mudguard, to gather dirt and slowly corrode, I wanted it all out there on display.

I cut the mudguards in the fork area because when you step away from the bike as a bike and look at it as a structure instead, then there is no reason why they should protude. The rear will follow a similar pattern.

AM-JKLUOTZYoN-b42N8eek6cOOyfOstO7lCaOhz883XIuRObcNGWFIAgIoHw7zhAPs-IQK8ZhSyeQgP_8rlWckcSmG5z0OdnIbVt50IewdVYORi59ZgB_KehHnNWLi2C43N4B5XYzWkfiQ2UlOBG8XrRtRkg7g=w901-h955-no


The '96' on the frame number, proudly displayed on the front of the bike, is also the year of manufacture. I should really use that number elsewhere on the build.... I wonder if I can find vinyl numbers for sale locally?

AM-JKLW_crEvj6OfFjq3q0zwmY3kgT_QkQowqPWLnY1qD_iB0FRFyQP39o1g8UPp_-nc8X8EsFH0933hQG5i5IDXtAQMwcTPIm7-8a6Hor5RcGY-THErtJmf-bUfOjhhh9IQut6mESFY-m52PztD_Y-NqyzvdQ=w985-h955-no


I used some of the strapping left by the electricians as a mounting strap and I am in the process of filing down a coach bolt as the fork mount so that I don't have to live with a nut or bolt head right there at the front. Some careful selection of fasteners will be required as they are so visible, I will have to try wifie's patience once more, endlessly picking up, looking at and putting down nuts and bolts down at the store.
 

Latest posts

Back
Top