- COMPETITIONS
- THE COMPETITION ARCHIVES
- RRBBO OFFICIAL COMPETITIONS
- BUILD OFF 11 (2016)
- BUILD OFF 11 BUILD JOURNALS
You are using an out of date browser. It may not display this or other websites correctly.
You should upgrade or use an alternative browser.
You should upgrade or use an alternative browser.
The Morgal Flyer! Aka DrHax's Steampunk Firestone Motorbike ( Front welded up.)
- Thread starter DrHax
- Start date


Help Support Rat Rod Bikes Bicycle Forum:
This site may earn a commission from merchant affiliate
links, including eBay, Amazon, and others.
PB Blaster and a cheater bar
- Joined
- Jul 30, 2013
- Messages
- 1,923
- Reaction score
- 2,671
Yup...plenty of lube doesn't hurt. Get one side off and you can use the cheater bar to stabilize the crank, as well. Remember: the non-drive side is reverse threaded.
- Joined
- Jul 30, 2013
- Messages
- 1,923
- Reaction score
- 2,671
I didn't realize this was your first time, so glad I mentioned it.
Yes...there are a few places to exercise some care. When I teach at the co-op, I often tell students to move their wrench towards the rear of the bike to remove pedals--towards the front to install them. Then it doesn't matter what side you're on.
On a traditional one-piece Ashtabula crank, it is customary that all threads on the non-drive side are reversed. Turn the lock ring, adjustable cone, etc clockwise to loosen or remove them. The opposite is true on the drive side.
On a modern three-piece crank set, everything changes <rolls eyes> but you'll get used to it. Just being aware that a fastener might be "backwards" is enough to avoid most mishaps.
Spoke adjustment/replacement is another area that causes a lot of confusion for beginners. They're threaded traditionally, but the wrench gets its purchase in an unusual way--as if the nipple is being tightened from the inside. That's baffling for some folks, and the best cure I've found is experience, focus, and making small changes at a time. A few will "get it" immediately, but others will struggle.
Last edited:
- Joined
- Apr 23, 2016
- Messages
- 169
- Reaction score
- 219
Received a small package. Couldn't figure out what the heck it was until I squeezed it. It is the intake for the carb I got... That was quick. It got here before the carb did... or most of my parts. Thats the fastest shipped item of this build.
Also for those who know of those chinese engine intakes you see on ebay the casting is is usually horrible. The welded intakes look even worse So I opted for a cast one. I figured if it looked like crap I could always just paint it black wrap some steel wool around it and stain it with rust.
But much t surprise the casting and machining is SPOT ON!Colour me impressed! (What does the colour impressed look like? I am actually quite curious  ) So that was a lovely surprise! Also just by looking at it will fit the briggs engine with little modification and the gasket it came with looks good too! Promise! This build is getting it!
Hopefully more packages arrive tomorrow!
It is the intake for the carb I got... That was quick. It got here before the carb did... or most of my parts. Thats the fastest shipped item of this build.Also for those who know of those chinese engine intakes you see on ebay the casting is is usually horrible. The welded intakes look even worse
So I opted for a cast one. I figured if it looked like crap I could always just paint it black wrap some steel wool around it and stain it with rust.But much t surprise the casting and machining is SPOT ON!
Colour me impressed! (What does the colour impressed look like? I am actually quite curious ) So that was a lovely surprise! Also just by looking at it will fit the briggs engine with little modification and the gasket it came with looks good too! Promise! This build is getting it!Hopefully more packages arrive tomorrow!
Worth mentioning again, the left pedal is threaded opposite. Righty loosey on this side, not righty tighty. I had trouble with my original pedal on One-Liner as well. Step one is definitely PB Blaster sprayed on both sides of the pedal threads / crank arm. Slipped the four foot long pipe over the pedal-less crank arm, put the 15 mm pedal wrench firmly on the pedal to be removed, and while pushing against the bar opposite of the wrench direction, placed my foot firmly on the wrench and slowly pushed down on the wrench handle. My pedal wrench has a rubber, very grippy handle, and stayed put under my foot. It still took a bit of leg strength to get it to budge. Like I always say, anything can be accomplished with three things; tenacity, patience, and leverage.....Good to know this is my first time ever taking apart a bike to frame level. Any other advice you guys can give me so I don't destroy something?
- Joined
- Apr 23, 2016
- Messages
- 169
- Reaction score
- 219
had a horrible day at work today..but I walked through door hoping for a package to see Instead much to my glee I had a MAY POST OFFICE CHRISTMAS!

What is from the bounty do we see that is all for me!?! Oh let us wait individually for us to see! (Okay I'll stop) One of the packages I noticed right off of the back was this guy from india

I wonder whats inside! Lets open the others first!

My carb arrived! With throttle cable and everything(took me a moment to figure out how install the throttle. First time ever seeing a slide carb. Good news the throttle cable came with the ends already rusted.

Also please tell me I'm not the only one who sees that a skull when I look at that. It's slightly worrying.

The big box gave me a load of left over chopper parts for 18 bucks. So I got turn signals, two license plate mounts(one with a tail light) and a handle mounted switch for the turn signals.. High and low beams and apparently a horn.. Should I mount an AWOOOGAH horn on this?)
But whats in the package from the spicy land of india? Is it curry after all this is a steampunk build.
No my friends Much to your dismay I would prefer to keep my insides INSIDE of me while I am working on this build so no indian curry for me.
No what does every steampunk love and desire!
BRASS!

Yupe! My brakes and clutch lever arrived

I am happy as a clam! I can not wait to mock up the handle bar goodies. However do you guys have any suggestions on how to.. .make that handlebar switch look a bit older? I do like its functionality its just.. It's too modern looking.

What is from the bounty do we see that is all for me!?! Oh let us wait individually for us to see! (Okay I'll stop
) One of the packages I noticed right off of the back was this guy from india
I wonder whats inside!
Lets open the others first!
My carb arrived! With throttle cable and everything(took me a moment to figure out how install the throttle. First time ever seeing a slide carb. Good news the throttle cable came with the ends already rusted.

Also please tell me I'm not the only one who sees that a skull when I look at that.
It's slightly worrying.
The big box gave me a load of left over chopper parts for 18 bucks. So I got turn signals, two license plate mounts(one with a tail light) and a handle mounted switch for the turn signals.. High and low beams and apparently a horn.. Should I mount an AWOOOGAH horn on this?
)But whats in the package from the spicy land of india? Is it curry after all this is a steampunk build.
No my friends Much to your dismay I would prefer to keep my insides INSIDE of me while I am working on this build so no indian curry for me.
No what does every steampunk love and desire!
BRASS!

Yupe! My brakes and clutch lever arrived

I am happy as a clam! I can not wait to mock up the handle bar goodies. However do you guys have any suggestions on how to.. .make that handlebar switch look a bit older? I do like its functionality its just.. It's too modern looking.
- Joined
- Apr 23, 2016
- Messages
- 169
- Reaction score
- 219
I was hoping I didn't need to add another post (So that way people can also comment on the massive May Post office christmas.) But this is something I want more eyes to see, and hopefully understand and offer insight. 
Okay here goes nothing
The clutch system for this bike has always been something that has plagued my mind. I could never figure out what the heck to do! <-- me trying to figure out clutch mechanism
I had a slight eurkea moment and my brain came up with this.

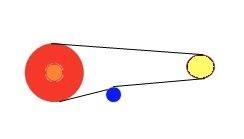
To give an idea of the colours. The first one shows a traditional bicycle set up for its drive train. (Sprocket to hub.)
the bottom shows my idea for a drive train system for the engine. To explain the colours. Magneto Engine sprocket the 3-speed hub is yellow and Clutch theory mechanism
So basically the clutch system will be a pivoting tensioner that is spring loaded with two points. A sprocket that is mounted on the axis point of the arm which the second sprocket rides on. There will be a spring pulling the arm up against the hub while there is a cable attached to the arm where the second sprocket is mounted. When you press the cable it will pull the bottom of the arm in the direction of the arrow moving the chain away from the hub disengaging it.
Any thoughts on this theory?
(Or was it read as BLAH! BLA BLA BAH! BLAH! BLA BLA BLA BLA)
(So that way people can also comment on the massive May Post office christmas.) But this is something I want more eyes to see, and hopefully understand and offer insight. Okay here goes nothing
The clutch system for this bike has always been something that has plagued my mind. I could never figure out what the heck to do!
<-- me trying to figure out clutch mechanism I had a slight eurkea moment and my brain came up with this.
To give an idea of the colours. The first one shows a traditional bicycle set up for its drive train. (Sprocket to hub.)
the bottom shows my idea for a drive train system for the engine. To explain the colours. Magneto Engine sprocket the 3-speed hub is yellow and Clutch theory mechanism
So basically the clutch system will be a pivoting tensioner that is spring loaded with two points. A sprocket that is mounted on the axis point of the arm which the second sprocket rides on. There will be a spring pulling the arm up against the hub while there is a cable attached to the arm where the second sprocket is mounted. When you press the cable it will pull the bottom of the arm in the direction of the arrow moving the chain away from the hub disengaging it.
Any thoughts on this theory?
(Or was it read as BLAH! BLA BLA BAH! BLAH!
BLA BLA BLA BLA)- Joined
- Jul 30, 2013
- Messages
- 1,923
- Reaction score
- 2,671
Your brainstorming diagram is not displayed. In the meantime, though, why not use a centrifugal clutch like everyone else? They're cheap and nearly certain to fit on a Briggs. To my mind, reliability trumps creativeness in this situation. The last thing anyone wants is for you to get seriously hurt by some failed Rube Goldberg contraption.
Last edited:

I agree here, I'd look at go kart clutches. I like your idea, but it does seem like a lot of moving parts.Your brainstorming diagram is not displayed. In the meantime, though, why not use a centrifugal clutch like everyone else? They're cheap and nearly certain to fit on a Briggs. To my mind, reliability trumps creativeness in this situation. The last thing anyone wants is for you to get seriously hurt by some failed Rube Goldberg contraption.
I understand the steampunk aspect you're going for, but it doesn't necessarily have to have a bunch of gears exposed.
A go kart or mini bike clutch is probably the safest, easiest, cheapest way to go.
Just measure the drive shaft of the motor and look for a clutch that fits, might be able to get one on the bay for next to nothing.
Just a suggestion, but you may want to select "Full Image" when you post pics.
- Joined
- Jul 30, 2013
- Messages
- 1,923
- Reaction score
- 2,671
I can see the diagram now and agree that, on paper, the concept is functional. But, in actual practice, both sturdiness and longevity would give me some serious pause. Does the blue magneto cog need to turn continuously? I've never seen a small engine that required that.
Were it my project, I'd stick with a centrifugal clutch on the engine (ala the top figure) and place the mag sprocket between the others so it serves as an idler/tension adjuster.
Were it my project, I'd stick with a centrifugal clutch on the engine (ala the top figure) and place the mag sprocket between the others so it serves as an idler/tension adjuster.
Last edited:
- Joined
- Apr 23, 2016
- Messages
- 169
- Reaction score
- 219
I was able to work on the bike today. Nothing major to the actual frame or anything but I was able to work on the motor. Heres some photos.. my fiancee was running the camera and I have yet to see them... I fear what I may see.
My day of bike working was actually cut short due to us looking at a house today.. (If we can pull it off it'd be cheaper then us renting a small apartment.)
Okay so the throttle cable that comes with these chinese carbs will obviously not fit a shimano shifter.. I mean why would we expect it to! That'd be too easy. The easy remedy was to file down the end until it fit in the shifter.

Here's my fiancee's photo taking...Is my nose really that big in real life?
Anyways here's the result of actually filing down that connector

Open

Close!
IT WORKS! (In theory)


I also had to extensively file down and redrill the holes in the intake. The gasket that came with the intake would not fit and modifying it to fit would not work. So I had to reuse the old ones.. The issue is they didn't work well during the test start.. Go spark compression and fuel leaking out of intake where it meets the engine I used some black silicon gasket stuff on the old gaskets making a sandwich of gaskets and silicon. Hopefully when it dries it will work. In highschool we used this crap to replace headgaskets in our small engines class because a tube of that crap was cheaper then having highschool kids destroy briggs headgaskets.. So it should work. (In theory)
I am hesitant to just order a go kart centrifugal clutch because reading about them.. Those suckers are HIGH maintenance! Like high heels in Beverly Hills level of maintence. Needs to be oiled every 2 hours of driving!  Can't be driven in stop and go traffic otherwise clutch will overheat. Steep hills, dirt roads, or short trips will shorten the life it
Does anybody have a manual clutch idea for this build?
Because I could slap on a go-kart clutch, but I want something a bit more care free.
My day of bike working was actually cut short due to us looking at a house today..
(If we can pull it off it'd be cheaper then us renting a small apartment.)Okay so the throttle cable that comes with these chinese carbs will obviously not fit a shimano shifter.. I mean why would we expect it to!
That'd be too easy. The easy remedy was to file down the end until it fit in the shifter.
Here's my fiancee's photo taking...Is my nose really that big in real life?
Anyways here's the result of actually filing down that connector

Open

Close!
IT WORKS!
(In theory)


I also had to extensively file down and redrill the holes in the intake. The gasket that came with the intake would not fit and modifying it to fit would not work.
So I had to reuse the old ones.. The issue is they didn't work well during the test start.. Go spark compression and fuel leaking out of intake where it meets the engine I used some black silicon gasket stuff on the old gaskets making a sandwich of gaskets and silicon. Hopefully when it dries it will work. In highschool we used this crap to replace headgaskets in our small engines class because a tube of that crap was cheaper then having highschool kids destroy briggs headgaskets.. So it should work. (In theory)I am hesitant to just order a go kart centrifugal clutch because reading about them.. Those suckers are HIGH maintenance!
Like high heels in Beverly Hills level of maintence. Needs to be oiled every 2 hours of driving! Can't be driven in stop and go traffic otherwise clutch will overheat. Steep hills, dirt roads, or short trips will shorten the life it Does anybody have a manual clutch idea for this build?
Because I could slap on a go-kart clutch, but I want something a bit more care free.
- Joined
- Apr 23, 2016
- Messages
- 169
- Reaction score
- 219
Sigh I looked around at that option but then I might as well just bite the bullet and use that entire drivetrain system at that point...
I have only found ONE manual go kart clutch.
http://www.ebay.com/itm/3-4-Manual-...ash=item23684b9812:g:WM0AAOSwU0RXHaWB&vxp=mtr
Specialty part with specialty pricing.
I have no idea at this point. I want simple but every option adds complexity to it. all I literally need is just a system to just disengage the chain to the hub while I brake (without disengaging power to the magento OTHERWISE I'd lose all electrical accessories like.. lights.... Those are very important.)
Also I'd rather have something where if it fails it just stops completely. A centrifugal clutch does the opposite.. if it fails it's basically a direct drive unit at that point.
Worse comes to worse I could always just use a belt tensioner to disengage power to the rear wheel. This however could potentially put strain on the 3 speed shimano hub.. But I do not know at this point.
This may be the simplest and easiest solution because I know thats how the Maytag Flyer worked using a tension system with the leather pulley to control speed.
So to make a system that would work with this bike all I would need is to have a tensioner that lifts with the pull of a lever.
Also speaking of levers I decided to purchase a dual brake cable so both of the drum brakes can be operated by one brass lever.
Last edited:
That clutch is very cool, pricey though as you said...
Luke.
Luke.