29'er Electra build.

Rat Rod Bikes Bicycle Forum

Help Support Rat Rod Bikes Bicycle Forum:

This site may earn a commission from merchant affiliate links, including eBay, Amazon, and others.
By my inactivity one may think i forgot about the build :D
Truth is i wasn't managing my time in life the way that would lead to this bike being finished quick, but i am not giving up! :)
I was thinking and decided not to cut the bottom tube off Electra frame and leave the BB, belly and head tube as is for some future stretch cruiser build. In the end i just wanted a plain straight bottom tube, and it is easier to source it from some donor bike then cutting and welding back the Electra frame. So here is a leftovers of some German bike that i was donated by a friend couple of month ago. The rear triangle was bent, so i didn't feel like assembling it.
IMG_7554.JPG


Here what it started to look like after some choppin' :)
IMG_7555.JPG


And here it is combined with the top tube and a rear triangle from Electra. Looks promising! I've put the original Electra contour to the cardboard piece before cutting it apart.
IMG_7556.JPG


The donor bike top tube is 1", and that's exactly the inner diameter of the Electra top tube, so i left a short piece of the top tube on. That way it will be easier to weld the tube on place. I also test fitted the wheels, it seems i actually would need to cut the seat stays off the drop outs and extend the plates slightly and then weld them back, since there is almost no clearance between where stays connect and a tire.
IMG_7557.JPG
 
Hellow fellow RRB'ers, how it's been?
I missed you guys not taking part in the big BO this summer, so even though i don't have a solid plan for a build i've decided to jump on to a WBO train.
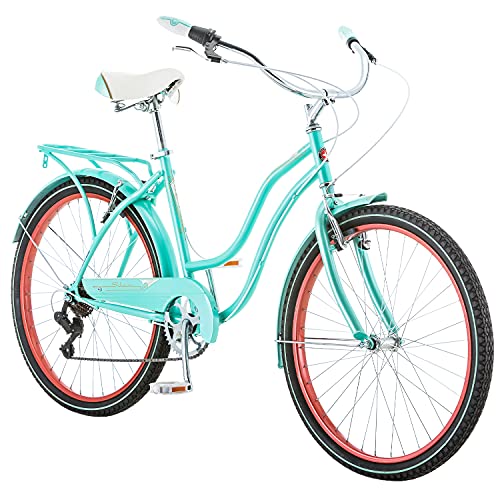
I didn't know what to build until ar some point i've seen this bike on my facebook feed. Let this be an inspiration to what i am going to build.
View attachment 212194

So a new school klunker inspired bike with an OPC it is.
I want to use as much of the stuff i already have and not spend too much money on the build :) I have this old ladies Electra frame lying around that i was planning to cut u for a custom frame at some point.
View attachment 212190

As you see it is already partially deconstructed, so it'd be a bit easier for me to cut it apart :)
View attachment 212191

I want the bike to be ridable for myself and i am a tall guy, so i am planning to run 29" tires on it. Regular city bike 28" wheels are widely available here, and i have a set of Schwalbe 29" tires i found near the trash can three years ago :) So a 29" it is. Seems that the wheel like this can be squeezed into the frame even without modification, so clearance shouldn't be an issue.
View attachment 212192

I really dislike derailleurs and rim brakes so my options are either single speed coaster brake or planetary hub on the rear, and drum brake or brakeless on the front. I could also agree on rim brakes on the front if it ends up to be so, but not for the rear, so i am not planning to run a freewheel on the rear. I believe single speed coaster would be more appropriate for early years klunkers. However i feel like 3 speed planetary hub would be more functional for actual use. Did they run inner gear hubs on first MTB's in the 70's?

Here is a quick sketch i've made to visualize what i can do with the Electra frame by using existing frame tubes and to see where i am heading too.

View attachment 212193
I raced against Tom Ritchey and all the other Bay Area crowd in the late 70's and early 80's here in Northern California. Bikes were called Klunkers, not mountain bikes though that soon changed. There were lots of 3 speed mostly Sturmey Archer AW hubs in use at the races. Any bike without a derailleur would not drop their chain many times during a race. So coaster hubs, 3 speed IGH hubs and 1 speed freewheel hubs were extremely popular because the chain would stay on for the entire race. When NORBA came about and started running the race scene they made rules that coaster brake and other bikes were in a different class than the derailleur bikes. This was done to sell derailleur equipped Mountain Bikes. That killed the 1 speed, coaster brake, 3 speed scene. I raced both coaster brake and derailleur equipped bikes and frankly the 1 speeds were just as fast on mountain courses if not faster than derailleur bikes. If you have raced on both types of bike then you know that it is just as hard to carry a bike uphill no matter what the drive system is. Downhills were so ridiculously steep that not having a high gear was never a problem, you were coasting most of the way anyway. 3 speed on, love to see it.
 
Today i have cleaned up most of the tubes taking the paint off and preparing them for welding. I also have cut the rear triangle apart to modify the dropouts and clean up the paint easier.
IMG_7564.JPG


I didn't take a lot of pictures, but here how the extended dropouts look like. I don't usually clean up my welds, but this time i've decided to do that. The top one is cleaned, though maybe i work on the surface a bit more. The bottom one is not yet cleaned. Of course both wheel slots are yet to be cut. I am planning to have the horizontal rear facing slots. You can still kind of recognize the Electra dropout shape though.
IMG_7566.JPG
 
So, here is some planning for the wheel slots and a fender mounting hole on the dropouts. I am probably not going to put the fenders on this bike as a part for build-off, but who knows. However, if i like the way it rides chances are i will use it for commuting, and in the winter times fenders are very useful to keep my back dry, so i am designing this bike in a way to leave the possibility to mount the fenders.
IMG_7570.JPG


Both drop outs are finished. Not ideally perfect, but quite good for a grinder and made ones :)
IMG_7571.JPG


Once more putting the pieces together to see how geometry comes together. Looks better and better!
IMG_7572.JPG


Here is my simple setup for tubes notching. Starting by notching the bottom tube for the BB shell.
IMG_7573.JPG


I don't know what kind of steel they used for this German bike, but seems that famous German quality is there. Even though it was a mid range touring bike my hole saw barely could bite in. Took me a few minutes to get through, Electra tubing takes way less. You see it even changed the color because of heat from the process. Now the tube is notched and beveled and ready for welding.
IMG_7574.JPG


I probably would weld the BB shell to the bottom first, then dropouts to the chain stays, then the rectangular profile connecting the chain stays to the BB shell. This way i could check the geometry once again when its done and fine tune the length of the top tube, the angle of the seat stays and the connecting bridge to the seat tube. Mid tube would probably be the last to be done. I also would get some more destroyed frames to source the thinner wall mid tube than the one on the photo, this one is only there for the test fitting.
 
Got sick last week, so the work have slowed down. This may result in me not having enough time to paint the bike before the build off deadline. It is rather cold now, so paint dries longer then usual, i would need at least a few layers. So i am preparing myself to leaving the bike in its raw finish. But we will see, ideally i will try to paint it somehow.

Anyway, here are the results of my work yesterday. Started with welding the BB to the bottom tube. First i used the welding table to make sure the geometry is straight and tack-welded it with semi-automat MAG.
IMG_7581.JPG


Then i TIG welded it around using old stainless spokes as a filler rod. So far the best thing i've came up with myself, still surprised nobody ever thought me that. I don't even see that being discussed online. Perfect way to recycle the old spokes, cheap and convenient. I am also happy that over the two years when i've picked up TIG my welds become better. Still not perfect, far from what Robert of HB cruisers does on his bikes, but way better then what i've started with, and that's what it is all about, isn't it?
IMG_7582.JPG


The next thing is welding the dropouts to the chain stays. Firstly I'm putting the dropouts in my small dropout jig, adjusting the distance with the nuts and washers.
IMG_7583.JPG


Then i'm assembling them together with the chain stays on the welding table, ensuring the geometry is right.
IMG_7585.JPG


The next step is to weld them in. This time i am using MAG for the whole thing, since there is a lot of gap to fill in. Pretty cool to have an access to my friends shop next door, so i can choose whatever welding technology fits my work better. That's the result. The fancy welding machine of his helps a lot with getting the nice clean beautiful welds.
IMG_7586.JPG


Once again pre-assembling the bike geometry. This time i am outlining the elements with the blue marker, since this is probably the final vision of how i put it together.
IMG_7587.JPG


The next step is to weld the bridge connecting the BB shell and chain stays to the chain stays. There is a hole in the chain stays after the kickstand shell was removed that i need to fill in. I am planning to not connect the whole thing for now so i can adjust the position of the elements further on, at this moment it is important in what order i am welding the elements to each other. Next goes the seat tube and the top tube after that. Then the bridge coming from the seat stays to the seat tube, and only afterwards the rear triangle is welded together and then to the front part. Mid tube goes last.
 
Back at it!

Putting in the axle with the washer in the middle for alignment.
IMG_7594.JPG


Welding the bridge to the chain stays.
IMG_7595.JPG


Here is the hole left after the kickstand was removed. Time for some cardboard aided design!
IMG_7596.JPG


This is a piece of 1,5mm thick steel that is becoming a gusset.
IMG_7597.JPG


Nearly there.
IMG_7598.JPG


Just need to file the surface of the arch down and put the hole for the threaded rivet here, while the place is still easily available!
IMG_7599.JPG


Back to the welding table. I've also grinded down the tubes in the outlined area to match the surface of the bridge height.
IMG_7600.JPG


Lookin' good! A bit of splatter around, but nothing criminal.
IMG_7601.JPG


I found out that to fit the top tube at the desired angle a piece of the former top tube i left on the frame has to be cut down at an angle.
IMG_7603.JPG


I don't have a hole saw to notch for the diameter of the seat tube, so I've eyeballed it. Actually turned out pretty neat and it is a perfect fit! I guess that's me getting more experienced. Or maybe just luck :D
IMG_7605.JPG


Here the seat tube is tack welded to the bottom of the frame and the top tube is cut to length, notched and fitted right where it has to go.
IMG_7604.JPG


I am basically ready to connect the halves of the frame together.
 
Started the day with spot-welding all the tubes together.
IMG_7606.JPG


Then I've straightened the thing and welded around the top tube/head and the frame bottom. For the seat tube/bottom and top tube/seat tube connection i've decided to use TIG welding process and that was a mistake. Soon i show you why. You see the photography light, it is not usually there. A friend of mine who practices photography as a hobby have dropped by today to take a few shots of me welding.
IMG_7607.JPG


Quickly checking the geometry again.
IMG_7608.JPG


Here are the TIG welds. Not prettiest but solid :)
IMG_7609.JPG


This is the weld that became problematic. Multiple times when planning and thinking over the build I thought to MAG weld it and not to TIG. But probably got too excited and forgot about it. Well, at least it looks good here.
IMG_7610.JPG


This is how the MAG weld on the top tube looks. The reason i went for MAG not TIG here is that the German frame was brazed before, and since TIG produces more heat it often happens that brass begins to melt, boil and zinc evaporates out of it, splatters around and makes a huge mess. Welding with MAG helps to avoid it. But the weld is not as beautiful. I actually ended up to clean it a little from the bottom.
IMG_7612.JPG


And that extra heat from TIG also often distorts the thin metal, and that could be crucial for fine geometry, like the seat tube, where the seat post must fit...
IMG_7615.JPG


Some of you have guessed it. Well, at least it is steel not alu, so it can be removed without creating even bigger mess. First I've tried to file it, but even though the tube has 1" ID and I've found a 1" rounded file, after almost an hour of hard filing it was still far from perfect. And it has to be literally perfect to accommodate the seatpost without causing the fitment problems. So while at it I've decided to make some small tool that is super useful in situations like that. If you haven't seen this hack before you may quite like it.
I grabbed some 12mm rod and i need to make a 6mm hole in it, around 50mm deep. I could have just tried to drill it as precise as i can, but instead i have put the drill in the vice and my rod in the chuck, kind of to emulate a lathe. This way physics works for me, and instead of the hole tending to get away from the center it would actually tend to center itself. This is the ultimate way to drill deep and precised holes, of course if you can afford to spin the work piece.
IMG_7616.JPG


Starting with 4mm drill, continuing with 6mm. Then i am filing a flat side and drilling a 4mm hole perpendicular to the first one and tapping an m5 thread in it. Here we go, an extension for the grinding stones is done. This way i can go deep into the tube as i need. Of course it is best to grind a small flat spot on the stone axle too. Took me a few minutes to make this tool, and then another 20'ish minutes (i am so glad hours and minutes are universal everywhere and not metric/imperial by the way) to perfectly grind the inside of the tube. Would've taken me at least a few hours and tons of effort to do it by the hand file. But still that was quite an expensive mistake, considering how easy it was to avoid it.
IMG_7617.JPG


I've spent some time cleaning the paint further off, while i still have easy access to the tubes. When the frame is done it would be more difficult to do. Done some hand filing and sanding here and there, and the time to test fit the rear wheel has come! So far so good!
IMG_7618.JPG


Then I've eyeballed the notch on the seat stays connection bridge. Pretty neat and close again. Guess it is not just only luck in the end :)
IMG_7620.JPG


Here is what i am finishing the day with. Need to get more discs for paint cleaning for my grinder tomorrow, clean the seat stays and the rests on a few other spots of the frame. Then i can weld the seat stays and make a mid tube. This would be it for the frame then! I'm thinking to make a hole in the frame bottom for the kickstand. Even though it is not "true" to run a kickstand on a sport bike, if i end up liking the bike enough to ride it a lot, it would be a pity for me to drop it in the city and scratch it. So same as with fenders, though i am not planning for it as in a framework of a build off, it is a good design to leave the opportunity to have it later.
IMG_7619.JPG


One more thing i would need to think of is the cable routing. Both former frames had welded on cable guides, so i have some on the bottom tube and the right chain stay. But for the roller brake i would need a second cable on the left side, so maybe it wold be easier to just remove the existing ones and run the thread-rivets? Once the frame is done i still need to build a fork before i can continue assembly and painting.
 
The reason i went for MAG not TIG here is that the German frame was brazed before, and since TIG produces more heat it often happens that brass begins to melt, boil and zinc evaporates out of it


And that extra heat from TIG also often distorts the thin metal, and that could be crucial for fine geometry, like the seat tube, where the seat post must fit...
If you want to stick with Tig you could gas purge your intersecting tubes and run a real high flow rate. The gas will shield and cool if you control your amperage. Not sure if your using a variable amperage setup or not. You can also use some makeshift cooling to keep those brazed joints from coming undone with cool wet cloths wrapped around them. I've had good luck in the past with that as a quick fix
 
If you want to stick with Tig you could gas purge your intersecting tubes and run a real high flow rate. The gas will shield and cool if you control your amperage. Not sure if your using a variable amperage setup or not. You can also use some makeshift cooling to keep those brazed joints from coming undone with cool wet cloths wrapped around them. I've had good luck in the past with that as a quick fix
Thank you for advice, i will experiment with that in future.
I do have a variable amperage setup, however i have not played with it a lot. At some point i was practicing a lot of pulse welding, but then i have decided to go back to mostly working on fixed power to improve this aspect of the skill, to come back to practicing more pulse later.
 
Didn't manage to work on a bike today, but got to the hardware store for some supplies. Grinding stuff for more better paint cleaning and a slightly bigger then my tubing hole saw to make a nice notch on the mid tube. Also some red oxide primer, turquoise paint and mate finish transparent varnish.
IMG_7623.JPG


Though i usually don't paint my bikes myself, this time i am probably giving it a go. Got a nice color epoxy filler and two half empty Montana cans from my stash. This is what i am going to go with for the paint job of this bike. Still not sure what finish do i expect in the end. Maybe clean, maybe a bit messy, maybe fake aged look? We will see how it turns out while experimenting. My only concern is the extended drying time in the cold weather like we have now.
IMG_7624.JPG


I probably won't have time to work on the project again until 2023. Some friend of mine is coming to pay me a visit (a custom bike builder as well, you might know his work by the name Park Road design), so we will spend time riding and celebrating.
 
So, happy New Year everyone! I had a great time cruising with our custom bike club on the last day of 2022 and then swimming in the cold sea on the first day of 2023. Now it is time to get back to work, the time is running!

Started with cleaning up the paint off the seat stays. Looks good in clean raw steel!
IMG_7691.JPG


Next thing is putting the bike on the welding table and tack welding the seat stays to the bridge and to the dropouts. Had to bend a left dropout sligthly to straighten the geometry.
IMG_7692.JPG


Now here is how i mark the place for the mid tube. As you see all welds are done but the one between the seat stays and the bridge.
IMG_7693.JPG


Here is my notching setup. I've chosen for a thin wall raw steel tube, since i believe it should be enough strength for a mid tube that doesn't actually carry much load.
IMG_7694.JPG


My first try ended up to be a little too short and thus got too low. I had to remake it.
IMG_7695.JPG


Much better now! The frame is basically done, just a few holes for nut-rivets are left. I've also took some time to clean it up, though i usually don't clean up my welds too much, i thought this time i may sand it a bit more then usual. But still not to a point you don't see the bead :)
IMG_7696.JPG


Since the frame is done i couldn't miss an opportunity for a quick mockup. Here is a choice of sprockets i had. Decided for a 42t sweetheart for now, though i also liked other options and may change later. However slightly smaller classic Schwinn design looked particularly good on this build in my opinion. More modern looking because of the smaller size, but still referring to good old days. Not the smallest one beacuse then i need to run extra small on the rear and i might end up not liking the gearing.
IMG_7697.JPG


Some second hand half-link chain, nice alu 1" seatpost, older European saddle, new set of platform pedals, old and slightly worn out ahead headset, modern BMX stem, placeholder fork until i make one, placeholder motorcycle handlebars (too heavy for a bicycle) and here we are!
IMG_7698.JPG


I kind of like how it turned out! Though the front end would need a serious reworking, it looks just the way i wanted it to look. The mid tube should get parallel to the ground once the longer fork is applied.
IMG_7699.JPG


It looks so good raw steel that it almost is asking me to leave it this way.
IMG_7700.JPG


Now its time to fabricate the fork!
 
Well, I was busy with other things, so it is clear I am not painting the bike until the build off deadline.
But I believe I will be able to finish it. Even though I didn't build the fork yet, I've made something to help me along the process.

IMG_7721.JPG

Here is a nice piece of a 50mm wide 6mm thick steel stripe. As you see the center line is marked.

IMG_7722.JPG

And here is a bottom of my tube notcher. The carriage with the axle are attached with the bolts.

IMG_7723.JPG

A bit of drilling and welding and here you are.

IMG_7724.JPG

The steerer tube is held in with a pair of old TV satellite holders.

IMG_7725.JPG
The height is adjusted with the washers, so i can make sure most forks, both 1" and 1-1/8" would fit and the center is aligned.

Is that absolutely necessary? No. Can i cut the fork apart with a grinder? Yes. I could probably have made a fork in the time i used to build this small jig. I didn't even finish testing it since i don't have a hole saw of the size i need. But hey, i still think it is kinda cool :D A useful tool to have in future. Would help me to cut apart old forks and build new ones. Though things probably would need some cleanup after using a tool like that. Tomorrow i get the new hole saw delivered and would cut my first fork apart with this tool, and use its parts to build a fork for the project.
 
So, i've started chopping apart the original Radiant fork with the freshly made tool after my new hole saw arrived.
IMG_7726.JPG


Just to find out it is made out of same extra hard steel that the hole saw won't even bite into! You can see the saw barely scratched the fork on this photo. Well, the good news are i will be sure of its strength.
IMG_7727.JPG


So after spending extra couple of days i did chop it apart the old fashioned way in the end using my grinder.
IMG_7728.JPG


Then with some steel profile i welded it back the way i wanted it to be. Bit higher for more clearance, bit wider and with the roller brake tab. The head tube is quite long, but i ended up taking some of the extra length off. I just prefer to have extra from the beginning then coming back to it a few times afterwards :)
IMG_7730.JPG


Here are some close-ups on the welds before cleanup.
IMG_7731.JPG

IMG_7732.JPG

IMG_7733.JPG


Assembling the bike I've put the old Electra straight 8 handlebars on. I've had my eye on some beautiful BMX bars, but the seller ghosted me so i have to use what i have. It looked kind of empty though, so I've made a cross bar out of a steel tube using a vice and a hammer. Now the bars look appropriate for the bike.
IMG_7736.JPG


Here is a fork top after cleanup.
IMG_7737.JPG


And here is how the bike looks now, assembled.
IMG_7738.JPG

IMG_7739.JPG

IMG_7740.JPG


So, trying to make it look more "sport" I've messed up, and now there is an significant toe overlap. So instead of happily finishing the assembly with adding cables and grips, i need to cut the fork apart and give it more relaxed cruiser angle to reduce the overlap. I may also switch to 165mm cranks instead of 175mm ones i am running now to further reduce overlap, but in general I've messed up :D
IMG_7741.JPG
 

Latest posts

Back
Top