Arrival of the BE(a)ST

Rat Rod Bikes Bicycle Forum

Help Support Rat Rod Bikes Bicycle Forum:

This site may earn a commission from merchant affiliate links, including eBay, Amazon, and others.
Joined
Apr 29, 2021
Messages
1,564
Reaction score
3,579
Location
Poland
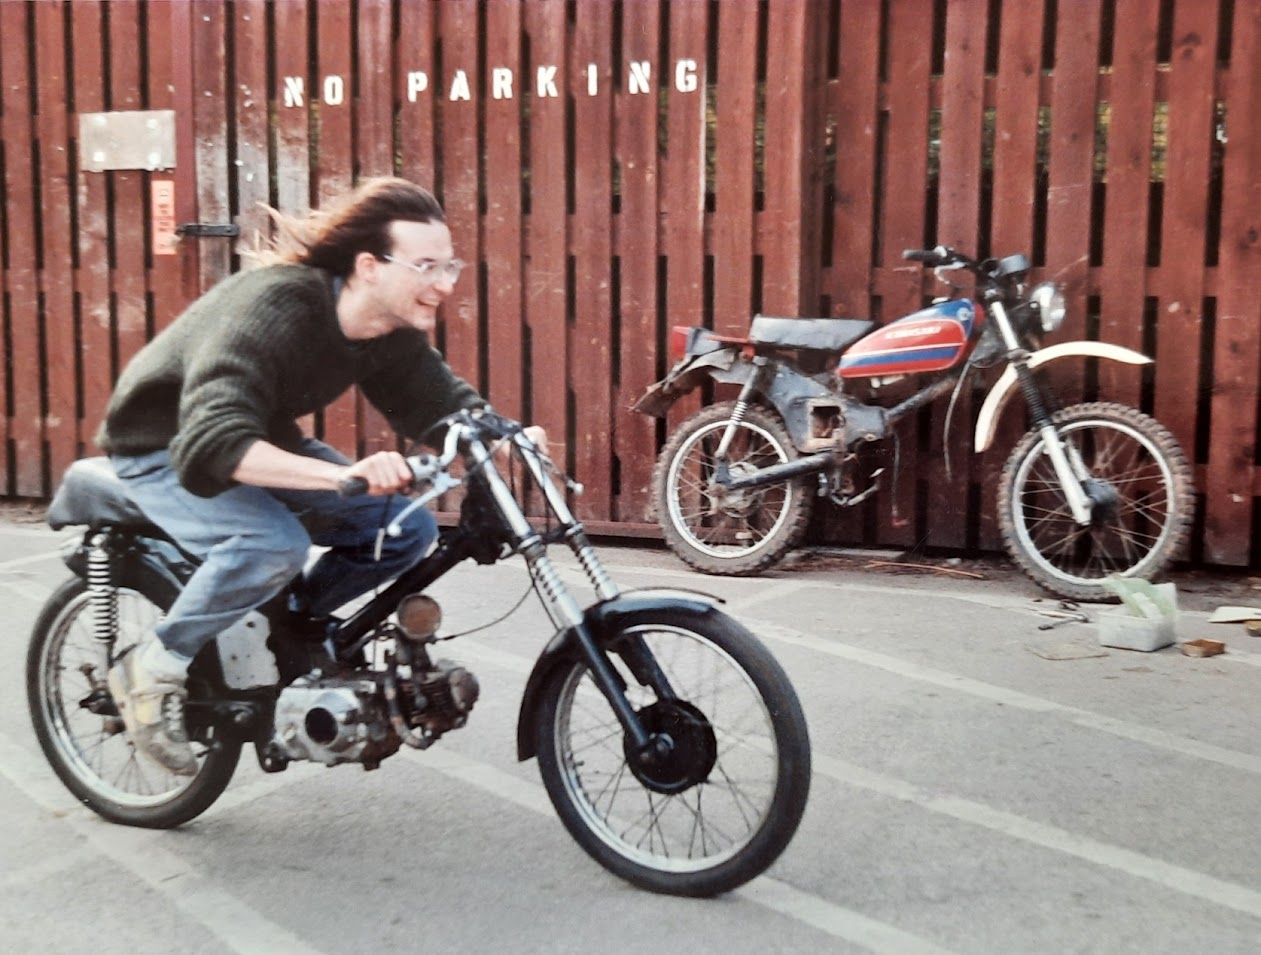
Many, many years ago I built a series of bikes from old Honda Cubs, the C50, C70 and C90, using whatever material I could find either in my garage or in the unwanted section of the local bike breakers. My most used one had a Kawasaki tank fitted, and did a lot of miles off-road - not only in the UK but also in the Alps and during a long weekend in Germany. Another one was used for moped racing, and both are shown in the picture below, with my Chris riding the latter.
AM-JKLUzBGiXCGPht8miz2npNNxWyPP4dumj3E8d2xBvksLnJ0s5MX02kjZ9SigcNnDXcUcgkKKhWRpnUBrbLCiD_z90faiMgMlMcIifPavH5tL2y8C7UJJsj_IcBpku9LQ0gtYP83Cv5qyQqV3ETzLM3M4erg=w1261-h955-no


The reason I chose the Cub as the basis was that they were cheap, no one cared what you did with them, and there was very high parts compatibility - and in the picture I know that this was the moped racer's first run as I had taken the C70 engine out of my trail bike and popped it in - and not a standard C70 but one with the 4-speed and manual clutch from an SS50. The point was to have a minimal parts stock and machines that could evolve.

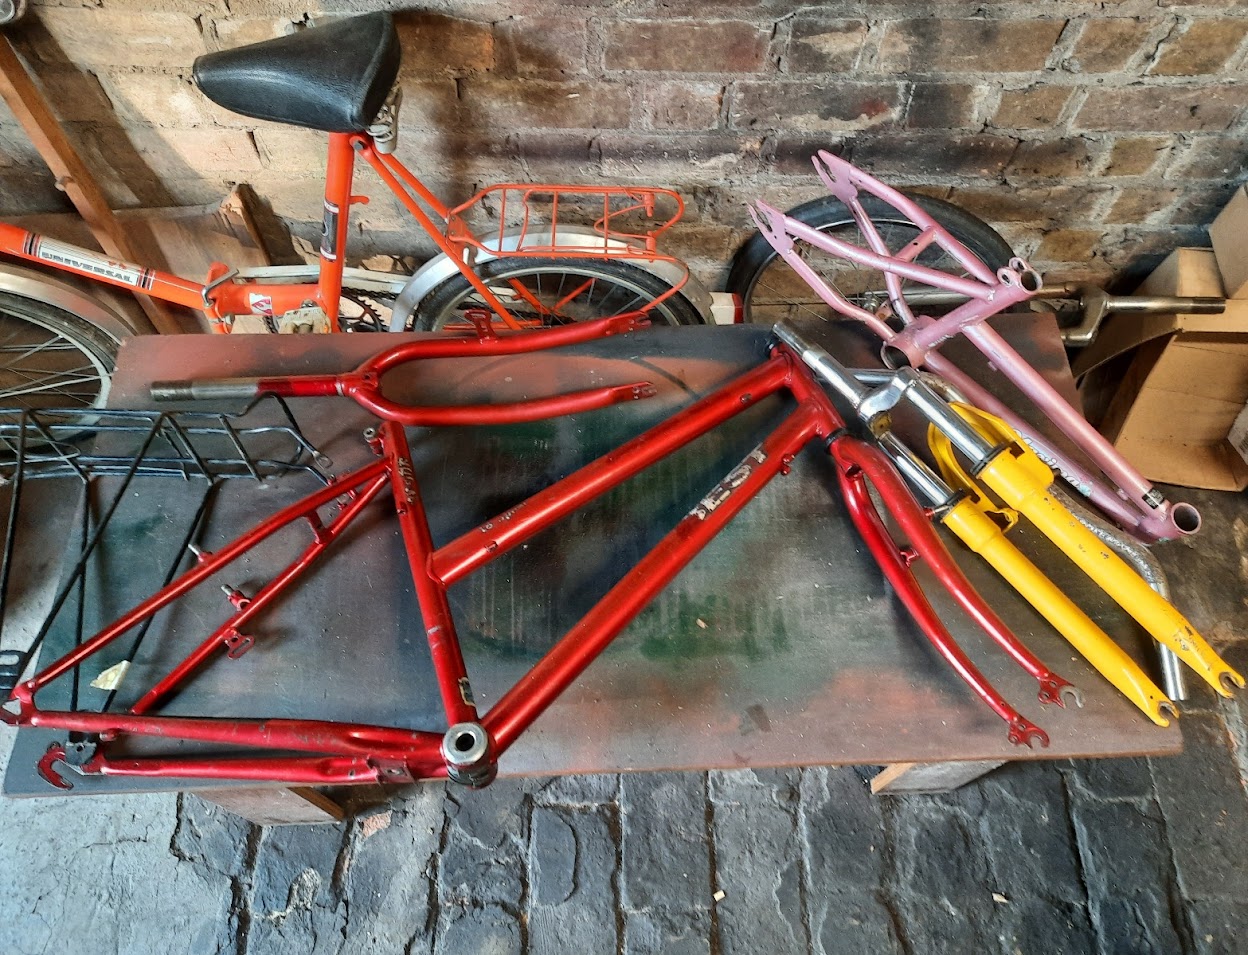
Fast forward to today and I have a workshop full of Romet Turing, Jubilat and Wigry parts, and some other bikes that I use as sources to extend the possibilities of my Romets. Below is a Kross Best that I bought for the 24 inch wheels and 5 speed derailleur set up that I planned to fit into one of my single-speed Jubilats, which I never got round to building as I then discovered and purchased a rare Zenit version of the Jubilat with 3-speed derailleur. I then exchanged the frame that did not get modified for a BSO with bouncy front and rear 'suspension' (suspending both the bike and belief, without any apparent useful function).

Ta-raaah! 1 x red Best, 1 x yellow fork, 1 x pink steel source (and, accidentally, 1 x incredibly rare 'Danusia' Jubilat front fork).
AM-JKLXvnKfTXt7aAxH1X0Hoy7zF0XQvfHgj-0dQtEH5nExMID6Z5QMLvqj-U5bzRrZEbSe0AU5P1oc8z_JDX7Kw7v6iwQH5cYfegGCZVB7J_1SjVETdg9br5Iw9IuDY4PthXoyIsHJ_Z4qExhVdj0fR2Y4f0Q=w1249-h955-no


So the plan is to take the parts here, add to it parts from my Zenit while that is stripped down to straighten the frame and replace its toasted BB, servicing the borrowed parts at the same time, saw up some barn door hinges to connect the yellow forks to the Best forks and extend the rear dropouts. The Best is a child's frame, and cannot be pedalled and steered into a corner at the same time, so the forks sounded like a fun way of getting more foot room, and in combination with rear dropout extensions gain a little ground clearance. These are the kind of things I was doing in the 1980s with my Cubs.

I have no plans for painting, although the rims and spokes will be painted but only as part of the Zenit renovation process, not because I think the project needs it - indeed, my choice would have been one of my matt black rim sets. Red, yellow and pink - what could go wrong!
 
Cool start.

Dad has a chrome Honda 50 that he has recently put back together. It doesn't look like quite like the one in the pic, his is setup for how he used to race it back in the early 60s. Nifty Thrifty Honda Fifty...

I am not familiar with a Danusia fork.

Looking forward to seeing it come together.
These are frames from the 70s, which were a bit different to the ones used in the 60s - I used to have one, but while I distinctly remember the iron OHV engine instead of the aluminium headed ones I had, I can no longer recall the differences in the frame - age, huh! Anyway, I welded on regular bike headstocks to both to fit telescopic forks, and my trail bike as a consequence had two frame numbers - the genuine one on the frame side and the one on the headstock from the stolen, dumped and burnt out frame I found. When it came to the annual test I was always quick to point out the location of the genuine number :)

At the moment I am filing little slabs of 6 mm steel to make them squarish for my dropouts, and I dream of a life beyond it...
 
Two little steel slabs, kind of 50 x 100 mm, are now ready for drilling. The barn door hinge clearly did some excellent service sometime in the past, either on my property or on the land the previous owners had on the opposite side of the road. I know that they had a cottage there, as some of it was sawn ready for firewood in one of my barns, and they probably had some sheds or a small barn too. However, under the Communist era rules, for farmers to get a state pension they had to sell a suitable amount of their land to the local government. Which they did, the difficult to farm gullied property across the road.

Amongst the metalwork I rescued were a number of these long hinges, most with a curved front face but one with a rectangular cross-section. There are probably more hinges in the other barns, but there was enough here for the dropouts, and I will use one of the other hinges for the things to hold the front forks together.

AM-JKLUMtS7KPwZ5yQHZIrOPiuIYkXJ2mXS3ysRn723YitQ02aLxVZHQTaCutq7HCO4hh3s69zYLYvWSADgSBbv523L-elTGVMYusGlE7yQpNj3QnUy1nshVZLTXSM3gqTyvh7GNNWGmzvkzpgyTlmAYkXeedg=w1236-h955-no


Luckily I had some 50 mm wide masking tape, as filing the surface smooth enough to mark out would have been a mind-numbing and unnecessary task as I am not building for an immaculate result. I did not even file the drop out end square, as I will be removing 60% of that end anyway.

We are off to the city for a few days, so the drilling, cutting and filing will have to wait, while I get on with other things.
 
This should be fun! Your background in mini bikes transferred to a pedal bike build, that's cool!

RaT oN~!
 
I hope so, and I sometimes rely on what I did back then to stop me from being too tempted by what other people are doing.
 
This is my pile of bits, subject to a possible change of chainwheel.

I need to do a test build with the spokes to see if I can get away with not buying another set of spokes for the SRAM I intending using.

AM-JKLUSWhQNRt8P1GNBmY1POSKSmBNsXbQIoAjDWV6pqskOev3nOJj-DyZSLMk0bWoOMhiIkQpcfKXlRm2vqrXy-rn7T8x7ERonCB1Rrf-GZLaPcYxF-VVfzRKNfnbFEhXyjJED1aHLrefAolwnyJ2QmiHyXg=w1075-h955-no


So no brakes, but there is the SRAM and front hub, the rims I painted last week, along with the stuff in the frame picture earlier.

I am tempted to paint that handlebar though. Black. Of course.
 
I am back in the big bad city, which means I am back working in the garage for a couple of days. I am trying to build up a basic set of tools here so that I do not have to keep moving a couple of toolboxes back and forth, twice a week.

I have the frame and the rear rack temporarily assembled, which gives this astonishing result:

AM-JKLV4YtAfeSSxfIGeVVNypAluxwyrVjSn5f7j-7rMccXUuFOWe8zCP451DP0Wbxhat_397w4VR_o6rrURyqxMNPCGiFUA9R5SLv1uMpoT_jgAkDSGnzKHwy_FdwrmMU9OIJ58vH1ufFkxSgrWkoSo0Q0SkQ=w1233-h956-no


See, I knew you would be amazed by how quickly this build is going forward!

The cardboard behind is part of my extensive cardboard collection I have here, mostly stored in my lovely warm and dry basement - more on that later. They are the slightly greenish cream that I have used on the wheel rims to go with the blackish-green spokes.

I know that my builds rarely seem exciting, in comparison to the multi-photo choice of assemblages many show or the amazing projects involving copious welding, but I really do not have many parts to ponder over, and what I do have tend to be mundane.

Parts from Ten Turing will be appearing on this build.

Expect more grimy images, too, as part of my minimalist mundanism, because its my style choice. ;)
 
At the weekend I used some of my stock of 2-ply cardboard to make a base for the structural beam upon which all the other cardboard elements will be supported. While checking that I had not goofed in the measurements, I took the opportunity to think about the size of different parts, such as the tank - using one of the milk carton crates that have featured in my cardboard works.

I love the cow design.

AM-JKLWQDkhFJQWyOWYnS32wMB8WVU7OkgLCiyH32tLlquRJZjgVtFTs5UjnmIi1Vvashx8XcaKIR-90VAgc1DCvfUbnkhKWsEBL0-tusxtLrC5ODvpuP5IqwJh6twhspQbw4_TJixwqyMPUROvJvUMRjGLAww=w1051-h955-no


Then I cut the base to fit. The kick up in the rack is a nuisance, and will compromise some of the stiffness of the beam as I will have to slot the beam otherwise I will not be able to install it. I was tempted to cut it off, or at least bend it down, but I don't want to lose a functional rack as most of mine have an older type of mounting.

It wasn't until I looked at the picture that I realised the rear end of the rack was bent, but since the previous owners had managed to smash the front wheel, bend the rear spokes and bend the chainwheel crank I should not have been surprised. These Kross frames were well built.

I am not sure yet whether the rack will be horizontal by the time I get around to the stage of fitting the wheels, but I am planning on that happening.

AM-JKLUo73qu9Pu1d2MrSpkJB0pymCmbWNL57kOR8X_Q3BFhR8tVAic9wA8HWHTqLo7Rsx1eIvEJp6r_YDVIDc7YreBnU6j5TvI2ZX4QwMiTQligew_VJ0Ufud94tx9FHE2GoUMGyM46ufLIWGxWfHvca_PANg=w1323-h956-no


On other things, here are the classic Romet chromed steel rims after painting, ready for me to choose and paint the hubs and spokes as appropriate. I still have not settled on what kind of rear hub to choose - derailleur or coaster brake, it all depends on how my new rear dropouts turn out. In an ideal world the derailleur will fit, so that down the line I can build the six-speed Romet Jubilat folder that got derailed earlier in the year by the purchase of the 3-speed derailleur Zenet Jubilat. Since Zenit is going 3-speed SRAM coaster brake, the plan is back on with a choice of parts that will go straight on.

If I fit the dropouts outside the frame then the derailleur should fit but the coaster brake axle will be too short. If I fit them inside the frame then the derailleur will be too wide but the coaster brake should fit comfortably.

AM-JKLWC4wcnsPdBA9ikB2d7d_Kr_A5lPR9ETnr-kVPdPSS9ses_4QC2FzBXYtlR-n1c95WqTvGI1mOzXLTg165GqvTQZYJJ_YkAjLEkNGg61UP70OdZIa_uQYLkJ8bN12ka9j6T1wIYrCYfI9cZgGtkNso1KQ=w817-h955-no
 
A little more progress, and I did a few minor upgrades to my garage in readiness for moving here for the winter. We would like to have been able stay at our farm, but we need to reinsulate the house and install some heating that does not require me sawing and splitting so many logs and then adding them to the stove every half an hour. So here is the garage, which soon will also have to house the car as well.

AM-JKLUvTpS1f4Y8IENMPMlCuEMhFJqjKZnJ2a2ju1_0f4HbbP03G5hSHNvgby2PowOnOPSz3fBedghFU4DzskyqfGtNDRWqpgmCTRqyoNBkkiMoH0x7VL6s77mj4jc47RE0ASDJbe2sErI0QF9THpeqlv8uEQ=w875-h955-no


That one strip of cardboard is now being transformed into a beam. One of the useful things about cardboard is that I can do most of the work indoors, in the lovely warm and centrally heated indoors...

AM-JKLUpNMf2NuijtpRwLu1HySzrS2HTQhZ35w3C2JmtXUuAAh4q9_SPTufN0_uurgqURza1PvhFhhelz4_HuI2FPqoW46dghkE0aOqkf1kF24A1RPKI2cTcPQPwqUv55ALR0DCb410gL1serVE0KZ9_ptz_Xg=w1274-h955-no


A little more work, and the beam was ready for its first trial fit. I took advantage of this to do a mock up of what the bike should look like - maybe not quite as tall at the back, and the front wheel a little further forward.

AM-JKLXxCPr8mjRcsMgIBwoQCZooPN1US8nM3xlYC4xXg1YG8_tzX4IkhtlYfHAlxe2A2mJsxGNWP-BYUc-hom1pI_dHriS5sD166XxVBjnsVtrXyDC2zVfQxwz1p-hsokd-QT95gdaMDayT6rHvNrB_4FbZpQ=w1064-h955-no


On the back of the beam are two pieces of wood, the side pieces from a drawer. I plan to glue them together, add some bracing and use it as a base for the seat. As the beam would not be able to withstand the load of me sitting on it I will be inserting some wooden blocks inside the beam and adding some steel plates on top of the rack. This is why there is no cardboard top plate at the rear of the beam, in the previous picture.

On the right is Ten Turing, my previous build off bike, in its new guise as a city shopper - and the very narrow handlebars from the Amsterdam bike means it should fit down beside the car.
 
The next stage was to figure out how to divide up the beam into functional areas - the tank, seat and rear light fairing. For this the milk carton crate had to be sacrificed.

I modelled the tank shape on the one I had on my C70, off some Kawasaki trail bike. I remember that when I mounted it that I did not put it as far forward as I originally intended to give plenty of clearance for the forks. I don't think that this would be a problem here, but for old time's sake...

AM-JKLWmvTedKmmvucEHnfNrUny_seF4jfQDF0cCObheaoBTXthQVAIL5vn78L8a_xQXm6IrGdgOf23CBI-CGXbY9lFmIZQBU2x8c_oUynpfXFWB95SfAqrDzYKvPZ31sONjXQxmjB2NUgyach86EH38sloE3Q=w1213-h955-no


It is going to be interesting getting all the curves on the tank about right, but I have been saving up a stock of pizza boxes for the job as they are nice and thin. When crushed properly, cardboard can be moulded quite well once wetted with the wood glue that I use. Yesterday I bought a length of large diameter wooden dowel to use as supports for the seat, and because it is wood it should bond well to the cardboard. I also bonded the first two parts of the seat base together, and just need to add a stiffener before it will be ready to be installed on the beam.

AM-JKLUcwg7XlFttdtmGUPbkjQzdgEi7mLZIxP92WdV7HMjn6m_n5VJJc82XPM4yR6GZAYNruANTeEo3KJaDX9SOHE5QB80PLUQOMo2QtDfnofIlivcs3pFkICKh7HQo9PF2lfVw34Q1EnyZ_gleW40d6hb_nQ=w1110-h955-no


I used a paint can lid as a test for the rear lamp. I tried to fit two in, but I did not make the fairing wide enough as I was mostly concerned with the side view at the time. Here it is only as wide as the beam, but in reality it needs to be as wide as the seat, so there will be plenty of room in there. I probably will not be installing any electrics on this build, which means all I have to do is paint two old caps red.

This seems to have become a build in two parts - everything on the top of the bike, and everything on the bottom of it - mostly ways of lifting the frame and moving the wheels apart.
 
Here on the right we have the rear wheel dropout extensions, and on the left we have the upper mounting plate for the second fork - which is still at the design stage. You can see that the barn door hinge used for the rear dropouts is very much different in cross-section from that for the fork mount, and the lovely 'patina' from decades of exposure. That corrosion layer can be hard to file, though, as bits of metal jamb in the file.

AM-JKLUxtwkb24EivwqDia1A7szecBOmG8-vKV7EODkRaIAFQiz-SvcytZB1na2e6TxE5EPoTn2dlk7GA837QbABknfY6c0XU6vLr5roKJOBb1ZmVEAmYZ8L0AhP9NOuDdoYUQdQzR9GMKQgvFNIAvBW1OY_uA=w1321-h955-no


All I need to do now with the dropouts is tap those holes, then drill and saw the cut-outs, and then maybe shave off some excess metal to lighten them - but only if there is time at the end. I don't mind the brutalist look here, as my bikes often feature a separation of the decorative and functional elements in terms of style.
 
This is my pile of bits, subject to a possible change of chainwheel.

I need to do a test build with the spokes to see if I can get away with not buying another set of spokes for the SRAM I intending using.

AM-JKLUSWhQNRt8P1GNBmY1POSKSmBNsXbQIoAjDWV6pqskOev3nOJj-DyZSLMk0bWoOMhiIkQpcfKXlRm2vqrXy-rn7T8x7ERonCB1Rrf-GZLaPcYxF-VVfzRKNfnbFEhXyjJED1aHLrefAolwnyJ2QmiHyXg=w1075-h955-no


So no brakes, but there is the SRAM and front hub, the rims I painted last week, along with the stuff in the frame picture earlier.

I am tempted to paint that handlebar though. Black. Of course.
If the spokes are a little too long, you can use a 4 cross pattern instead of 3 cross, and vice versa.
 
Yes, I have a strange reluctance to order stuff, although I already have a wheel for another project that needs a set of spokes, my Ten Turing build off bike is a spoke short. I will be experimenting with patterns - but not just yet, as I have managed to delay that decision by realizing that I wanted the SRAM in a different rim, not the one to be used for this project.
 
I have decided to go the derailleur hub route, mostly because it will simplify the areas of the build that are not particularly important - so no buying spokes or finding a suitable SRAM gear change lever and cable bits - that can all wait until I get back to working on my Zenit renovation.

As I was in my coalshed on my farm, and the frame was in my garage in the city, I pulled out a convenient frame to test my dropout extenders. It is actually a Zasada frame, another Polish bike manufacturer, and while I only bought it for the SRAM and 36-spoke, aluminium rim 20" wheels, I am quite impressed by the materials, build quality and braze-ons - expect it to reappear in future builds.

AM-JKLUZIHmzGDDUyk76kpfO6DRnBAuXHY3Fq6BVNmQxsNMT2EF1nlJdzBa7uXYHsVHmUU-vcD5jK8CKuFXLHg9Q0eNr2HmP7Y02enAW0v-b3S7I7FHhlAoVNGgKHi0b6P_dKAdkzK4zd8j9I_Tb6SLe5ED1Sw=w907-h955-no


Anyways, the extenders work, not that I would ever trust them to take them off road without welding them on first. Given that I am building a cardboard top half, actually going off road was never on the cards anyway - this build is more NORBO than ORBO.

This is also a 24" wheel in a hole designed for a 20" one, and I have a tire that would fit that gap, which is not bad. I might also need to buy some shorter bolts, or just call them rear foot rests.

AM-JKLVuhB9w78lHH1lwlVmV_HqbuZYCtJfmOD8wJbTYlt2LFr7nUpdEjQCo5DNaznXwrgsn_bEVOPACMnN12n2MJgxn5OWDbv63fCteWX7SjQbhBRa0koVP8wm2QrwYgHhJcpnV9daUaPe8GgSm_lyzL5BhPQ=w969-h955-no


Somehow I cannot see myself getting the chain down past those bolt heads and onto that smallest cog - but if you look in the previous picture you may spy my 3-speed derailleur hub lying on the bench, so that is another problem that has gone away! I love my 3-speed Falcon hub for what it is - a design choice to save pennies on two extra gears under a collapsing Communist government in the 1980s.
 
Back
Top