GOOD PHOTOGRAPHY TIPS

Rat Rod Bikes Bicycle Forum

Help Support Rat Rod Bikes Bicycle Forum:

This site may earn a commission from merchant affiliate links, including eBay, Amazon, and others.

Rat Rod

Owner & Founder
Joined
Dec 31, 1969
Messages
18,502
Reaction score
7,515
Location
Texas
Thinking it might be good to discuss the do's and don'ts of good bike photography for final build off photos.

Over the years I've seen folks who spend huge amounts of time and energy building an awesome bike only to have the final product display pretty poorly because either the builder's camera was junk or they just made a lot of common mistakes when shooting the pics. Some folks have recognized their lack of skill or equipment and have either asked a friend or hired a photographer. Regardless of how it gets done, there's one thing for sure, awesome photography goes a long way in making your entry stand out.

Feel free to give tips below on how to shoot great bike photos.
 
Great topic idea :thumbsup:

Try to keep your Eagle Talon nappy feet out of the shot whenever possible!
And also no shadow holding a camera pics :whistle:
 
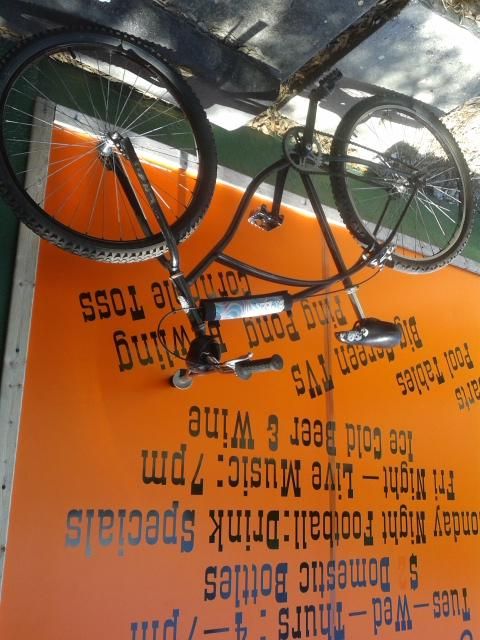
What about background composition? Garage door shots look terrible, as do to much busy in the background. What makes a good background?

How about this?
20140608_132332_zps9fc80199.jpg
 
Last edited:
here's a quick reference guide to make some awesome photos.

#1 find a clean, uncluttered background in an open shade environment. (think in between two tall buildings or under a canopy, etc...
You want to stray away from harsh, direct or dappled sunlight.

#2 Prop the bike up several feet away from the background to create separation.

#3 stand many feet further from the bike and zoom in on the bike, then focus on something on the bike (such as the chain wheel)
* This will put the focus on the bicycle and blur the background.

#5 Click the shutter

These tips will work awesome for point and shoot cameras or even smart phone cameras.

****If you have a DSLR or are savvy with apertures, use a wide aperture in the F/1.4 to F/4 range to achieve a much shallower depth of field to make the bike pop from the background even more.

I hope to post example photos soon.
 
Mikee, I would say that is not a good background, at least not that time of day. Part of the bike is in dark shadows while part is in sun. Also that dark border around the signage isn't helping.
 
I take a lot of photos of my bike around Savannah and one thing that I know is that just because a backdrop looks great for a tourist photo, it doesn't mean it makes a good backdrop to showcase your bike.

One thing I have been doing as I go on shakedown rides is scout for photo locations. Stop and take a reference photo of you bike and depending on the results, file the spot away in your head for future use.
 
Unfortunately the local Parks and Recreation Department covered up all the awesome graffiti that I've used in many of my past pics. :eek:
I have a few cool photo shoot areas in mind after the build. But for now I just use the garage door before pulling everything back down into the basement for the day.
Once it's rideable I will take cooler pics :whistle:
 
One of the biggest mistakes is to be to far away from the bike. Remember the photo is about the bike no matter how cool the background may be. Fill most of the frame with the bike. This will also help with the suggestions of using a shallow depth of field and placing the bike away from the background.
 
One of the biggest mistakes is to be to far away from the bike. Remember the photo is about the bike no matter how cool the background may be. Fill most of the frame with the bike. This will also help with the suggestions of using a shallow depth of field and placing the bike away from the background.

Standing close and using a wide aperture or standing farther away and zooming will yield similar results. Filling the frame with only what is interesting is a very valid point.
 
...You want to stray away from harsh, direct or dappled sunlight.
I'm not disagreeing, I'm just going to add a caveat. Sunlight can bring out polished chrome and deep candy colors. From a muscle bike perspective, where you are trying to get a bright show quality, outdoor sun is great, and indoor bright spotlights work very well too.
 
Agreed, there are exceptions to all rules. My list was a general guideline for making good photos.
Overcast days work well too. It's like shooting under a huge softbox.
 
Last edited:
The two best times of the day to shoot pics are morning and evening....basically when the sun is not right above you.

I usually take my shots in the evening as the sun is going down and I avoid direct sunlight at all costs.

I also do some editing in Photoshop to adjust exposure, saturation, etc.

Here's an example of shooting the photo in the late evening and I added the darkening vignette in Photoshop to draw your attention to the bike and not the background or surrounding areas.

yamaha2200.jpg


Shot this one in a different location in the morning....probably around 10am in an alley downtown. Once I again I did some post editing in Photoshop to adjust color, shadows, exposure, etc.

skull1c.jpg
 
How about some tips on what you typically do within Photoshop?
 
I'll start by saying that I'm a professional graphic designer that's been in the business for 17 years now. I literally have sat in front of a Mac using Adobe products since Photoshop 1 was on the market. :21: Even after 17 years I don't consider myself an expert with Photoshop because the software is just so vast.

There are some add on tools for Photoshop that are made by a company called OnOne >> http://www.ononesoftware.com

I use their Prefect Effects filters to do several things, but mostly use their vignette filters. I also use some of their color editing filters, but for the most part, I tend to adjust color, exposure and saturation directly in Photoshop.

Usually my tweaks are very subtle and minor, but it's enough to enhance the images to really make them pop.

I also use an old Nikon D40 DSLR camera and my lens is always SPOTLESS! :D

Hey RR, I'm a graphic designer too. Started back in 1990 and all I know is every time I just start becoming an "expert" with the program, ie. photoshop, illustrator, ect... Adobe puts out a new one and I have to start all over again. I will admit, my Mac makes it a lot easier. When I first started I actually had to hand draw all my own fonts. Shesh!! That took forever. I'm still learning photoshop, Illustrator is my main usage, but one of these days I'll consider myself 'good' at it. But then Adobe will upgrade it again and I'll have to start all over. Ugh!
 
Ha Ha....yeah, I was going to design school at UNT in the early 90s and they made us hand render type and just about everything else we had to do back then. I still can't stand the site of a French curve as a result of that torture. :21: I think they had 4 Macs in the School of Visual Design back then and you had to wait for hours to get in and work on your projects. I ended up dropping close to three grand into a Mac 8100 just so I could get my projects done.
 

Latest posts

Back
Top