Thanks!Love the handlebar setup…
- COMPETITIONS
- THE COMPETITION ARCHIVES
- THEME BUILD OFFS
- ORBO/SWBO 2024
- ORBO & SWBO 2024
- ORBO & SWBO 2024 - BUILD JOURNALS
You are using an out of date browser. It may not display this or other websites correctly.
You should upgrade or use an alternative browser.
You should upgrade or use an alternative browser.
ORBO Step-Thru Klunker
- Thread starter Bike from the Dead
- Start date


Help Support Rat Rod Bikes Bicycle Forum:
This site may earn a commission from merchant affiliate
links, including eBay, Amazon, and others.
Earlier this weekend, I decided to clean the handlebar grips I planned to use for this bike. However, instead of just cleaning 2 or 4, I decided to go ahead and clean all 50 loose grips I had stashed away at the same time. Given how sore I get when I stand in place for even short times, I should have known better. Still, at least I now have 23 pairs of grips and 4 stragglers all nice and clean. Now I just need to pick the 2 that will go on this bike.
Before:

Some grips started out dirtier than others. This was one of the worst ones.


After:


Before:
Some grips started out dirtier than others. This was one of the worst ones.
After:
Riding a bike, especially an old bike, off road can be interesting, and requires some different techniques. Knowing when to lift yourself off the saddle slightly, holding the handlebars lightly and similar things can all help.
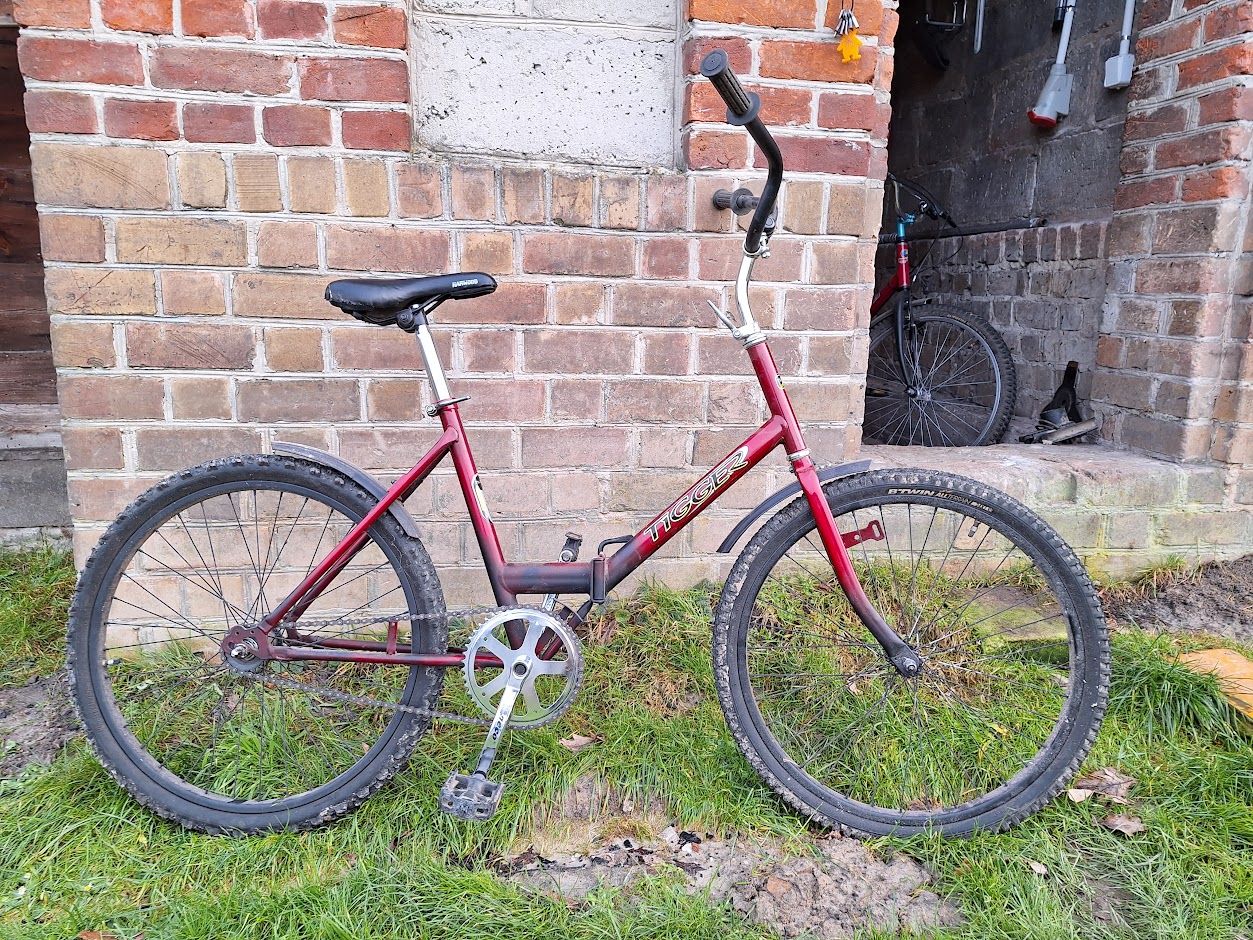
This is one of my three off road bikes, you can see the front end of an almost identical one with derailleur gears in the barn, and I also have a modern suspension bike in another part of the barn. I almost never jump either of these two, but they get to experience the woods and trails all around our very rural farm.
I recommend building an off-roader, just make sure that you do not mind if you bend it.
These are Romets, and they still have almost no value today in Poland as virtually every farm has one, and most farms have less than 5 hectares of land.
Riding a bike, especially an old bike, off road can be interesting, and requires some different techniques. Knowing when to lift yourself off the saddle slightly, holding the handlebars lightly and similar things can all help.
Unless there's a class or online tutorial for it, all those techniques sound like something I'll just have to learn by trial and error or experience.
Nice! I hardly see any folding bikes here in the U.S., at least where I live. Looks good! Outside of seeing you build yours, I'm not sure I've ever heard of Romet bikes.
This is one of my three off road bikes, you can see the front end of an almost identical one with derailleur gears in the barn, and I also have a modern suspension bike in another part of the barn. I almost never jump either of these two, but they get to experience the woods and trails all around our very rural farm.
I recommend building an off-roader, just make sure that you do not mind if you bend it.
These are Romets, and they still have almost no value today in Poland as virtually every farm has one, and most farms have less than 5 hectares of land.
I honestly don't plan to jump any of my bikes or ride them all that hard anyway, especially not this one. I don't think I could handle that sort of thing myself! As long as my bike can handle riding on dirt and gravel trails at a good cruising speed and climb the occasional hill, that's all I really need right now. I don't think the kind of riding I plan to do will bend even this frame, but just in case, I plan to add a little extra rigidity where it'll need it most. At the very least, if this frame does get damaged, at least it didn't cost me anything to get it.
Unless there's a class or online tutorial for it, all those techniques sound like something I'll just have to learn by trial and error or experience.
Nice! I hardly see any folding bikes here in the U.S., at least where I live. Looks good! Outside of seeing you build yours, I'm not sure I've ever heard of Romet bikes.
I honestly don't plan to jump any of my bikes or ride them all that hard anyway, especially not this one. I don't think I could handle that sort of thing myself! As long as my bike can handle riding on dirt and gravel trails at a good cruising speed and climb the occasional hill, that's all I really need right now. I don't think the kind of riding I plan to do will bend even this frame, but just in case, I plan to add a little extra rigidity where it'll need it most. At the very least, if this frame does get damaged, at least it didn't cost me anything to get it.
If I get a welder, and since I have another of these Romet frames in stock that someone has done a massive welding repair job on near the folding hinge, then I might weld the hinge up and add a top tube to make it stronger. That might make an interesting hack bike.
That would be cool! It's worth a try!If I get a welder, and since I have another of these Romet frames in stock that someone has done a massive welding repair job on near the folding hinge, then I might weld the hinge up and add a top tube to make it stronger. That might make an interesting hack bike.


$19.99
Electra Glide Wall Decal 2ft Long Sport Harley Davidson Bike Motorcylce Sticker Man Cave Garage Boys Room Decor
FatCat Wall Graphics


$19.99
$24.99
Top Brass Bicycle/Motorcycle Chain Picture Frame 5" X 7" Photo - Faux Bike Chain
Old River Outdoors (USA Merchant)


Made a little progress yesterday.
Tried cleaning these 2 Schwinn grips in the washing machine with some rags and mop heads, but it barely did anything to them. Could've shot better photos to show that, but oh well.


The big thing to discuss is this 7ft piece of 1/4in steel rod. Since the welding class I'm in doesn't have brazing equipment, and the only other person I know with the equipment is unavailable right now, I'm going to use part of my last welding class tonight to make my own truss rods out of this steel rod and some other pieces I have laying around. It's not the most rigid rod out there, but since I don't plan to ride this bike all that hard, they'll get the job done. These truss rods are more for aesthetics than function anyway.


I found this bracket as I was cleaning up my workspace, and I think it'll work for mounting a pair of truss rods. Unfortunately, since it appears to be stainless and the rod is regular steel, I can't MIG-weld them together, but my dad has a thread-cutter that would allow me to hold the truss rods in place with a few nuts.

I'll need to bore out the holes in the bracket a little bit though, as they're juuuuust too narrow for the rod to fit through. That shouldn't be too hard to fix though.

I also found this portable tire pump I got as part of a kit years ago, and figured it'd be right at home on this bike. I don't expect to ride this bike so hard that I'll actually need it, but it'd be nice to have just in case.

I also picked out the 2 grips I'm going to use. They aren't exactly what I wanted to put on this bike, but they're good enough for now.

I still want to mockup this 46-tooth "sweetheart" chainring I got new off eBay years ago, because if I don't use it on this bike, I don't know what bike I'd use it on. I may try it on later today.

Here's the bike as it looks right now. I still want to look for a better mounting bracket for the truss rods, as the bracket I have on there now would make the truss rods almost perfectly straight, as opposed to looking like they're coming through the handlebars like the ones I mocked up before. I really want those truss rods to travel though the gap in the bars, as it's just something I don't see, but this bracket will just make the truss rods stick out in front of it. Still, I can always swap out the truss rods if need be.


Tried cleaning these 2 Schwinn grips in the washing machine with some rags and mop heads, but it barely did anything to them. Could've shot better photos to show that, but oh well.
The big thing to discuss is this 7ft piece of 1/4in steel rod. Since the welding class I'm in doesn't have brazing equipment, and the only other person I know with the equipment is unavailable right now, I'm going to use part of my last welding class tonight to make my own truss rods out of this steel rod and some other pieces I have laying around. It's not the most rigid rod out there, but since I don't plan to ride this bike all that hard, they'll get the job done. These truss rods are more for aesthetics than function anyway.
I found this bracket as I was cleaning up my workspace, and I think it'll work for mounting a pair of truss rods. Unfortunately, since it appears to be stainless and the rod is regular steel, I can't MIG-weld them together, but my dad has a thread-cutter that would allow me to hold the truss rods in place with a few nuts.
I'll need to bore out the holes in the bracket a little bit though, as they're juuuuust too narrow for the rod to fit through. That shouldn't be too hard to fix though.
I also found this portable tire pump I got as part of a kit years ago, and figured it'd be right at home on this bike. I don't expect to ride this bike so hard that I'll actually need it, but it'd be nice to have just in case.
I also picked out the 2 grips I'm going to use. They aren't exactly what I wanted to put on this bike, but they're good enough for now.
I still want to mockup this 46-tooth "sweetheart" chainring I got new off eBay years ago, because if I don't use it on this bike, I don't know what bike I'd use it on. I may try it on later today.
Here's the bike as it looks right now. I still want to look for a better mounting bracket for the truss rods, as the bracket I have on there now would make the truss rods almost perfectly straight, as opposed to looking like they're coming through the handlebars like the ones I mocked up before. I really want those truss rods to travel though the gap in the bars, as it's just something I don't see, but this bracket will just make the truss rods stick out in front of it. Still, I can always swap out the truss rods if need be.
The step thru is looking great! I've got a '50s vintage Colson step thru frame that I'm going to build up as a klunk/MTB kind of a thing eventually. I'd like to put a cool fork on it, still looking there. This build is getting me thinking in that direction.
For getting started off road I'd recommend finding an 80s or 90s mountain bike for cheap. I found these advertised locally in the $30-$70 range. You could probably find something even cheaper or for trade at a swap meet.


I even found this cool Brodie for $150 which I might go look at in a couple of weeks if it's still available

I'd recommend sticking with a decent brand like Specialized, GT, Trek, etc. Steer clear of dept. store brands like Murray, Huffy, etc as they aren't up to actual offroad riding. Find something close to the right size for you too. A front suspension fork is ok if it's not a junker. I'd steer clear of rear suspension on a cheap bike. But, honestly, a decent garage sale $50 full rigid 90s MTB in functional condition is all you need until your riding style turns more aggressive.
For getting started off road I'd recommend finding an 80s or 90s mountain bike for cheap. I found these advertised locally in the $30-$70 range. You could probably find something even cheaper or for trade at a swap meet.
I even found this cool Brodie for $150 which I might go look at in a couple of weeks if it's still available
I'd recommend sticking with a decent brand like Specialized, GT, Trek, etc. Steer clear of dept. store brands like Murray, Huffy, etc as they aren't up to actual offroad riding. Find something close to the right size for you too. A front suspension fork is ok if it's not a junker. I'd steer clear of rear suspension on a cheap bike. But, honestly, a decent garage sale $50 full rigid 90s MTB in functional condition is all you need until your riding style turns more aggressive.
Thanks Pondo! I remember seeing that frame when you built your 24" klunker back in the 2022 RRBBO. That loop-tail Colson would make an awesome klunker for sure!The step thru is looking great! I've got a '50s vintage Colson step thru frame that I'm going to build up as a klunk/MTB kind of a thing eventually. I'd like to put a cool fork on it, still looking there. This build is getting me thinking in that direction.
I'll keep all that in mind. Admittedly, I have a few '90s/early '00s mountain bikes I've picked up for free over the past few years, but they're either Murray, Huffy or Schwinn, and nearly all of them have been cannibalized for parts.For getting started off road I'd recommend finding an 80s or 90s mountain bike for cheap. I found these advertised locally in the $30-$70 range. You could probably find something even cheaper or for trade at a swap meet.
View attachment 260492
View attachment 260493
View attachment 260494
I even found this cool Brodie for $150 which I might go look at in a couple of weeks if it's still available
View attachment 260495
I'd recommend sticking with a decent brand like Specialized, GT, Trek, etc. Steer clear of dept. store brands like Murray, Huffy, etc as they aren't up to actual offroad riding. Find something close to the right size for you too. A front suspension fork is ok if it's not a junker. I'd steer clear of rear suspension on a cheap bike. But, honestly, a decent garage sale $50 full rigid 90s MTB in functional condition is all you need until your riding style turns more aggressive.
I honestly don't need anything that hardcore anytime soon, as I'm not an aggressive rider, and I don't feel comfortable riding trails with a lot of big rocks, steep grades and narrow paths. I just want a bike that I can take for a nice relaxing cruise on the more scenic and gentle dirt and gravel trails I come across. I like trails where I can take it slow and enjoy the fresh air and the scenery around me. Sometimes I may pedal harder just to see how fast I can go, but only for a brief moment or if it's on a trail I'm really familiar with. I don't ride to make time; I ride to have a great time.
Big update from yesterday!
I just finished my welding class last night, and to cap it off, I got to do some welding for my bike!
I dug through my stash of bikes and parts to look for a better bracket I could use for my truss rods, and I found one in the form of this reflector bracket off an old Huffy 10-speed. It didn't look like much, but I already had a plan in mind. Instead of making my truss rods pass through a couple holes and threading the ends to hold them in place, I'd sandwich the ends of the truss rods between 2 plates and hold them in place with a single bolt like what I've seen on original Schwinn truss rods!
I modified the bracket over at my dad's shop before class. He helped cut pieces with the cut-off wheel (I still don't trust that tool, especially without a guard,) but I cleaned up and smoothed out everything with the belt sander.


Halfway through my welding class, I stopped practicing my welds and used the rest of the class time to fabricate the truss rods. Thankfully the classroom had a vice, which I used along with a piece of tubing and a hammer to shape the rods as needed.

I didn't have enough time to take process photos, but with my teacher's help (and a giant bandsaw that was also in the classroom,) I cut off a pair of fender braces from a Schwinn fender and trimmed them to length to wrap around the bottom ends of the truss rods. I tack-welded the axle mounts to the truss rods, but got the axle mounts a little sideways, which meant I had to bend them slightly to line up with the axle. They may not have come together quite as well as I'd like, but I can officially say that I did some welding for this bike myself!


I need to make a few minor adjustments to get the bolt holes to line up right by either shaving off a bit of the truss rods at the ends or shaving a bit of the bottom clamp at the back. Otherwise, I really like how this turned out!


They may not be as dramatic as the chrome truss rods I had mocked up earlier, but I still love how they turned out! They're parallel to the fork and headset, and best of all, they travel through the handlebars just like I wanted.

Not the best photos, but here are the tack welds I did to mount the fender braces to the truss rods.


There's not much left to do on this bike. I still want to mockup at least one other chainring, clean and primer the seat post scrap that's going down deep into the seat tube to reinforce the frame, and then it's just a matter of cleaning and greasing bearing cups, bearings, and wheel hubs. It won't be much longer before this klunker's a rider!
I just finished my welding class last night, and to cap it off, I got to do some welding for my bike!
I dug through my stash of bikes and parts to look for a better bracket I could use for my truss rods, and I found one in the form of this reflector bracket off an old Huffy 10-speed. It didn't look like much, but I already had a plan in mind. Instead of making my truss rods pass through a couple holes and threading the ends to hold them in place, I'd sandwich the ends of the truss rods between 2 plates and hold them in place with a single bolt like what I've seen on original Schwinn truss rods!
I modified the bracket over at my dad's shop before class. He helped cut pieces with the cut-off wheel (I still don't trust that tool, especially without a guard,) but I cleaned up and smoothed out everything with the belt sander.
Halfway through my welding class, I stopped practicing my welds and used the rest of the class time to fabricate the truss rods. Thankfully the classroom had a vice, which I used along with a piece of tubing and a hammer to shape the rods as needed.
I didn't have enough time to take process photos, but with my teacher's help (and a giant bandsaw that was also in the classroom,) I cut off a pair of fender braces from a Schwinn fender and trimmed them to length to wrap around the bottom ends of the truss rods. I tack-welded the axle mounts to the truss rods, but got the axle mounts a little sideways, which meant I had to bend them slightly to line up with the axle. They may not have come together quite as well as I'd like, but I can officially say that I did some welding for this bike myself!
I need to make a few minor adjustments to get the bolt holes to line up right by either shaving off a bit of the truss rods at the ends or shaving a bit of the bottom clamp at the back. Otherwise, I really like how this turned out!
They may not be as dramatic as the chrome truss rods I had mocked up earlier, but I still love how they turned out! They're parallel to the fork and headset, and best of all, they travel through the handlebars just like I wanted.
Not the best photos, but here are the tack welds I did to mount the fender braces to the truss rods.
There's not much left to do on this bike. I still want to mockup at least one other chainring, clean and primer the seat post scrap that's going down deep into the seat tube to reinforce the frame, and then it's just a matter of cleaning and greasing bearing cups, bearings, and wheel hubs. It won't be much longer before this klunker's a rider!
Made some more progress on the Klunker yesterday and today.
Yesterday, I swapped out the Schwinn 4-ring chainring for this 46-tooth "sweetheart" chainring I bought on eBay years ago for my first vintage Schwinn. It's always been sitting on a pegboard waiting to be used, and I think this is the bike to use it.


Close-up of the welds I made to these truss rods Thursday. They could've been better, but I don't care. I made these, and that's good enough for me.

I also tried flattening the tops of the truss rods with a hammer to make them fit the bracket better, but to no avail. I needed to sand them down to fit.


Here's what I did today. I sanded down the ends of my truss rods so they'd fit nice and tight inside the bracket.


Then I used a wire wheel to shine them up.

Now those truss rods (and those welds) really shine!


I mocked them up on the bike, and I got to say, I'm falling in love with this bike. I didn't think I'd ever really like these Schwinn step-thru frames, but with the right paint and parts, even a stickler like me can be swayed. I can hardly wait to get this bike out on the trails!


The last thing I did was give the truss rods a satin clear coat, and the seat tube reinforcement piece a thick layer of primer. I left all 3 pieces to dry at my dad's shop until Monday. Should be plenty of time for them to cure.

Yesterday, I swapped out the Schwinn 4-ring chainring for this 46-tooth "sweetheart" chainring I bought on eBay years ago for my first vintage Schwinn. It's always been sitting on a pegboard waiting to be used, and I think this is the bike to use it.
Close-up of the welds I made to these truss rods Thursday. They could've been better, but I don't care. I made these, and that's good enough for me.
I also tried flattening the tops of the truss rods with a hammer to make them fit the bracket better, but to no avail. I needed to sand them down to fit.
Here's what I did today. I sanded down the ends of my truss rods so they'd fit nice and tight inside the bracket.
Then I used a wire wheel to shine them up.
Now those truss rods (and those welds) really shine!
I mocked them up on the bike, and I got to say, I'm falling in love with this bike. I didn't think I'd ever really like these Schwinn step-thru frames, but with the right paint and parts, even a stickler like me can be swayed. I can hardly wait to get this bike out on the trails!
The last thing I did was give the truss rods a satin clear coat, and the seat tube reinforcement piece a thick layer of primer. I left all 3 pieces to dry at my dad's shop until Monday. Should be plenty of time for them to cure.
Last edited:
The sweetheart chainring looks just right on this bike. Truss rods came out great! Bike is lookin' good!I think this is the bike to use it
Thanks Pondo!The sweetheart chainring looks just right on this bike. Truss rods came out great! Bike is lookin' good!
It would have been good to get some welding at the free end of one of the rods, but well done - you have created a very neat set of truss rods ")
With some kind of welder at home, the range of what you can achieve now will extend beyond what you can imagine.
Great job!
With some kind of welder at home, the range of what you can achieve now will extend beyond what you can imagine.
Great job!
Yeah, I meant to do 4 tack welds on each, but the way the second one was clamped allowed me to do 6. I would've added 2 more welds to the first one, but class was already technically over, and I didn't want to keep the teacher any longer than I had.It would have been good to get some welding at the free end of one of the rods, but well done - you have created a very neat set of truss rods
With some kind of welder at home, the range of what you can achieve now will extend beyond what you can imagine.
Great job!
I don't have a welder at home yet, but I'm definitely eager to do more welding as soon as I get the chance!
Thank you!
Between house-cleaning, picking up 7 more free bikes, visiting relatives and friends over in Missouri, and just plain old ADHD, I didn't make a lot progress on my klunker this past week. I did fully disassemble the Schwinn earlier this week, and just earlier this evening, I knocked out a few small steps to make the next few even easier.
First, I cleaned up the inside of the frame with some Simple Green, some plastic brushes and socks, and an air compressor. While I was doing that, I noticed this little bump on the inside of the head tube, which I think was originally for a locking springer fork, if I recall correctly. Did all Schwinns come with that by default around the early 1950s, or just the ones with locking forks?


I also picked out a crank to use, cleaned the threads and removed most of the rust. I haven't decided on a pair of pedals yet, but the ones pictured below might work. They spin smoothly, but not exactly freely, so I may or may not use them.


I also cleaned up a few other pieces for the fork and bottom bracket, but those will all go in the ultra sonic cleaner, hopefully tomorrow.
Also, because I don't think I pointed it out before, here's my kickstand setup for the time being. I may go back and install the correct Schwinn kickstand, but those things are such a pain to remove that I doubt installing them will be any easier.

First, I cleaned up the inside of the frame with some Simple Green, some plastic brushes and socks, and an air compressor. While I was doing that, I noticed this little bump on the inside of the head tube, which I think was originally for a locking springer fork, if I recall correctly. Did all Schwinns come with that by default around the early 1950s, or just the ones with locking forks?
I also picked out a crank to use, cleaned the threads and removed most of the rust. I haven't decided on a pair of pedals yet, but the ones pictured below might work. They spin smoothly, but not exactly freely, so I may or may not use them.
I also cleaned up a few other pieces for the fork and bottom bracket, but those will all go in the ultra sonic cleaner, hopefully tomorrow.
Also, because I don't think I pointed it out before, here's my kickstand setup for the time being. I may go back and install the correct Schwinn kickstand, but those things are such a pain to remove that I doubt installing them will be any easier.
I made a lot of progress yesterday!
First thing I did was disassemble the Komet Super coaster brake hub, which came apart far more easily than the last couple of times I did this.


First thing I did was disassemble the Komet Super coaster brake hub, which came apart far more easily than the last couple of times I did this.
More progress from yesterday:
Since the bearing cups I used during the mockup phase weren't good enough for riding, I had to dig through my collection of bearing cups for a good set. Finding a good pair of bottom bracket cups thankfully didn't take too long, and I know automatically that they're made for this bike!

Finding a good pair of headset bearing cups, however, proved to be more of a challenge. First off, while I had plenty of Schwinn headset bearing cups, I mostly just had the lower, shallower ones. I don't recall if other manufacturers did this, but for whatever reason, Schwinn decided that instead of making both headset cups the same, they'd make one deeper than the other. What that means is if you use the wrong cup on top, there will be a big open gap between the cup and the crown race. I couldn't find a good top cup loose, so I had to disassemble one of my other bikes (fittingly named Parts Bin Schwinn,) to get the bearing cups I needed.

Also, I found this fork shim while looking for bearing cups. I was going to use the old beverage can shim trick I've done before, but I think I'll try this out instead, at least this time.

Once I got all the headset and bottom bracket parts gathered, I put them in my ultrasonic cleaner and cleaned them up.


While I had stuff in the ultrasonic cleaner, I started cleaning out the wheel hubs. I noticed some small grooves carved into the coaster brake hub, which I guess means this wheel made a lot of hard stops over the years. I don't exactly remember what I did with the last Komet Super hub I built, but I decided to sand the inside of the hub with some heavy-grit sandpaper. Not sure if made much of a difference, but hopefully it'll help the coaster brake stop better.

I stuck the Komet Super parts in the ultrasonic cleaner next. I got most of the parts clean, but some will need one more pass to be clean enough for me. I also found all the other Komet Super parts I had cleaned before when I rebuilt my first one a couple years ago. a few have sadly started to rust a little, but most everything here is still good enough to use as-is, so I can pick out the best parts to rebuild this coaster brake.

Good thing too, as the original axle for this hub looks worn out on one side.


Unfortunately, the wheel hub I thought would be the easiest to work on turned into a nightmare. The cone nuts for the front axle had some nasty wear to them, which basically meant that I couldn't use them.

None of the other wheels I had in the garage had parts with any less wear and tear, and that was if they even had the correct cone nuts.
Fortunately, I had a tote box full of wheel hub parts that I had all but forgotten about, including a bunch of front axles and cone nuts!
(Seriously, I had these parts since 2019, before I joined RRB, and I have never once used them, much less looked through them.)

Unfortunately, none of the axles had cone nuts that were in any better shape than what I started with.


On a side not, I really need to go through everything in that tote box and find out just what sort of coaster brakes I can build out of the parts.

Although I had no luck finding the parts I needed yesterday, I'm still certain that I can get this bike rolling. One option is to go back to the storage building and dig through my wheel collection for potential replacements or replacement parts. The other option is to use some other wheels I have on hand, like the ones pictured below.
This wheel is the same style/manufacturer as the one I'd like to use, except it has slightly beefier spokes and an ugly welded seam where the hoop was put together.


I also have these wheels that I pulled of another bike. They aren't the look I'm going for on this build, but if all else fails, I know I could at least use these to make the bike functional.

I had hoped to get the klunker riding yesterday, or at least close to it, but complications with the bearing cups and especially the front axle prevented that from happening. Still, I'm getting closer to the finish line. The problem now is that the weather has cooled down drastically for today and tomorrow (current temperature is 38 degrees F,) so I'm not sure what I'll be able to do until it warms up again Thursday. I have some parts that need to be cleaned with a wire wheel, and I could go ahead and install the bottom bracket assembly and fork, but I'm not sure I want to mess with that when it's this cold out.
Since the bearing cups I used during the mockup phase weren't good enough for riding, I had to dig through my collection of bearing cups for a good set. Finding a good pair of bottom bracket cups thankfully didn't take too long, and I know automatically that they're made for this bike!
Finding a good pair of headset bearing cups, however, proved to be more of a challenge. First off, while I had plenty of Schwinn headset bearing cups, I mostly just had the lower, shallower ones. I don't recall if other manufacturers did this, but for whatever reason, Schwinn decided that instead of making both headset cups the same, they'd make one deeper than the other. What that means is if you use the wrong cup on top, there will be a big open gap between the cup and the crown race. I couldn't find a good top cup loose, so I had to disassemble one of my other bikes (fittingly named Parts Bin Schwinn,) to get the bearing cups I needed.
Also, I found this fork shim while looking for bearing cups. I was going to use the old beverage can shim trick I've done before, but I think I'll try this out instead, at least this time.
Once I got all the headset and bottom bracket parts gathered, I put them in my ultrasonic cleaner and cleaned them up.
While I had stuff in the ultrasonic cleaner, I started cleaning out the wheel hubs. I noticed some small grooves carved into the coaster brake hub, which I guess means this wheel made a lot of hard stops over the years. I don't exactly remember what I did with the last Komet Super hub I built, but I decided to sand the inside of the hub with some heavy-grit sandpaper. Not sure if made much of a difference, but hopefully it'll help the coaster brake stop better.
I stuck the Komet Super parts in the ultrasonic cleaner next. I got most of the parts clean, but some will need one more pass to be clean enough for me. I also found all the other Komet Super parts I had cleaned before when I rebuilt my first one a couple years ago. a few have sadly started to rust a little, but most everything here is still good enough to use as-is, so I can pick out the best parts to rebuild this coaster brake.
Good thing too, as the original axle for this hub looks worn out on one side.
Unfortunately, the wheel hub I thought would be the easiest to work on turned into a nightmare. The cone nuts for the front axle had some nasty wear to them, which basically meant that I couldn't use them.
None of the other wheels I had in the garage had parts with any less wear and tear, and that was if they even had the correct cone nuts.
Fortunately, I had a tote box full of wheel hub parts that I had all but forgotten about, including a bunch of front axles and cone nuts!
(Seriously, I had these parts since 2019, before I joined RRB, and I have never once used them, much less looked through them.)
Unfortunately, none of the axles had cone nuts that were in any better shape than what I started with.
On a side not, I really need to go through everything in that tote box and find out just what sort of coaster brakes I can build out of the parts.
Although I had no luck finding the parts I needed yesterday, I'm still certain that I can get this bike rolling. One option is to go back to the storage building and dig through my wheel collection for potential replacements or replacement parts. The other option is to use some other wheels I have on hand, like the ones pictured below.
This wheel is the same style/manufacturer as the one I'd like to use, except it has slightly beefier spokes and an ugly welded seam where the hoop was put together.
I also have these wheels that I pulled of another bike. They aren't the look I'm going for on this build, but if all else fails, I know I could at least use these to make the bike functional.
I had hoped to get the klunker riding yesterday, or at least close to it, but complications with the bearing cups and especially the front axle prevented that from happening. Still, I'm getting closer to the finish line. The problem now is that the weather has cooled down drastically for today and tomorrow (current temperature is 38 degrees F,) so I'm not sure what I'll be able to do until it warms up again Thursday. I have some parts that need to be cleaned with a wire wheel, and I could go ahead and install the bottom bracket assembly and fork, but I'm not sure I want to mess with that when it's this cold out.
Made more progress yesterday!
I dug through my storage stash for as many axle cone nuts as I could find, and out of everything I grabbed, I'm certain that there are at least 2 good ones I can use. On a side note though, I'm noticing that most of my vintage wheel stash needs their cone nuts replaced, and I don't know if there are any aftermarket replacements for that, especially since not all wheel hubs are built the same.
Once I pulled what I needed from storage, I took everything to my dad's shop to clean them up, mostly with a brass wire wheel. While there I also cleaned up the handlebar stem, seat post options, the inside of the fork, and the threads on these 2 pedals I found on one of my parts bikes.
That is a great stash you have there!More progress from yesterday:
Since the bearing cups I used during the mockup phase weren't good enough for riding, I had to dig through my collection of bearing cups for a good set. Finding a good pair of bottom bracket cups thankfully didn't take too long, and I know automatically that they're made for this bike!
View attachment 261138
Finding a good pair of headset bearing cups, however, proved to be more of a challenge. First off, while I had plenty of Schwinn headset bearing cups, I mostly just had the lower, shallower ones. I don't recall if other manufacturers did this, but for whatever reason, Schwinn decided that instead of making both headset cups the same, they'd make one deeper than the other. What that means is if you use the wrong cup on top, there will be a big open gap between the cup and the crown race. I couldn't find a good top cup loose, so I had to disassemble one of my other bikes (fittingly named Parts Bin Schwinn,) to get the bearing cups I needed.
View attachment 261139
Also, I found this fork shim while looking for bearing cups. I was going to use the old beverage can shim trick I've done before, but I think I'll try this out instead, at least this time.
View attachment 261142
Once I got all the headset and bottom bracket parts gathered, I put them in my ultrasonic cleaner and cleaned them up.
View attachment 261140View attachment 261143
While I had stuff in the ultrasonic cleaner, I started cleaning out the wheel hubs. I noticed some small grooves carved into the coaster brake hub, which I guess means this wheel made a lot of hard stops over the years. I don't exactly remember what I did with the last Komet Super hub I built, but I decided to sand the inside of the hub with some heavy-grit sandpaper. Not sure if made much of a difference, but hopefully it'll help the coaster brake stop better.
View attachment 261141
I stuck the Komet Super parts in the ultrasonic cleaner next. I got most of the parts clean, but some will need one more pass to be clean enough for me. I also found all the other Komet Super parts I had cleaned before when I rebuilt my first one a couple years ago. a few have sadly started to rust a little, but most everything here is still good enough to use as-is, so I can pick out the best parts to rebuild this coaster brake.
View attachment 261144
Good thing too, as the original axle for this hub looks worn out on one side.
View attachment 261145View attachment 261146
Unfortunately, the wheel hub I thought would be the easiest to work on turned into a nightmare. The cone nuts for the front axle had some nasty wear to them, which basically meant that I couldn't use them.
View attachment 261148
None of the other wheels I had in the garage had parts with any less wear and tear, and that was if they even had the correct cone nuts.
Fortunately, I had a tote box full of wheel hub parts that I had all but forgotten about, including a bunch of front axles and cone nuts!
(Seriously, I had these parts since 2019, before I joined RRB, and I have never once used them, much less looked through them.)
View attachment 261147
Unfortunately, none of the axles had cone nuts that were in any better shape than what I started with.
View attachment 261153View attachment 261155View attachment 261157
On a side not, I really need to go through everything in that tote box and find out just what sort of coaster brakes I can build out of the parts.
View attachment 261154
Although I had no luck finding the parts I needed yesterday, I'm still certain that I can get this bike rolling. One option is to go back to the storage building and dig through my wheel collection for potential replacements or replacement parts. The other option is to use some other wheels I have on hand, like the ones pictured below.
This wheel is the same style/manufacturer as the one I'd like to use, except it has slightly beefier spokes and an ugly welded seam where the hoop was put together.
View attachment 261149View attachment 261150View attachment 261151View attachment 261152
I also have these wheels that I pulled of another bike. They aren't the look I'm going for on this build, but if all else fails, I know I could at least use these to make the bike functional.
View attachment 261156
I had hoped to get the klunker riding yesterday, or at least close to it, but complications with the bearing cups and especially the front axle prevented that from happening. Still, I'm getting closer to the finish line. The problem now is that the weather has cooled down drastically for today and tomorrow (current temperature is 38 degrees F,) so I'm not sure what I'll be able to do until it warms up again Thursday. I have some parts that need to be cleaned with a wire wheel, and I could go ahead and install the bottom bracket assembly and fork, but I'm not sure I want to mess with that when it's this cold out.

