round hollow metal canister holders would look cool where the "cylinders" would be, and if you could put stainless steel water bottles or thermos' in there, even better.
- COMPETITIONS
- THE COMPETITION ARCHIVES
- RRBBO OFFICIAL COMPETITIONS
- BUILD OFF 18 (2023)
- Build off 18 - CLASS 2
- BUILD OFF 18 - Class 2 Build Journals
You are using an out of date browser. It may not display this or other websites correctly.
You should upgrade or use an alternative browser.
You should upgrade or use an alternative browser.
The Rustacean
- Thread starter BartRidesEternal
- Start date


Help Support Rat Rod Bikes Bicycle Forum:
This site may earn a commission from merchant affiliate
links, including eBay, Amazon, and others.
Looking good @BartRidesEternal!
Perfect!A little bit art deco
I like this style. Has a 50's vibe to itAnd found inspiration for a BB plate:
View attachment 231647
View attachment 231648
Very cool, but not what I envisioned.
Reminds me of the "Soundgarden" chainring I saw on the forum or internet: (not mine)
View attachment 231649
View attachment 231650
Final design. I really like how simple and cool looking it is. A little bit art deco? And it will stiffen that bottom bracket barrel significantly.
The design with the 90 degree bend was 1.5mm's thick. This one is 2mm's thick.

A lot of engineering going on here!
I thought about that idea! I could put liquor in there or:round hollow metal canister holders would look cool where the "cylinders" would be, and if you could put stainless steel water bottles or thermos' in there, even better.
That the direction I'm heading in.I like this style. Has a 50's vibe to it
And thanks @Frankie plekhand @Pondo and @OddJob !
Not much updates, unfortunately.
I ordered the BB plates at the lasercutter, together with an "top crown" plate for the fork.
I can fabricate these myself, but a tight schedule made me choose a 3D cad file and lasercutted parts.
The lower tube is ordered with the same shape as the original frame tube that I cut off.
And I was testing some ideas with the 'car mirror' part. Not shure if I'll use it, but it doesn't hurt to try it in various positions!
Oh yeah, almost forgot. Wednesday I went to a Dinosaur park with my family. I don't know who had more fun, Daddy or the kids haha! I'll add some pictures you guys can probably appreciate.

Top crown plate. The two ears get a 90 degree bend.

Rear light?

Rear light?

Hmm.....

Would that fit between the tubes?

Not shure...
Maybe first weld the top tube on and check for these ideas again.
Dinosaur park:


Balls of steel (40kg each)

More updates soon
Attachments


$458.25
$509.99
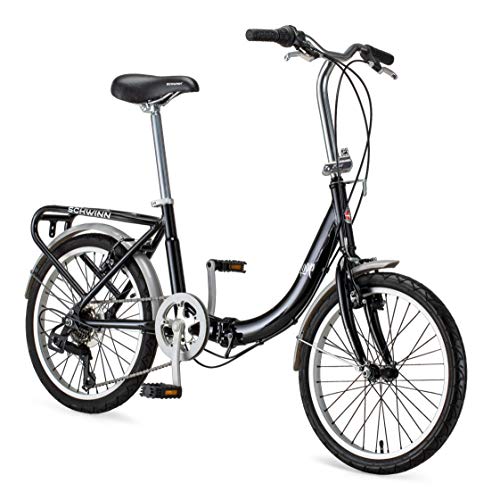
Schwinn Loop Adult Folding Bike for Men and Women, 20-inch Wheels, 7-Speed Drivetrain, Rear Cargo Rack, Carrying Bag, Black
Amazon.com


$19.99
Electra Glide Wall Decal 2ft Long Sport Harley Davidson Bike Motorcylce Sticker Man Cave Garage Boys Room Decor
FatCat Wall Graphics


$29.95
Crossroads Home Décor A Biker's Prayer, Gift for Motorcycle Riders, Inspirational Bike Picture Frame, 6451BW
Crossroads_Home_Decor


That light? piece is cool and definitely needs to find a spot on the bike.
Looks like a great day at the park, too!
Looks like a great day at the park, too!
I thought about that idea! I could put liquor in there or:
That the direction I'm heading in.
And thanks @Frankie plekhand @Pondo and @OddJob !
Not much updates, unfortunately.
I ordered the BB plates at the lasercutter, together with an "top crown" plate for the fork.
I can fabricate these myself, but a tight schedule made me choose a 3D cad file and lasercutted parts.
The lower tube is ordered with the same shape as the original frame tube that I cut off.
And I was testing some ideas with the 'car mirror' part. Not shure if I'll use it, but it doesn't hurt to try it in various positions!
Oh yeah, almost forgot. Wednesday I went to a Dinosaur park with my family. I don't know who had more fun, Daddy or the kids haha! I'll add some pictures you guys can probably appreciate.
View attachment 232144
Top crown plate. The two ears get a 90 degree bend.
View attachment 232145
Rear light?
View attachment 232146
Rear light?
View attachment 232147
Hmm.....
View attachment 232148
Would that fit between the tubes?
View attachment 232150
Not shure...
Maybe first weld the top tube on and check for these ideas again.
Dinosaur park:
View attachment 232155
View attachment 232156
View attachment 232157
View attachment 232158
View attachment 232159
View attachment 232160
View attachment 232164
View attachment 232165
View attachment 232166
View attachment 232167
View attachment 232168
Balls of steel (40kg each)
View attachment 232169
More updates soon
I vote for mounting it down below near the dropout. That looks amazing!
Looks like a great day out at the park!
Looking forward to seeing your laser cut pieces in place.
Looking forward to seeing your laser cut pieces in place.
Tomorrow the lasercut parts arrive and I can pick up the other frame tube.
Thursday I have a chance of working a few hours on the bike so maybe welding next week... maybe.
This evening I worked on the front arms and the assembly in the fork.
The whole is not finished just yet; I need to finish the shape of the arm with the detailing process. Not shure if there is going to be a number plate. And the fork still has some stuck rusted screws in it.
There will be no suspension, but the ability to adjust the front a bit heightwise, with little effort.
Screws n' bolts are not the final form either. Will use oldschool stuff with final assembly.


Going to cut the long hex nut in the lathe so the arm is supported on both holes per side. I like em tough!

Arm assembly. 8mm screws and shaft. 12.9 quality.

Testfit inside the fork. As seen from below.

Complete arm assembly. By adjusting the two nuts, you can alter the stance/height. I used two nuts; one is a counternut for locking it and keeping it in that position.

Used an clean aluminium top nut.
Allen key screw will be replaced by a hexagon bolt.

Removed the kickstand. It could turn 360 degrees, so probably broken
The pins on the end are quite worn. I will checkout if I can find or fabricate a replacement.
You don't see these kickstands much in the Netherlands.
Thursday I have a chance of working a few hours on the bike so maybe welding next week... maybe.
This evening I worked on the front arms and the assembly in the fork.
The whole is not finished just yet; I need to finish the shape of the arm with the detailing process. Not shure if there is going to be a number plate. And the fork still has some stuck rusted screws in it.
There will be no suspension, but the ability to adjust the front a bit heightwise, with little effort.
Screws n' bolts are not the final form either. Will use oldschool stuff with final assembly.
Going to cut the long hex nut in the lathe so the arm is supported on both holes per side. I like em tough!
Arm assembly. 8mm screws and shaft. 12.9 quality.
Testfit inside the fork. As seen from below.
Complete arm assembly. By adjusting the two nuts, you can alter the stance/height. I used two nuts; one is a counternut for locking it and keeping it in that position.
Used an clean aluminium top nut.
Allen key screw will be replaced by a hexagon bolt.
Removed the kickstand. It could turn 360 degrees, so probably broken
The pins on the end are quite worn. I will checkout if I can find or fabricate a replacement.
You don't see these kickstands much in the Netherlands.
Attachments

Last edited:
I think so too! @Starnger built a great bike with the same starting point a few years ago:
View attachment 229905
View attachment 229876
View attachment 229877
Personally, I will keep the bottom bracket loop.
Alright, some quick and dirty mockups. The crank and sprocket is just a fit, don't know if I'll use it in the end.
I already ordered the tires before the buildoff started, but did not assemble them. I knew I wanted these in combination with the creme coloured rims.
Enjoy!
View attachment 229881
Tires temporary fit.
View attachment 229882
Wheel between the fork legs. Needs an attachment or arm. There is no dropout for the front shaft currently.
I like the fork/rim colour combo! Just slightly different.
View attachment 229883
View attachment 229885
View attachment 229886
View attachment 229887
View attachment 229888
The fork dimensions are not the same as a bicycle.
I am thinking to simply cut the threaded fork tube and weld in a new one, but in the 1 1/8" threaded size for the frame.
View attachment 229903
View attachment 229904
Love that loop
First the fork, then geometry mockups and seatpost positions/type.
After that frame modifications.
Thanks for lookin' !

@Dr. Tankenstein will want to follow your fork work and diagram. He has a fork similar to that one in his stash.
My vote is for the two smaller bars, but curve them more to flow better with the top tube. It could become a wicked Project 346 "Spade"Liner


Sorry for all of the "Likes" but I finally got around to going through your thread. I am really liking what I am seeing so far. The tire and patina wheel combo is awesome. The frame ideas are killer. The engineering on the forkage and BB are great.
Keep building brother, this is gonna be a beauty!
Keep building brother, this is gonna be a beauty!
The fork dropouts are looking awesome, I like that you can adjust the ride height to perfect the stance.
Happy to share anything if the Dr has this fork. It is almost, but unfortunately not the regular 1" thread.@Dr. Tankenstein will want to follow your fork work and diagram. He has a fork similar to that one in his stash.
That looks really good too! Thanks for digging out that picture King! ♤♡◇♧My vote is for the two smaller bars, but curve them more to flow better with the top tube. It could become a wicked Project 346 "Spade"Liner
View attachment 232762
View attachment 232763
I already made my choice with two parallel tubes, but your picture made me re-evaluate again.
No problem! I appreciate 'the Kingfish' taking a look!Sorry for all of the "Likes" but I finally got around to going through your thread. I am really liking what I am seeing so far. The tire and patina wheel combo is awesome. The frame ideas are killer. The engineering on the forkage and BB are great.
Keep building brother, this is gonna be a beauty!
Thanks Luke!The fork dropouts are looking awesome, I like that you can adjust the ride height to perfect the stance.
Got some stuff done today, had a few hours for grinding off and cleaning the old welds, deburring the lasercut parts, removing paint for welding and cutting tube close to the desired length.
Hoping for some time welding next week.
Pictures in chronological order:

Parts came in!

That looks good!

Picked up the curved CrMo tube! (25CrMo4)

Bent the ears for the front fork top bracket.

Sparks! Cutting the head of a stuck bolt. Could not free it up with oil and heat. And the other end did not have an means to hold it with normal tools.


The other end. It normally holds a spiral spring for suspension. Did scratch the fork a little bit, rust will do the camoflage-ing


Bracket testfit! Very happy!


Both arms assembled for a mockup soon! Not the finished product, need different screws and bolts for the look I want to go. No allen key/head screws or torx in the final assembly.

Cleaned the frame in preparation for welding.


The plates fit really good! Very tight. I will keep the top open, since I like those lines

Maybe even paint the original 'center' plate in a different colour to create a backdrop or cool look.

Getting an idea of the looks!
I need to finish notching the tubes this week.
I am very happy with the progress and looks!!
Thank for taking a look!
[Edit] the bottom bracket conversion cups in the frame are there to keep the bb tube round when heated by welding. These were broken and perfect for this. In the end I will use an "one piece crank".
Last edited:
Loving the progressHappy to share anything if the Dr has this fork. It is almost, but unfortunately not the regular 1" thread.
That looks really good too! Thanks for digging out that picture King! ♤♡◇♧
I already made my choice with two parallel tubes, but your picture made me re-evaluate again.
No problem! I appreciate 'the Kingfish' taking a look!
Thanks Luke!
Got some stuff done today, had a few hours for grinding off and cleaning the old welds, deburring the lasercut parts, removing paint for welding and cutting tube close to the desired length.
Hoping for some time welding next week.
Pictures in chronological order:
View attachment 232930
Parts came in!
View attachment 232931
That looks good!
View attachment 232932
Pickup up the curved CrMo tube! (25CrMo4)
View attachment 232933
Bent the ears for the front fork top bracket.
View attachment 232934
Sparks! Cutting the head of a stuck bolt. Could not free it up with oil and heat. And the other end did not have an means to hold it with normal tools.
View attachment 232936
View attachment 232937
The other end. It normally holds a spiral spring for suspension. Did scratch the fork a little bit, rust will do the camoflage-ing
View attachment 232938
View attachment 232939
Bracket testfit! Very happy!
View attachment 232940
View attachment 232941
Both arms assembled for a mockup soon! Not the finished product, need different screws and bolts for the look I want to go. No allen key/head screws or torx in the final assembly.
View attachment 232942
Cleaned the frame in preparation for welding.
View attachment 232943View attachment 232944
View attachment 232945
The plates fit really good! Very tight. I will keep the top open, since I like those lines
Maybe even paint the original 'center' plate in a different colour to create a backdrop or cool look.
View attachment 232946
Getting an idea of the looks!
I need to finish notching the tubes this week.
I am very happy with the progress and looks!!
Thank for taking a look!
Love your bottom bracket plates! So glad you decided to keep the BB loop. I've always liked the Project 346 frames, but never cared for the way the BBs were attached - your plate is a nice, stylish improvement. Looking forward to seeing where you go with this build.
The new parts are looking good, I really like the new bottom bracket plates. The double bar is going to look great as well. This moped fork is pretty trick looking. Love this build, keep it coming!
Don't know how it would go with your vision, but some fine mesh attached to the inside of your new BB plates might look really good
Thanks Cap!Loving the progress
I read somewhere that the Basman cruiser frame had issues with the single bb plate.Love your bottom bracket plates! So glad you decided to keep the BB loop. I've always liked the Project 346 frames, but never cared for the way the BBs were attached - your plate is a nice, stylish improvement. Looking forward to seeing where you go with this build.
Thanks Pondo!The new parts are looking good, I really like the new bottom bracket plates. The double bar is going to look great as well. This moped fork is pretty trick looking. Love this build, keep it coming!
I appreciate your input mr Hatter! Maybe I will try that. Haven't thought about it. If I find some mesh I will try that.Don't know how it would go with your vision, but some fine mesh attached to the inside of your new BB plates might look really good
Little update
The tubes are cut by hacksaw and notched with an file! Took some time, measuring, marking, checking, cutting and file-notching. Continuously checking the progress by fitting it onto the frame.
Tuesday first welding session. I'm scared, since welding isnt my strongest point. I will try and clean the welds afterwards.


After cutting.

Blood sacrifice


Checking if its straight before notching by file!


Pretty clean! Some more paint will be removed before welding.

Cleaning the hole, by tapping m8 thread in there. Then use a drastically shortened screw to put in there and weld + clean it.
June is the month for faux-patina and paint!