:lol: :lol: Too funny but you're right, and it's a classic color that you can never go wrong with! Maybe I'll end up having a change of heart once I see a mock up of the wheels & tires on the frame. We'll just have to wait and see!deorman said:Just found your thread. You know, its never too late for
:mrgreen:
You are using an out of date browser. It may not display this or other websites correctly.
You should upgrade or use an alternative browser.
You should upgrade or use an alternative browser.
*Silent Assassin* - Rear Fender Added
- Thread starter laidbackcool
- Start date


Help Support Rat Rod Bikes Bicycle Forum:
This site may earn a commission from merchant affiliate
links, including eBay, Amazon, and others.
- Joined
- Aug 3, 2010
- Messages
- 12,545
- Reaction score
- 2,885
I'd think if you're going to go for anything but the bare metal I wouldn't go full black, too common and predictable. I'd go for a black chrome or a light black tint over the bare metal.
Duplicolor shadow works well for this:

http://www.duplicolor.com/products/shadow/
Duplicolor shadow works well for this:
http://www.duplicolor.com/products/shadow/
It just so happens that my girlfriend's bike is the exact same frame as mine, and she's currently running 26x2.2 tires on 1.75 wheels . With the rear wheel mounted approximately in the middle of the dropout, the spacing between the chainstays near the bottom bracket is a shade under 3 inches wide. The measurement of the front fork legs closest to the truss rods is virtually the same. My guess is that a wheelset in the 24" or 26"x 2.24-2.5 range should put me in good company, and I should still have enough clearance to run tires in the 2.125-2.35 range.laidbackcool said:You're absolutely right. Good call!kingfish254 said:Man, those 144 holes in the wide butt rims look sweet!!!!! LOW FAT RIDER kinda sweet.
No need to really worry about your hb spacing front or rear, that is easily widened. What you need to be considering is how wide the fork of chain/seat stays are at the area the rims/tires would hit.
You've just so eloquently described the precise reason why to this point I've chosen to go bare metal over full black! But if for some strange reason I change my mind and go black, I will definitely make a trip to AutoZone and pick up the Duplicolor Shadow!outskirtscustoms said:I'd think if you're going to go for anything but the bare metal I wouldn't go full black, too common and predictable. I'd go for a black chrome or a light black tint over the bare metal.
Duplicolor shadow works well for this:
http://www.duplicolor.com/products/shadow/
I like the way your build is going 8)
Thanks a lot! To be honest, I was a little concerned that I would never figure out where to go with this build. Thanks to the suggestions and support of several forum members, it's lead me to developments that quite frankly have me pleasantly surprised. I still think there are a few more surprises to come 8). I just hope it turns out half as good as some of the other builds in this competition.MplsCoaster said:I like the way your build is going 8)
That's part of what makes the build off so cool. Someone will make a comment or see something from a totally different angle than you had planned and the gears just start turning in your head.
Just keep having fun with it, and you end up with the bike you want.
Just keep having fun with it, and you end up with the bike you want.
I couldn't agree more! This build has pushed me outside of my comfort zone, but because of that I'm having much more fun than I did building the Chief. Slowly but surely, I'm seeing progress toward creating the bike I want, and I'm so glad I decided to get involved in the build off.kingfish254 said:That's part of what makes the build off so cool. Someone will make a comment or see something from a totally different angle than you had planned and the gears just start turning in your head.
Just keep having fun with it, and you end up with the bike you want.
- Joined
- Aug 3, 2010
- Messages
- 12,545
- Reaction score
- 2,885
But to me I say that is precisely what makes a great build and a great builder. Don't do the same thing twice, do something NEW. Just think if someone hadn't ever french-ed a headlight, never lowered a suspension system, never chopped the roof off a perfectly good car and take inches out of it, never sectioned a hood, never done anything cool because they didn't know if they could do it because no one else had done it before? Don't let fear take the wheel and drive your build into being "regular" I say steer right for the brick wall, floor it, and have a breakthrough! Because on the other side is innovation and discovery and it's a beautiful thing.
Amen! Very well said!outskirtscustoms said:But to me I say that is precisely what makes a great build and a great builder. Don't do the same thing twice, do something NEW. Just think if someone hadn't ever french-ed a headlight, never lowered a suspension system, never chopped the roof off a perfectly good car and take inches out of it, never sectioned a hood, never done anything cool because they didn't know if they could do it because no one else had done it before? Don't let fear take the wheel and drive your build into being "regular" I say steer right for the brick wall, floor it, and have a breakthrough! Because on the other side is innovation and discovery and it's a beautiful thing.
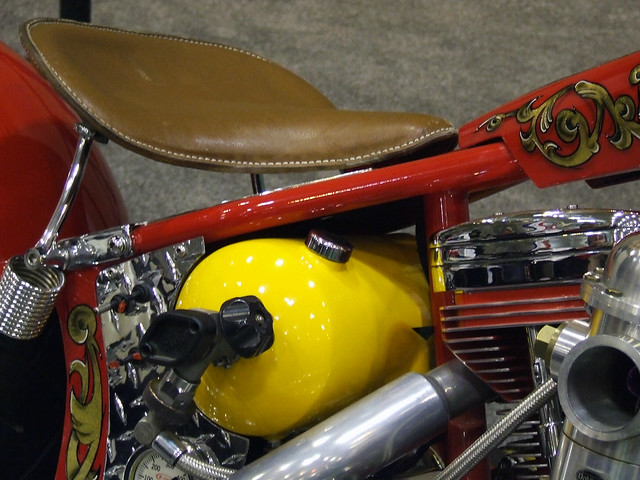
It dawned on me earlier today that I still had this Troxel saddle, which I used in a mock up for my very first build, laying around in the shed.


Since I'm somewhat trying to build Silent Assassin on a budget, I figured I could save money by figuring out a way to mount the seat onto the seat post. I've spent most of the day brainstorming and finally figured out a simple but cool solution. I also got caught up working on the seat and forgot to take pictures. Unfortunately, it's dark in my neck of the woods and will have to post photos tomorrow. But for the time being, here are a couple of pictures that serve as inspiration:
Kingfish, I hope you don't mind me using your photo, but it provided a starting point for where I needed to mount the seat on my frame. This is my way of saying thanks!
And here's the other photo...
What I ended up doing was chopping down the undercarriage of the seat in order to the right fit around the seat post.

Regarding the smaller holes behind the seat post on the seat stays (which I assume are used for mounting rear racks), I drilled out larger openings with a 5/16 drill bit. I also used long enough screws to slide through the springs, middle brace, and rear rack holes to mount to the frame. The photos that I post tomorrow will show you much better than I can explain.
Since I'm somewhat trying to build Silent Assassin on a budget, I figured I could save money by figuring out a way to mount the seat onto the seat post. I've spent most of the day brainstorming and finally figured out a simple but cool solution. I also got caught up working on the seat and forgot to take pictures. Unfortunately, it's dark in my neck of the woods and will have to post photos tomorrow. But for the time being, here are a couple of pictures that serve as inspiration:
Kingfish, I hope you don't mind me using your photo, but it provided a starting point for where I needed to mount the seat on my frame. This is my way of saying thanks!
And here's the other photo...
What I ended up doing was chopping down the undercarriage of the seat in order to the right fit around the seat post.
Regarding the smaller holes behind the seat post on the seat stays (which I assume are used for mounting rear racks), I drilled out larger openings with a 5/16 drill bit. I also used long enough screws to slide through the springs, middle brace, and rear rack holes to mount to the frame. The photos that I post tomorrow will show you much better than I can explain.
So you are going to mount your seat with an awl through the seatpost clamp too?

The seat is actually mounted through the seatpost clamp via hex bolt and nut, however seeing your seat mounted through the clamp triggered the "On" switch to flip the :idea: inside my brain!kingfish254 said:So you are going to mount your seat with an awl through the seatpost clamp too?
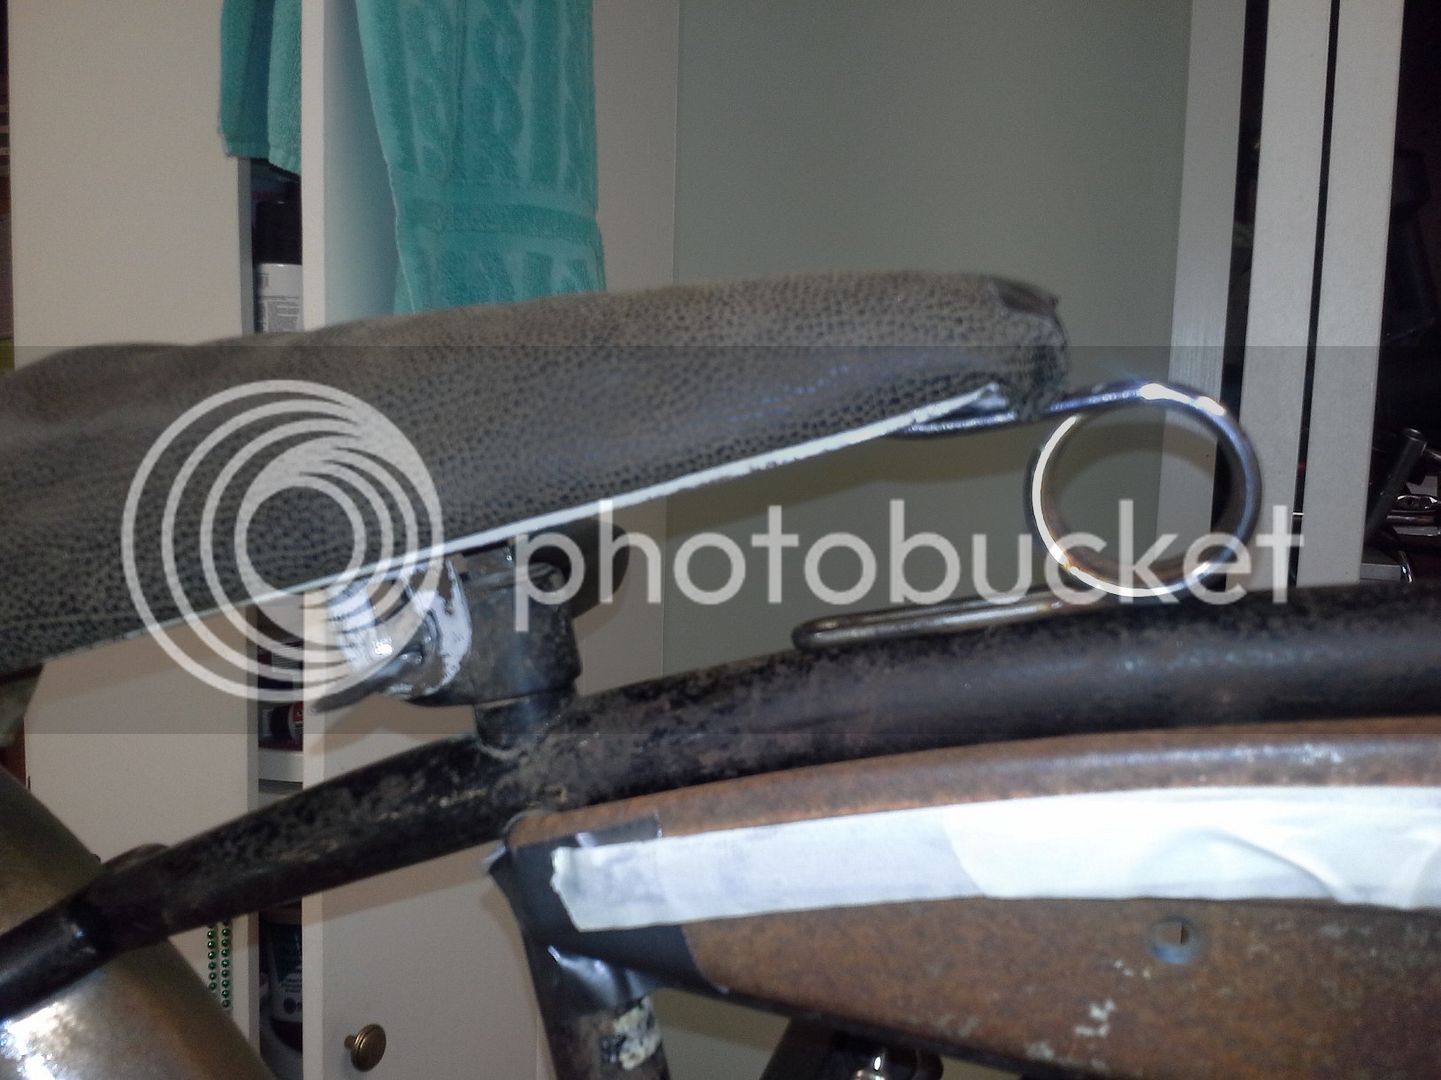
I finally took some photos of the seat mounted to the frame.

The hairpin that was already welded to the undercarriage

The chopped up section of the undercarriage that is mounted through the seatpost clamp

A couple of bolts, nuts, spacers, and several washers used to mount the springs to the rear rack holes on the frame

That's it in a nutshell. Now, it's time for me to figure out what to do with the seat from a cosmetic perspective.
The hairpin that was already welded to the undercarriage
The chopped up section of the undercarriage that is mounted through the seatpost clamp
A couple of bolts, nuts, spacers, and several washers used to mount the springs to the rear rack holes on the frame
That's it in a nutshell. Now, it's time for me to figure out what to do with the seat from a cosmetic perspective.
Thanks. I'm just glad I was lucky enough to have that feature at my disposal 8) !jats said:love the use of the rack mounts will have to keep that one in mind! ty
Troy
I never got a chance to contact The Cruiser Shop about their 26" hoops pre-drilled for 144 spokes. They open back up today at 5 PM on the west coast, and I'll shoot them an email. In the meantime, I stumbled across a few more parts in the shed that I may consider for this build.
A Nexus 3-speed hub that has never been used. How many 144-spoke rear wheels have you seen with a 3-speed coaster? Well, if all goes according to plan, then this could be one of the few...

...thanks in part to these spoke adapters that I'll buy if I'm fortunate enough to get the wheelset I desire!
A hood ornament that I might mount somewhere on the frame or fenders if I get some


Sweetheart skiptooth sprocket

And the original crankset that came with the frame I'm working on as I speak...

A Nexus 3-speed hub that has never been used. How many 144-spoke rear wheels have you seen with a 3-speed coaster? Well, if all goes according to plan, then this could be one of the few...
...thanks in part to these spoke adapters that I'll buy if I'm fortunate enough to get the wheelset I desire!
A hood ornament that I might mount somewhere on the frame or fenders if I get some
Sweetheart skiptooth sprocket
And the original crankset that came with the frame I'm working on as I speak...
Speaking of the last photo above, there's a seat in the background that originally had a crash rail. I removed the rail and mounted it to the seat I have on the frame.

As crazy as it looks, for some reason I like the end result.
As crazy as it looks, for some reason I like the end result.
My initial idea for a handlebar and stem combo...


Looking good! Love that seat mount idea!
Luke.
Luke.