You are using an out of date browser. It may not display this or other websites correctly.
You should upgrade or use an alternative browser.
You should upgrade or use an alternative browser.
Led-Sled Sidecar Project
- Thread starter Half Link
- Start date


Help Support Rat Rod Bikes Bicycle Forum:
This site may earn a commission from merchant affiliate
links, including eBay, Amazon, and others.
Re: Led-Sled Sidecar Project - All Most Done
What a stunning job you've done on this, everything on it looks so good!
What a stunning job you've done on this, everything on it looks so good!
Re: Led-Sled Sidecar Project - All Most Done
No new pic’s today just a bunch of thank you's to all of you for the complements and very kind words.
Hope to post some new pictures soon!
Thank you!! HL
No new pic’s today just a bunch of thank you's to all of you for the complements and very kind words.
Hope to post some new pictures soon!
Thank you!! HL
Re: Led-Sled Sidecar Project - All Most Done
Wow. Stellar job right there!
Wow. Stellar job right there!
Re: Led-Sled Sidecar Project - All Most Done
Thanks guys!! I’m getting closer to the final pictures but first I have to wrap up some unfinished business. After narrowing the seat to make room for the interior side panels I left the folding seat back unfinished. No longer. I grabbed some left over seat material and a $1.89 pack of furniture tacks from the lhs and wala!!! Quick and easy!!! One last thing to do and then the final pictures and the Led-Sled Sidecar Project will be done!
Later HL
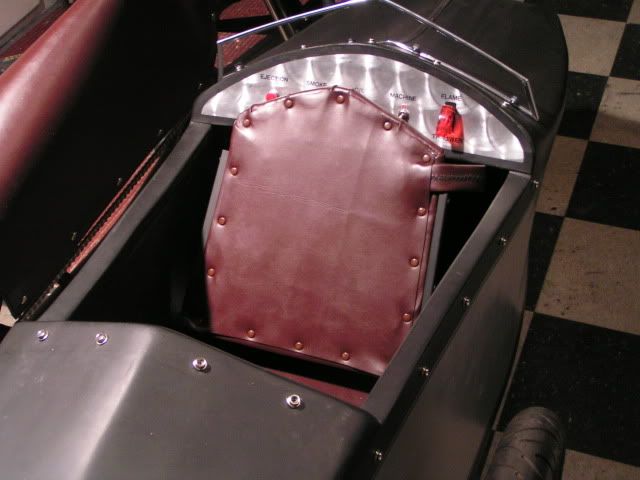


$19.99
Electra Glide Wall Decal 2ft Long Sport Harley Davidson Bike Motorcylce Sticker Man Cave Garage Boys Room Decor
FatCat Wall Graphics


yoothgeye
I build stuff.
Re: Led-Sled Sidecar Project - All Most Done
What is it with you and cliff hangers?
Half Link said:One last thing to do and then the final pictures and the Led-Sled Sidecar Project will be done!
What is it with you and cliff hangers?
Re: Led-Sled Sidecar Project - All Most Done
Sorry yoothgeye!! Bro It’s not intentional in any way!! As I have moved along in the build I continue to
find things that I think need to be added. Keep in mind this thing started with pvc pipe and an idea!!!
Maybe I should change the title to All Most ..All Most Done ....Today?!! :lol: :lol:
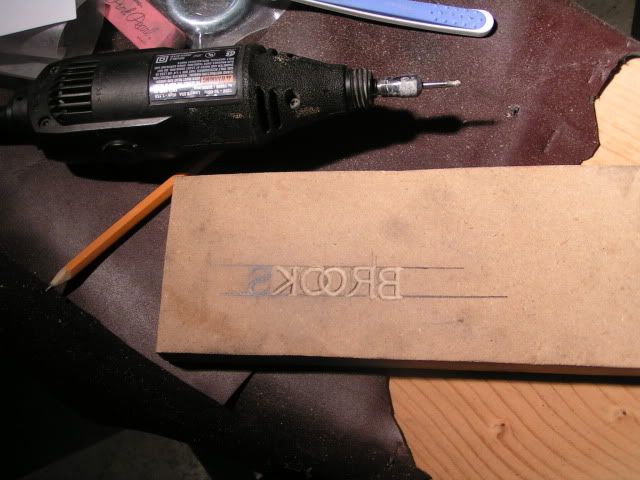
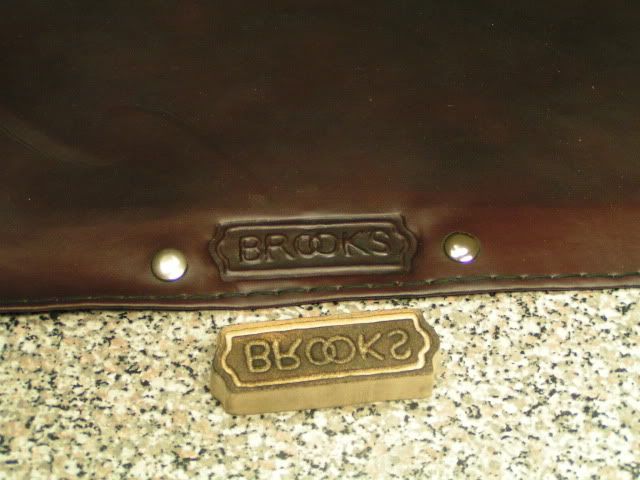
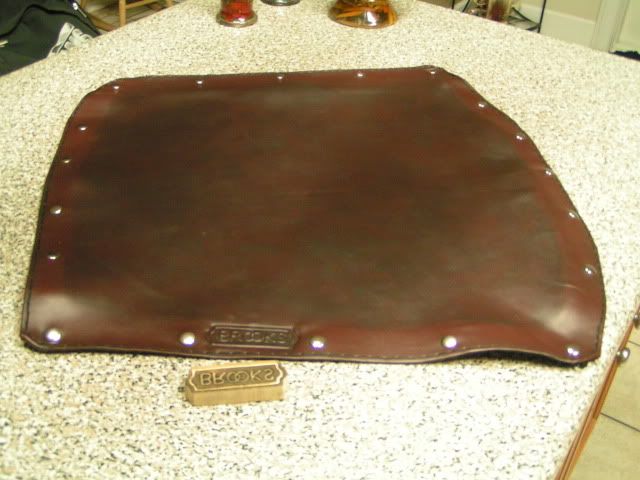
Started goofing around with an idea based on the seat and started wondering how I could tie in the seat and tanoue cover. I knew that the tanoue cover needed to have the aged look so after many tries of different things I fell back on the fogging of the rattle can. After a light mist of flat black I moved on to my next task!!I grabbed a leftover piece of wood, the dremel tool and started carving. After slapping it in the vice this is what I came up with.
Later, HL
Sorry yoothgeye!! Bro It’s not intentional in any way!! As I have moved along in the build I continue to
find things that I think need to be added. Keep in mind this thing started with pvc pipe and an idea!!!
Maybe I should change the title to All Most ..All Most Done ....Today?!! :lol: :lol:
Started goofing around with an idea based on the seat and started wondering how I could tie in the seat and tanoue cover. I knew that the tanoue cover needed to have the aged look so after many tries of different things I fell back on the fogging of the rattle can. After a light mist of flat black I moved on to my next task!!I grabbed a leftover piece of wood, the dremel tool and started carving. After slapping it in the vice this is what I came up with.
Later, HL
yoothgeye
I build stuff.
Re: Led-Sled Sidecar Project - All Most Done
OK, first, that's hot.
Second. I need a refresher, is the cover made of leather or some type of pleather? It really took that embossing well. Looks like MDF you made the mold out of... is it?
Answer these questions and soon all my saddles will have "actual" Brooks covers.
OK, first, that's hot.
Second. I need a refresher, is the cover made of leather or some type of pleather? It really took that embossing well. Looks like MDF you made the mold out of... is it?
Answer these questions and soon all my saddles will have "actual" Brooks covers.
Re: Led-Sled Sidecar Project - All Most Done
Thanks yoothgeye!!
The material that I used for the tanoue cover, sidecar seat and grips is indeed pleather that
I picked up at a local fabric store for $6.00!! The wood that I carved was mdf and after cleaning all of the carved areas with and old toothbrush I used a torch to get all of the fine fibers smoothed down. (no way to really sand inside the letters and boarder) I folded the material on the tanoue cover so that I could add the stitching around the outside so it is actually two layers of material. No Expert Here! but I think that there are two major key’s to making this happen..... First, I opened the flap on the inside and sprayed just enough 3m adhesive to ooze into the letters during the crimping possess, second is that when I placed everything in the vice I used a piece of wood on the opposite side with a leftover piece of carpet so that the fluffiness of the carpet would help to push the material into the mold. Don’t forget you need to crank that vise down and walk away for at least a day so it will set up. It worked for me plus the 24 hour wait to see if it turned out it’s fun stuff!! Try it out on some scrap pieces and let me know how it comes out! Hope that helps you!!
If anyone else out there has something to add please throw in your two cents. This was a first time try for me and I would hate to send someone in the wrong direction!
Later, HL
Re: Led-Sled Sidecar Project - All Most Done
Just gets cooler and cooler! :wink:
Just gets cooler and cooler! :wink:
yoothgeye
I build stuff.
Re: Led-Sled Sidecar Project - All Most Done
I'm going to use a piece of steel, carve out "BROOKS" and then heat it, and get my wife to brand me on my lower back, then I'll go riding with a short shirt on and everyone will see my Brooks tramp stamp and they won't care that I'm riding on a China made saddle.
I'm going to use a piece of steel, carve out "BROOKS" and then heat it, and get my wife to brand me on my lower back, then I'll go riding with a short shirt on and everyone will see my Brooks tramp stamp and they won't care that I'm riding on a China made saddle.
Re: Led-Sled Sidecar Project - All Most Done
Boy!!!...
I was born with that brooks mark on the back of my head... :!: :shock: :?: :shock: :shock: :lol:
Get´s cooler and cooler... but I keep waiting for the matching tank! :wink:
Boy!!!...
I was born with that brooks mark on the back of my head... :!: :shock: :?: :shock: :shock: :lol:
Get´s cooler and cooler... but I keep waiting for the matching tank! :wink:
Re: Led-Sled Sidecar Project - All Most Done
Thanks Skipton!! Just a side note I was born in Danville!! Small world? or just a huge site!
Hey yoothgeye don’t do it!!!! All that I get from my brooks tramp stamp is people asking me if brooks is my daughters! :lol: :lol:
Well Gdcast something special may be coming your way soon! :shock:
sensor, thank you buddy!! I appreciate the very kind words!!
Hope to post some updated pic's soon!
Later, HL
Wow! I didn't know that it's possible to stamp pleather. Very nicely executed, looks proffessionally made!!
Galtbacken said:Wow! I didn't know that it's possible to stamp pleather. Very nicely executed, looks proffessionally made!!
You and me both buddy! :shock: I just tried it and with extra adhesive and patience and it worked.
I’m glad you like it. I have learned so much from you and others on this site maybe it’s something that others can use in there builds as well. Thanks, HL
I'm pretty sure I'll use that idea sometime!! Great stuff, thanks for sharing!
Re: Led-Sled Sidecar Project - All Most Done
Totally awesome.
Bump!
Half Link said:Thanks yoothgeye!!
The material that I used for the tanoue cover, sidecar seat and grips is indeed pleather that
I picked up at a local fabric store for $6.00!! The wood that I carved was mdf and after cleaning all of the carved areas with and old toothbrush I used a torch to get all of the fine fibers smoothed down. (no way to really sand inside the letters and boarder) I folded the material on the tanoue cover so that I could add the stitching around the outside so it is actually two layers of material. No Expert Here! but I think that there are two major key’s to making this happen..... First, I opened the flap on the inside and sprayed just enough 3m adhesive to ooze into the letters during the crimping possess, second is that when I placed everything in the vice I used a piece of wood on the opposite side with a leftover piece of carpet so that the fluffiness of the carpet would help to push the material into the mold. Don’t forget you need to crank that vise down and walk away for at least a day so it will set up. It worked for me plus the 24 hour wait to see if it turned out it’s fun stuff!! Try it out on some scrap pieces and let me know how it comes out! Hope that helps you!!
If anyone else out there has something to add please throw in your two cents. This was a first time try for me and I would hate to send someone in the wrong direction!
Later, HL
Totally awesome.
Bump!