Zasada Rides Again

Rat Rod Bikes Bicycle Forum

Help Support Rat Rod Bikes Bicycle Forum:

This site may earn a commission from merchant affiliate links, including eBay, Amazon, and others.
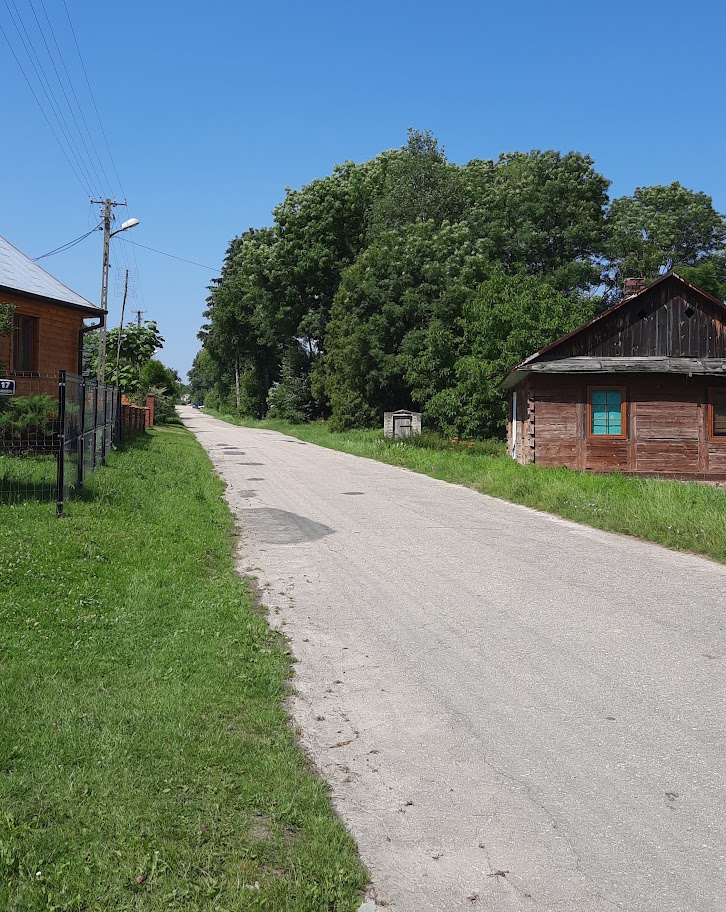
Our road, the only one in the village and which goes nowhere but to the forest, is rather like 'The Street' in the village where I was born, back in the sixties, remarkably lacking in litter.

AJFCJaVM-QATA3zlaOCFT20CDjsVXIkKnLvE2HRtqy1bILmNRXNyROT4_BAUao0LZmjml4uV9K6PSocxf3dC_pvO2syNlXoHD6jTAowCHsXDO42QwRiK5uisvYuepoSA3_QbnXcr0e2N2QiIHYb5PKHVgc6s=w726-h912-s-no


There is not even a litter bin.

This is how I like it, trying to build bikes without going out to find parts, re-using waste materials where possible and as far as possible.
 
I know this sounds strange, but we rarely buy food and drinks in any kind of can, and even the cans that we do buy have a light ripple or ridging that is a nuisance when you are trying to make a shim. I guess that ripple helps to let them use thinner steel.

Anyway, our beer comes in glass bottles , which we can take back to the shop and get back about a Zloty per bottle. In fact we have a nice plastic container for transporting them.

AJFCJaUwev53dL-g-i9vGHU07lR7sQ9Y3oRit0dlxhRhHDFZuLivgBGnDAlGZH43QOz0jb3aluAy9wFOGTS0wPrxKiHQWEGejvcwcWUtN4Wpzb_H-t19M8uBVu6t6IAjlI2ZriIwUOhBN8GweeSjO4KEYABv=w737-h912-s-no


One down, five more to go...

I could go and buy some beer in cans, but that kind of defeats the purpose of my builds, which is mainly to use the materials that I can find around me. I could cut up one of our large plastic cans we get cooking oil in, because the main bottle is nearly finished.

The only question I have is which would produce a better bike, rather than just a more socially acceptable one?
Beer always tastes better in cold glass over a can, any day.
 
While examining those former chair legs that I hope will make good seat supports, I noticed that one had a threaded hole in it, while the other had a sheared off bolt in its threaded hole. They are higher on the tubes than where I planned on drilling the lower mounts, but I thought that it is worth trying them out to see how it all looked. It would set the seat lower and further back, but it would also give more focus on the lower part of the tubes where they extend below the frame. I have not remember seeing anyone doing this who was not building their own frame, so in order to achieve it all all I had to do was remove this broken bolt.

AJFCJaXo0Jz5ECq90i48eD0oub5GtA9qMWIqpLNcr-hHCevPvlfJj-eu5_kYkxpXIdT3Rbqxev0TK9G3SNgLxLByLneNVzQIPskVJhigNdZfDmpaW7debGJ35X9FEe1iqTVO-PXZ43TDA5pYqEUSiklXw6yR=w874-h969-s-no


I sanded off the remaining pink paint from the rear frame mounts, maybe because the insistent pressure on associating pink with girls and blue with boys in our societies, which is really annoying as I do not want a life controlled by such ridiculous things. So no pink and no blue.

AJFCJaXuTaX5KYVWTI0viMEVHWRuxxxcU2rA3qD-w4nlM4Wt2a-EAVW-jYfqQglg5YFTR_5bPe8sxdHOlZS0xGah1-QBE2R81WBpmWCT75GfrKUXtM_SERi2ltNoPj2ly10NXa5Xr5VJGrega7oRWdWqmdue=w889-h969-s-no


I think that if I really believed that this was going to be the solution, I would have sanded them down a bit better, but that can wait for later. Even if I do not use these, they will be perfect for some future job, especially when I finally invest in some welding equipment.
 
There was a convenient threaded hole in the tubes to support the rear of the seat, except it did not go all the way through. Now while I believe in the benefit of good tools, I see no reason why I should buy collections of tools where I only end up using a small series of them all the time. What I do instead is buy a set of cheaper tools and only replace the ones that break or wear quickly with good tools. Now this handle is rubbish, but while checking out the tools stalls at some of our local fairs this summer I will keep an eye out for a good secondhand replacement. I am also sure that I can also reuse parts of this handle on other things.

AIL4fc8-V22M8SCUMtwyrSqEG9Sesi0WZ9_MQdWnJ_qh6KKtV0Ulr7uy8ai9w3FpbbnClWywmSMeR-__P5ssy78XN1No1DXPT1nTFz1LVmtHFZaqq2lYgc9JbKrtXfXK_oE2Q1qKytqY2qQP6BzpCtEuR5yB=w828-h969-s-no


I also need to keep an eye out for a good secondhand vice, but in the meantime it held the tap to finish cutting the thread all the way through.

AIL4fc8Csaac3vtaJQNQoIZpvvrRQXztrj0BCFE0B2ApaaILedmcd9jD5IkOx5A6MYHOQgsZXjgxIiK5y1P4ICXqj_SBjGQd-Va6Mg06wvHNScOKaGQPMLVmOTu8xnpTeUOAdyfTimeQADiBhWbqgN8XGiVd=w891-h969-s-no


This is my 1/4" and 3/8" socket set, by the way, and in there are some Snap-on sockets as well as a lot of cheap sockets that I have never used in 40 years (and some of the unused ones have rusted onto their clips). I mean the really rarely used sizes are perfectly OK for those rare uses, and are excellent for grinding down to fit really tight spaces. That is what tools are to me.

AIL4fc80mptwIVo4PgVDKpJ-wZxyTBVGlKO3JEilD9CQ793InqNb6oS4KntB4gfi9x8B36QgJkqYvvLbrKGmlmybQ15HlY0EWcKOVlv_p4I58N0Wecyj67F-2xHvJ2jPAxMUu1GJAye_zKrmYkEdDfihavJI=w1483-h969-s-no


Progress is being made, and I feel that the bike is coming together, nut by nut :)
 
What I do instead is buy a set of cheaper tools and only replace the ones that break or wear quickly with good tools.
That's how I do it too. Works pretty well. This is a really interesting build GP. I really like the creativity and ingenuity of just adapting what's laying around to work for the build. You've come up with some cool solutions and it's fun to watch. :cool2:
 
Thanks, I just converting my stuff into stuff, and then into other stuff. While I am at it I manage to restore several other bikes that pays for it all.
 
Here are the rear saddle supports attached using those original threaded supports for the seat these bars originally came off. I decided to reuse the saddle stem off my last year's bike here as the current seat would not be long enough to reach the aluminium stem. I could build a longer seat, but maybe not for this project.

AIL4fc9tJLlztWFumiFxVQL9VRHmgWPqe8G6TzDfTQL0m7XICcKkeK8cIsczU0jLMIVjT9wWaJYJwIGms0Fj84030ey_v3vD2eKrgxaYVOWlxTH-kX-c56srWSvHHnlRzzumJHmcwhJDgf66xPdeNiFzJNeW=w1416-h969-s-no


Since I was ready for a rebuild of the front fork assembly, I also attached the front and rear wheel partly to see how the suspension would work out.

As a concept I am quite fond of it, the closeness of those rear bars to the ground are rather like the pedals are on low riders. As a practical rider here on our single road, along with the steepness of our entrance and the fact that our yard is all grass could all make it rather difficult to ride. However, if I were to build a bike with 26" wheels then this could be a fun choice. I actually have a frame on the wall that I have never used as the front fork was badly bent when I found it, and I also now have a good supply of timber from which to build a mark two seat.

I still need to do a couple of mods to the front wheel mounting assembly in order get everything to line up well. Then of course I need to add the front brake and mudguard.

AIL4fc-LbFrkJwKM-jz-cvr5oy9HahiWsOEC0aFuSZXr08_5ANSD5YLbdXTJ4GNUnEp1Nm-LqCwkYC6_T9qUyPFMVJ5viy3D-PngRM8jblzdnKsiiSiru5aj8RZbo-c9f7P3KuRbvyyCnOtXWpgpFpmjIflZ=w1166-h969-s-no


The fact that the bolts holding on the rear wheel extensions do not allow the bars to be positioned more upright is probably a good thing, otherwise the bottoms of the tubes would need some trimming or bending work to fit like this. But yes, on a bike with a 26" rear wheel, this might work out well.

AIL4fc-P3iU7OIuObWWouytvkOL2GWmGsiif00XMdiPn-LfM3IrJseuFHjrtIkkzljkrNrzFKqpo-d6n1s-ghWQYer8rMZTmFkWDrWMgG4jloRPvN-6sG4ESxHrTSC-9mqjXrGO0jcOfTFp0f6ZTc1ANHF-H=w727-h969-s-no


I can also see that I need to do some more work on the seat, to fill in the lower side more so that it conceals the front seat mount more. I must also replace those square parts of the original seat mount with plain old washers. It is not as if I need them here, since the seat will also be mounted at the rear.

I would like to find a couple of decent plastic mounts to connect the seat to the rear frame, but I could not see anything decent at out local DIY store. Still, we are visiting the big city next week, where I will be able to check out a couple of big stores plus I have a chair in my garage that might yield something I can use.
 
Well it is really coming together now, but I think the sissy bar needs to go up. I think that the sissy bar should always go at least a tiny bit above the rear of the seat.
 
Well it is really coming together now, but I think the sissy bar needs to go up. I think that the sissy bar should always go at least a tiny bit above the rear of the seat.
Yes, that is happening, I just wanted to be sure what the options are, for now and for the future. I might use the bars to build a larger bike next year, I have a frame hanging on the wall that I would like to use.
 
I thought I should spend some time getting the BB on the bike, otherwise it may never become an actual bike if I found some problem with it.

Most of my bikes seem to come with some variation of the classic 8 ball BB, either on a three piece crank or, as with most of my Romets, a two piece crank that comes with a 50 tooth already welded on. A couple of years ago, while I was looking for an alternative to Romets two piece cranks, I got distracted in the main bicycle shop in Lublin and bought the BB on the left.

Well, the day has come. and I am going to try and build it in this bike.

AIL4fc-dndCkp0Tm5P5h9hVr9A7W9DYJ6kMFyimuqrCVeEI9wLhXvUggrccgxaAyiRlAyQS_fN4C6PcfCPuJzxpvzjqrCPpbTjpiLHcQMv8WwSyYH484_sMU6EJ6pvHBQNkkzi9jRDNFmxqim5_ZradYUUNt=w1094-h969-s-no


Well that was not so bad, after I spent some time picking out all the dried hard stuff on the threads that they must have used to keep the original BB in place. I replaced it with copper grease, as I actually want to eventually take the BB back out of this bike without any struggle. It is like the difference between working on someone else's car and your race car - one eventually comes apart while the other always comes apart easily - unless you bend something.

I also gave the frame a bit of a clean, since I had it in pieces and upside down.

AIL4fc_0hjN3fox_wd172OC4SbCv7UgonTvWSA0529FGSiC9o15jwXQyC58WnugTZ6dxHpdvLpLA20XtTnlIS6m7EKfouEqG34r8otXOrDzzPFulZgfT2Geq-9RgtpRRPiKAMDWB0LUkiRZkdur7pgbcIFrW=w1286-h969-s-no


Now that I have got the bike back together I thought it was time to work on the replacement spacer for the seat tube, cut off the kids frame that I made the seat tube from on my last summer's bike. Since this was steel instead of plastic, I switched to using my angle grinder to make the steel slim enough to fit - with a bit of extra effort from my sanding tool to achieve a smoother finish.

Remembering, of course, that a protective helmet should be worn when cycling.

AIL4fc8YoXWXb2Cov11OUjwfMm4CP4u41VCmsCBkubHUvkHIos7DbSaCDoKHhw3sQIiwT78TtZCHaQOYsffxUPx9EBcMWekcjzThSc9nNyNbkfn8JHT9CdLwZLGbECCk7E8h3GUhWG_qcDmuAYt-5yMDtqpP=w1204-h969-s-no


Now for the one piece of wood that I am kind of glad to be incorporating, although this is a bit of ply. I only have 4 small squares of plywood, used as the 4 attachment points for the legs of a small table. I also spent a few zloties on a small tin of wood filler so that I could fill all the extra holes that I did not need.

AIL4fc9r5kmdREkMDYM84wQBXBBzD5s1QeKsT6QusN1lI-OspYmdf_kyQbS7WKC3xScuO17VByloQKLJGpdreIEUON6xHV6cYMh4tK-dOv5qr2Vaqt3FjR55ljzgpf_GEDNsk9CNeOqGc6a7dQ3ETTOPvSwW=w1196-h969-s-no


Things are progressing now, and I think I have almost everything that I need to finish the project except some small things like some kind of tack or clip to hold the seat cover on, unless I glue it.
 
Wood filler? Bravo!

And here I thought you were out at the edge of civilization where it was impossible to get common supplies like paint thinner and glue. :D

I am even starting to feel like there is an electric welder in your future.

I am so glad that we are not hearing stories of serious deprivation from you, due to the war.

We are so far across the globe from it that I would never know except for the constant media bombardment. That, and the rising cost of commodities and services.

We had a huge national debt here, and we basically doubled it to support this effort. But I don’t think that it will go much further than that here. I don’t think will see any conscription. Just heavy taxation.

But that has been coupled with a huge influx of things like reasonably priced foreign tools. I would never pay the money for a set of Snap-on tools or even Proto or Mac. Plus, I too grind on them, and bend them on purpose, for tight applications.

I’ve been watching videos about the construction of the 5-litre flying Millyard and the Kawasaki V-12.

After having a look inside of Allen Millyard’s shed I feel a little over-tooled! But then he does not work on cars and trucks as far as I know. He’s strictly a cycle guy. Who loves his hacksaw… :)
 
Wood filler? Bravo!

And here I thought you were out at the edge of civilization where it was impossible to get common supplies like paint thinner and glue. :D

I am even starting to feel like there is an electric welder in your future.
The trick to buying such wonderful things is knowing what they call them in Polish, or just guessing based on the pictures on the packet...

And yes, I may buy a welder in the summer, I just need to sell a bike or two top pay for it. I don't need to sell anything to get the money, actually, but it is how I work. :)

But that has been coupled with a huge influx of things like reasonably priced foreign tools. I would never pay the money for a set of Snap-on tools or even Proto or Mac. Plus, I too grind on them, and bend them on purpose, for tight applications.

I remember all the mechanics that I worked with, at around 1980, almost suddenly switching from their old tools and toolboxes to Snap-on ones. Over a period of a year or two they went from having traditional tool boxes on their trollies to having ever-increasing in size red Snap-on ones. I kept my original toolboxes, and then left when my apprenticeship was over, not to the surprise of my rather good manager.

I’ve been watching videos about the construction of the 5-litre flying Millyard and the Kawasaki V-12.

After having a look inside of Allen Millyard’s shed I feel a little over-tooled! But then he does not work on cars and trucks as far as I know. He’s strictly a cycle guy. Who loves his hacksaw… :)

I have worked alongside many people who have built many remarkable things, and the actual number of tools they used was always relatively small - but they could use those tools remarkably well. Now I just hope that I can still match what they do ;)
 
Well, after a fair bit of work using the angle grinder and my sanding tool, I managed to produce this shim from that piece of kids bike frame. It is slit down the other side to allow it to open wide enough to fit on this, my rather beat up aluminium seat post. I have no recollection where this seat post came from, as it is too small for any of my Romets so I suppose it must have come off either one of my kids bikes or the Dutch bike. I imagine it must have been the latter, although I do not remember the frame being that light?

AIL4fc-u0P6zao7PCpkv0Ras9u3pXea_JiSmf7S64SouC3qkW_N43vGBK1q1YSHr_S3Hza2gFEEi0RPMGVk0DTrdVYM0612s6lXgZpOtxBOP6qQqZHJLGeeIAtY973uDHbIqKGvsUc7biBynJCHqFNUo2Syy=w1257-h969-s-no


So now we have it, finally slotted into my frame and locked up. The tape I had wrapped around the tube earlier did its job well and allowed me to do some pre-assembly work around the seat, which is good.

But here is the stupid thing - I was focusing so much of my effort in sanding down the tube to fit, that I forgot that I had the lock closed on the frame. I only closed it while checking that it did up properly, and then forgot to release it. Ah well, at least I noticed it just in time, because it was a nice snug fit in the end. :)

AIL4fc9YWpo2NUDJMOAjYwZlL7b1X8Td4oLsKgWpnNepFr9tNfZlAOFPkuz7Jq4MFsnxUs2TDH71yZaRMfirwH3t2DdCksws4KWdPWc_H8IXescGNE-48xkzwieGkXEcuwtWAanWW5GRCcZSzh0GEP0zFl0Q=w783-h969-s-no


While I had the angle grinder out with the sanding wheel on it, I had a go at sanding away the remains of the welds for the piece of tube that originally linked each side together when they were part of the chair. While I had them on the bench it was also a good time to decide where I was going to drill the actual holes. Like much of the stuff we buy, I could not say that the left and right sections were mirror images of each other, but they were close enough.

Kinda...

AIL4fc-7lWLM0nDLXtD01ciJzmwljgeqvlmwuIdMhl-CXmEe8e4jB7hly81lYzuSEkBJ5EDItLpntQZRqO9wBqeXRrSOZWq2M6Z-ha-xAH02TPhPCzxJzeoVOPNLSLhmXu65njV_PWTC9IKGWO3JicJYvOcR=w897-h969-s-no


I would like to weld them together at the top end of the tubes, but the best I could do at the moment would be to slide a smaller tube inside them and then drill through to fasten them with a pair of bolts or rivets. We will see, it depends on how much they move when I get to use them.
 
Things are progressing, now that the weather is warmer and we are living in the same place as the bike is located, rather than only visiting it three days a week.

One of the things I still need to do is remove the already cut down square pieces from the seat mount. You know what it is like, you start to design something, then unexpected things happen, and now I have a pair of square-ish bits that visibly do not line up. I am going to replace them with a pair of washers, but if that does not make everything look cool down there then I might add a bit more expanded polystyrene to hide it all away.

I will think about it.

Anyway, the rear seat frame has now been mounted, and while it definitely looks good the top part is as far forward as it can go. Since the sides pieces are not identical, the other side just kisses the wheel bracket mounting nuts.

Somehow, I think the bike is beginning to come together, even the mix of colours. Originally I was going to repaint the forks, but now I am moving towards the idea that it should look slightly used, like it has been around for some time and been modified.

AIL4fc_0hgAD4Yt3EuAxBn7KKTVEimfQWg0F3uQUXCE0r7K1dS9nOzI4z31g3bZgfhUI3487_NseTZZVnDQgzuWjkMzab4TqjZROpnH2JlBiQDglEUyzMngnfWibTYFD1JMkK7ot-QebGQcOzeSxcQdpSloB=w1178-h912-s-no


Here is the front mudguard on. I cannot remember now whether I checked whether it fitted the mounting bracket, but it does - except it also just clips the new front suspension bars. I will have to think about what I should do there. I do not want to modify the mudguard, so it might be angle grinder time again.

I also see that I forgot to paint the front part of the mudguard mount...

AIL4fc_gVgmHIvZgtdUfinQQJhpcUDdLfkBSRh0ivfPGzLnEAyRpZLxoW60_hatQoTNKYGvM62i0eqvGgOnEzQelr_Gvo-tythTdFpgeJMkVnHqJlP0MU17aLLIMuuLtbcVBqxrqcOigf8f7i-J-BtB1QPId=w632-h912-s-no


When I decided where to position the brake/mudguard, I forgot that the brake caliper would need to clear the original brake mounting points. Since the rim is curving down in relation to the caliper, the brake blocks no longer fully touch the wheel rim. I knew that the design was tight because I wanted the mudguard a certain distance away from the wheel at the front, a bit like you see on motorcross bikes, even though there is not any suspension movement between the wheel and the mudguard.

AIL4fc-X_QBZCL-eFd7ZmwFcu0V2RnRdDwX_prl1V8Sdm1ANPw-_2iXG8Qn97uXaBF6MRoA7l62ZOx-x2pCNO2tuA-OHUq1J8V6S9j-9aRmBrTqOwNYD8d6NuVHIhpO2RsoEB1Oo5qdiNkpt2bVUyqmZ9owc=w684-h912-s-no


That is what I enjoy about this stage - time is getting short, and there are a ton of little issues that need resolving now that the parts are finally going together. The dream is finally arriving in a series of minor issues that will all have to be thought out and fixed.
 

Latest posts

Back
Top