Zasada Rides Again

Rat Rod Bikes Bicycle Forum

Help Support Rat Rod Bikes Bicycle Forum:

This site may earn a commission from merchant affiliate links, including eBay, Amazon, and others.
Things are progressing, now that the weather is warmer and we are living in the same place as the bike is located, rather than only visiting it three days a week.

One of the things I still need to do is remove the already cut down square pieces from the seat mount. You know what it is like, you start to design something, then unexpected things happen, and now I have a pair of square-ish bits that visibly do not line up. I am going to replace them with a pair of washers, but if that does not make everything look cool down there then I might add a bit more expanded polystyrene to hide it all away.

I will think about it.

Anyway, the rear seat frame has now been mounted, and while it definitely looks good the top part is as far forward as it can go. Since the sides pieces are not identical, the other side just kisses the wheel bracket mounting nuts.

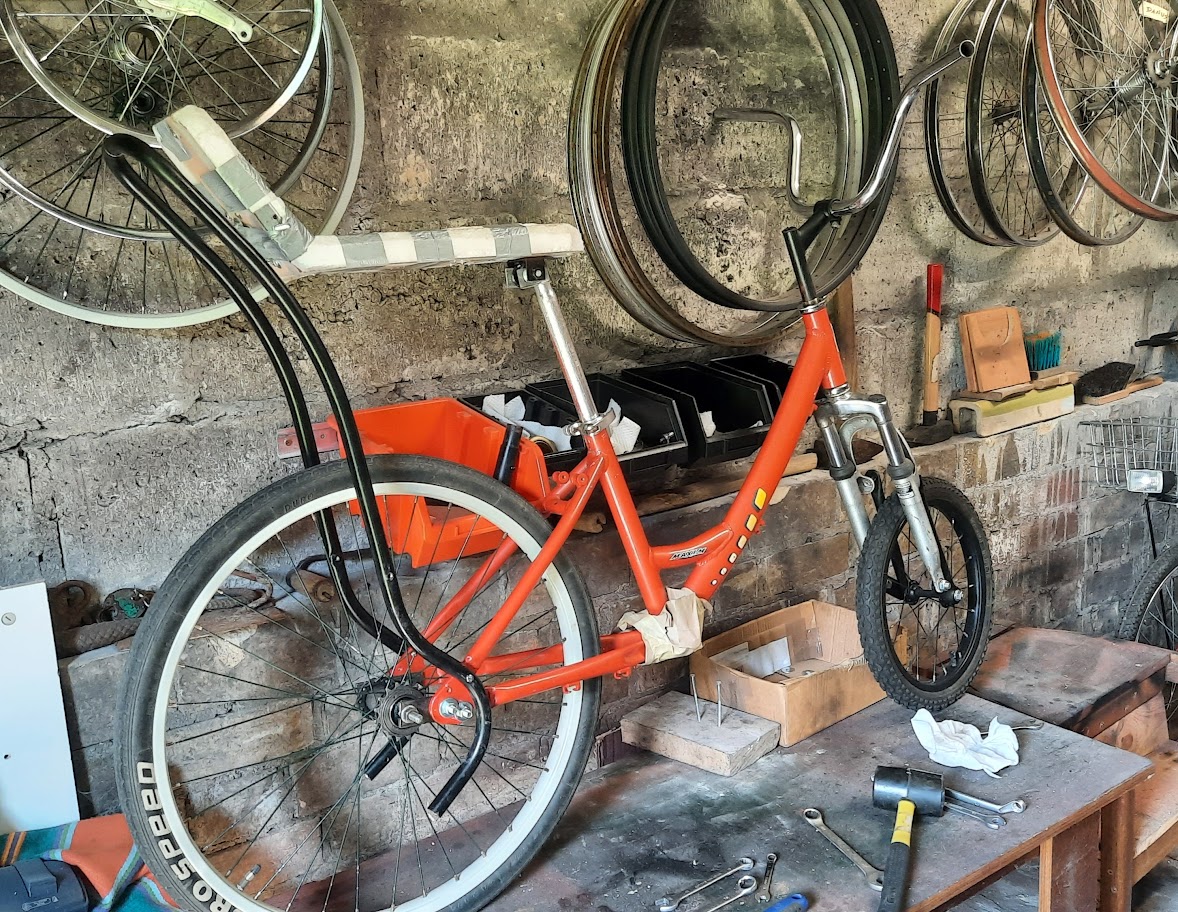
Somehow, I think the bike is beginning to come together, even the mix of colours. Originally I was going to repaint the forks, but now I am moving towards the idea that it should look slightly used, like it has been around for some time and been modified.
AIL4fc_0hgAD4Yt3EuAxBn7KKTVEimfQWg0F3uQUXCE0r7K1dS9nOzI4z31g3bZgfhUI3487_NseTZZVnDQgzuWjkMzab4TqjZROpnH2JlBiQDglEUyzMngnfWibTYFD1JMkK7ot-QebGQcOzeSxcQdpSloB=w1178-h912-s-no


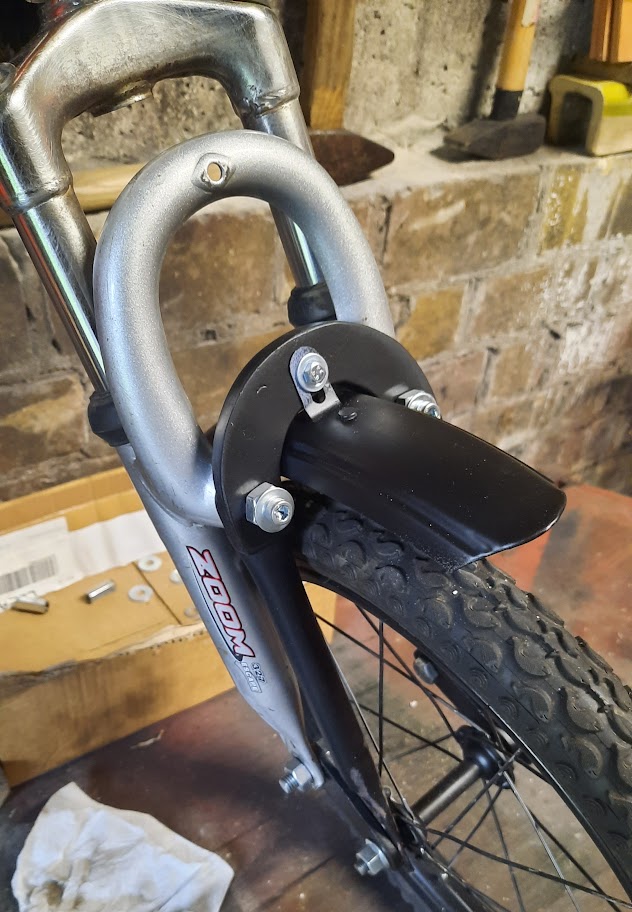
Here is the front mudguard on. I cannot remember now whether I checked whether it fitted the mounting bracket, but it does - except it also just clips the new front suspension bars. I will have to think about what I should do there. I do not want to modify the mudguard, so it might be angle grinder time again.

I also see that I forgot to paint the front part of the mudguard mount...
AIL4fc_gVgmHIvZgtdUfinQQJhpcUDdLfkBSRh0ivfPGzLnEAyRpZLxoW60_hatQoTNKYGvM62i0eqvGgOnEzQelr_Gvo-tythTdFpgeJMkVnHqJlP0MU17aLLIMuuLtbcVBqxrqcOigf8f7i-J-BtB1QPId=w632-h912-s-no


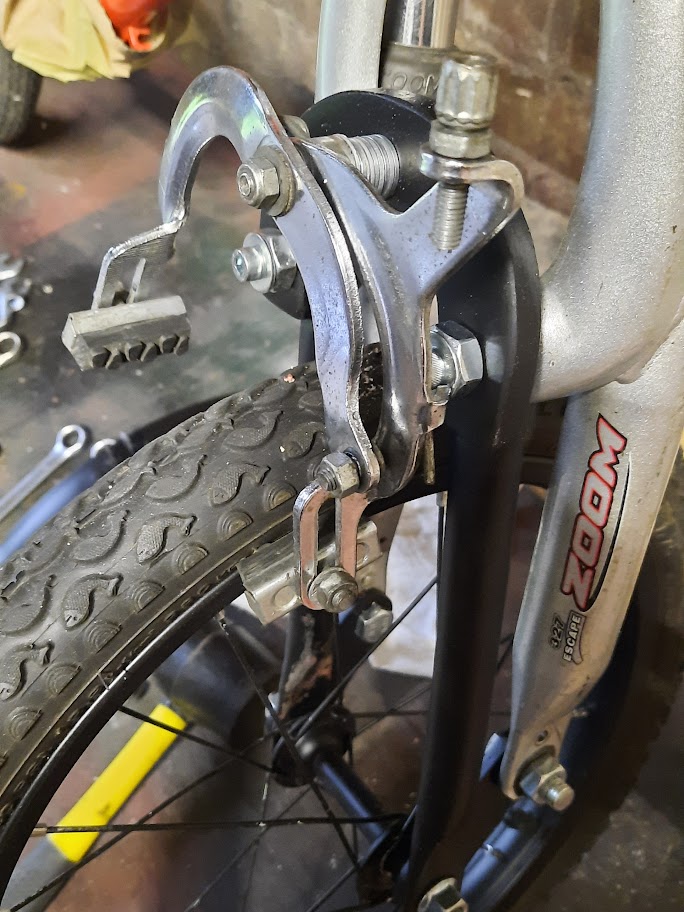
When I decided where to position the brake/mudguard, I forgot that the brake caliper would need to clear the original brake mounting points. Since the rim is curving down in relation to the caliper, the brake blocks no longer fully touch the wheel rim. I knew that the design was tight because I wanted the mudguard a certain distance away from the wheel at the front, a bit like you see on motorcross bikes, even though there is not any suspension movement between the wheel and the mudguard.
AIL4fc-X_QBZCL-eFd7ZmwFcu0V2RnRdDwX_prl1V8Sdm1ANPw-_2iXG8Qn97uXaBF6MRoA7l62ZOx-x2pCNO2tuA-OHUq1J8V6S9j-9aRmBrTqOwNYD8d6NuVHIhpO2RsoEB1Oo5qdiNkpt2bVUyqmZ9owc=w684-h912-s-no


That is what I enjoy about this stage - time is getting short, and there are a ton of little issues that need resolving now that the parts are finally going together. The dream is finally arriving in a series of minor issues that will all have to be thought out and fixed.
Maybe this idea from Sheldon Brown could help with the front brake issue?
brakes
 
@GeePig
Can you improve alignment just by reversing the caliper?

It would not look as pretty but then this is a rat rod right?
Yes, that was something that I was considering!

It all depends whether the caliper can be mounted far enough forward so that it misses my extra frame tubes. I did worry for a moment whether the brake would operate properly mounted that way around, but then, duh, that is how rear brakes are mounted...

Maybe this idea from Sheldon Brown could help with the front brake issue?
brakes
I have never seen that before, and I like the idea!

To do it here would mean dropping the level of the mudguard as well, but I was trying to keep that high, a bit like an off road motorcycle, but while still using one of the brakes that I have recovered from one of the bikes I have bought or found because that is what I like doing :)
 
Here are some of my brake calipers, and it is interesting how different they are. The one on the left is one of cheap brakes and it is made of very flat steel and they are quite easy to bend. The one on the right is beefier and has also been stamped with that indent to make the arms much stiffer. I never really looked at bike brakes on different bikes before, but now I strip down my non-runner bikes completely so that I can compare the parts better.

AIL4fc-WROOf_IeWf3jzymAad0KsbpFJVC-PBgE0n6M4_on6hQasYCy0MTZr8x4PEc4FOShpg39pb9xUneOITPAy8WWbXxz--AKek65pQMAox9lVlakgVhIzHZw0gS9W7gFRDHWSkCRRA3kVByx6jDCvxBJ-=w1346-h969-s-no


Even the steel is thicker on the better brake, but I am probably going to fit the cheap brake as it I can get the brake blocks a few more millemetres lower.

AIL4fc83VycXqKYyk3pyt9CO2N7_NTJmwaGR4zA9ZBTaJQ3bgLLMqhRnRj5rSOx-mFu_TmINqPyOEL670FGZXPjHFqrMuf7vErbG8mN3U2GZllPPxFJZjhbvp8kLNTlcFzNEHMJ0SOa98nT31mR8QkKkkqY-=w764-h969-s-no


Then the duh point arrived, when I suddenly realised that I was still using cap head bolts to hold on the bracket instead of hex head. That should save about 2 washers on mounting the brake. The nut and washer are merely there to fill up the end of the brake lever mounting point.

AIL4fc9XwwC6bYv3xTk9gX2kTqT-D49biarNx8Pboid4TvAEd9lHvkzjE5r5N5oyMY_Xts6mpwBiWTh1E3zDRSihUONBAmLkBF5kxZTEH6vMQ1n5ONLTKsc7V8k3n0gSHuk8Tze8j3TQegNKcO4zopHA3bGT=w837-h969-s-no


I still need to align the front wheel a bit better, which will mean making the top hole a bit more oval in shape, or maybe the one at the bottom as that one gets clamped more tightly.
 
I removed the square blocks I had used from a normal seat mount and replaced them with big washers, but I was still not happy with the look of it. My next idea was to add a sheet of expanded polystyrene onto the underside of the saddle, sticking it on with some tape. I want the seat cover material to be easy to fit, but I am not quite sure how I will attach it securely.

One of the options I have is to apply some more of the clear plastic sheet that I bought to cover the window holes in the other part of this barn to the underside of the polystyrene onto which I can fix the seat cover.

There are two windows on the front and back of the main barn space, which while they each had an oak wooden frame nailed in with some steel rods fixed in the middle of them plus just some hardboard attached loosely to them for some reason, which made it rather dark in there. I covered the rear pair by cutting down some of the old windows we took out of our cottage when we had double glazing fitted, but that was a lot of work and only covered about 98% of the window. So for the front windows I bought some hard clear plastic, which was much better - but the oak was really hard to fit the screws into when you were standing on a ladder. But I kept the bits of plastic that I chopped off in my warsztat.

Actually I should one day get some more as I have a pair of windows in my warztat covered in old plastic fertilizer bags, but since the wooden barn is about a foot away and block the windows, I keep forgetting to do it. One day we will probably take the wooden barn down, though, sadly.

So if I put a sheet of this plastic on the bottom of the polystyrene using some screws to attach it to the wooden frame, then I can attach the cover to that.

AIL4fc8epSUpH1Yeo4PS9w5WAPpUFotCYjZ0PlyAQmc0GumPpCwZ91CUTF5E4Sm1IX4u99mycvkfmT4VwKxTgnwn1Vj49zvbVrO2Z4lQPFunJ2Fu7UI245z0-KqNii9XEVUJbRBZSkUk_8V2ySegkiX94oi_=w1352-h969-s-no


First I need to trim the shape, but I need to decide whether I should add some more polystyrene to the upright part of the saddle.

I also need to get the bike on the ground to decide exactly how high I need the saddle to be so that it matches the handlebar height and is also far enough away from the pedals.
 
I have been a bit busy for the past few days, as I have had a few days off and our niece and her husband are staying here in our village home for the week, meaning that we have been doing things like taking them to a restaurant to celebrate their 30th wedding anniversary. It is July, which means that the weather is good, but every few days their are big downpours, and everything is either terribly wet or terribly dry.

It was time to figure out how I was going to mount the front brake, and I decided it would have to be fitted backwards to get anywhere even close to clamping on the wheel without also hitting the tire. As you can see, that meant I had to fit a lot of washers and mount the brake on backwards.

AIL4fc_OhWegSN8juls34GKO2DeB28hVna57f_aaB46R0ZoWis43uF0FOPbsE1rCwSrhS-3svT-ssK1DRqOcgOay6ZXyep8AX1qUQaPIjAMJ6BaJVj05ccaQQXqmOcfDvdJiKyifQ96iPOPYmTmiidEC0c_H=w665-h912-s-no


If I had a welder then I could have fitted some brake mounts on the forks, but that was not an option and I did not really want to do that with this particular set of forks. I knew that I would have to think about this, so I decided to look at the situation on the rear wheel.

AIL4fc_UZy24H98iFIztM8UwchkTZLMg-HlJyhwREpiOLp5tGDmrCLm5fwDDa53XwFq9CptZkr6zkBAashaFIuL0vKU-6l7H_rYm7iInqK-IMtab3HuM6iVC4gjVx51uG69tA5clz67f1dHifEmQoFRJ0h4A=w810-h912-s-no


Since I had decided to use a derailleur wheel with a single gear fitted, I could not use the usual Romet hub brake. I could also have fitted a hub brake, but I really wanted to see if I could use the single gear that had come with one of the abandoned bikes that I had rescued at our place in Lublin. Our block is full of people who have moved from the countryside, and then they have kids and they all seem to get new bikes as presents from their grandparents, and many are eventually thrown away, usually around Easter time.

Anyway, as you can see, the 24" rear wheel is just a little too large for my brakes to fit.

AIL4fc8aRsZOsPZHmZlfhXFgqiVSB89iWYlR5mw1eVzW4kb5azp8IcOqjgqKDUkP5FmjRYgGCsb8Z21Xw6TrUvHG_hzyehp05rVyhBViBUZAsqJE57l7MqsLiCMGK66dZQHGbadEVZH7tcmTHf6k_dV56ikz=w843-h912-s-no


The other problem is that the brakes are mostly from the front wheel, where the cable comes straight down from above, but I do have one brake hub on my 3-speed derailleur Romet Jubilat that allows the cable to come up from below. This is good, as my frame has no cross bar but does have some nice welded on cable clamps that originally was for a geared hub.

AIL4fc_f5-F085DSysQTgvl0Zle7n0U8xUIQsbb6hOIR-TFvsyl6kWY7HndarnyxeN64voQsF_mmzGOswuuLKO5CnNdkh8zlxhfBURXXo8lIycl4uQImdhv4UfSlKpoxbEHFNkWolcN_KKyqSGCLKh4NuIXT=w833-h912-s-no


I still had to reposition the brake, and I happen to have a couple of agricultural tools that I found in one of our barns. So I got my angle grinder out and cut through the welds fixing the mount on.

AIL4fc9Xq3jG_PXeOWz3HBojKhEPFjlsQDXK0s-Hj4oPJ3jaOFfHHuftnGrS06Ni24dUOFCH0vxvkDmFx5DO5VjATyxasSXR-9oaW3N8mJNVZOILEZCNxcfUYeUja-iMSYFkovI0HvNdkmL60Qc1INtiMi9a=w878-h912-s-no


Since my speciality is reusing the objects around me, it is a bit thicker than I required, but that will be fine.

When I have my main holiday in August, I will be visiting the Wednesday fair at one of our local towns, which is very rural, and I might be able to pick up some more stuff for future builds. It is where I bought our wheelbarrow and foolishly failed to but a rather nice vice - and the wheelbarrow would have made it very easy to transport the very heavy vice to our car, parked on the other side of a large meadow. Ah well.
 
After much fiddling around with the bigger parts, now I just need to resolve a huge number of small issues - basically fiddling around with little bits that most often need tweaking or painting. With about 10 days to go, I hope that it will all get finished.

Anyway, after much sorting through the options and the reach of the different brake calipers I had laying around in my box, this was the best option I could find. The pads just reach the wheel rim without contacting the tires, and there is no longer a mass of washers anywhere.

And the brakes work, well other than the fact that I still need to fit the cable and lever.

AIL4fc8Cg7uby0VNs_xMdfWTpmElHy6L95ntVNSDlekH4FLI2idhihs95jOobwbNVPIl4Aje3vJGuYh-s90KfUDDWy7eF5hc9yDx_nrS95_C6wraQY-xR_7o6rzqtx24T7-bokQNuWnyacLXk7_7Jwz9LSAI=w756-h969-s-no


Brake levers were another question, and after much sifting I figured out that I had two kinds of pairs. The problem here is that many of the bikes I have obtained have only had a single brake, usually at the front and often with a short brake cable - other than those that have only had a coaster brake. This makes choosing a matched set of levers impossible because all the matched pairs are already in use, and while I have bought half a down inner cables I still could do with some long outer cables and end fittings.

I could and maybe will one day paint that white lever black, but that will mean a lot of work. What is funny is that while nothing quite matches, they can each be paired up loosely, even though they are all off different bikes.

AIL4fc-XR-GhMY7qQBCWK009qF1wh2RZIXFaSvPP5UuxK1Sa7txHXgLCTyobtKD_JtNmb-Qs6RGjgRby9BkUQAeosuqX4xyDdHNAMSyodCEUB8hs0QxbBaBBGsHWco_uSyO-MZ1RBtqqO9s284vhqYD4FCHj=w821-h969-s-no


Well, there is another pair that I could borrow, since I have already borrowed the rear brake caliper off my derailleur Jubilat. It is waiting for a new set of handlebars, which will not happen until at least next month.

AIL4fc_Zqs5ibT4adJcrfVcandt0DqMrzjAOx9kbBPdkhiSnCQErEJddDTHTnb0b-cHAsAW79TDDsSg9vUYWbRh_oCtgts_tVTnDMmpDUCmoGfDWLNBvwnNbY__eS7-hRwePNxVEYiYhQiyiceps9qmQyF5l=w839-h969-s-no


I finally put the front sprocket and things on, now that I no longer need to continually need to remove and refit the wheels. Of course, it was only after fitting them that I noticed some undercoat showing through in places...

AIL4fc8ed0tB7KYEmR3KSiqYGiwkSby2lKrGJWH7Vt0gNScL8Bgt2dArF5WyfsvYfoZ6I3zprL8suZXCaC0Z1re_tRk18Kooyy76cKgcuEl-YJO9hMO2EgQFyaNaeTu2yj_TvCtowCqK1a_UmS9YYBCMrZEf=w1357-h969-s-no


Most of what remains is mostly the fitting of small things and the painting of bits and pieces.
 
To continue on with getting the small bits ready, here is my rear brake caliper mounting bracket ready for a test fit. I just had to hope at this point that the caliper really would fit in this gap between the rear racket supports. If the bracket had been less agricultural chunky, I would have given it two bends so that it fit better.

AIL4fc_neo2W7ravjWVDydeEB4WoAIJx7AUObpuYrrnhbxiLzLMFGl1RTcrtxbccqhOJ-Qx4gk-MJSj00L5xaqj2CJLusaZjkBdhKqYhQtn6l1_abpEjuwYSHbRtW1vcZbFFVSbOeATydMqi5HHIYpL3IbK7=w847-h906-s-no


With a little bit of fiddling and appropriate spacing, it actually fitted quite nicely. Now all I need to do is remove the brake caliper off the other bike and fit the brake cable in those very nice cable clips the frame has. I have a set of plastic clips from my 1980s 3-speed Romet, and they are really annoying and tacky in comparison.

AIL4fc8XhkrGjMrsSkWwrPcZ0k-WDA9LqnrUS7z88uounv4j3bEpKLUZyZxWtPP3bpajddiz4-Fp2LYb9oOsH9lVbNhaifvsBK9rx70BntpsAHJs1YV_-9y1M-BzKVl5uwP2blKX1iA60aMGZFGcIshJ9AKP=w850-h906-s-no


When we went to Chelm the other day for our niece's 30th wedding anniversary, wifie wanted to check out a local greengrocer's in the city. I was not going to complain, because I could park near what is now quite a rarity - a Żuk, built locally in Lublin, between about 1958 and 1997. People used to laugh at me when I took pictures of them 25 years ago, now people collect them or use them for advertising.

AIL4fc_KlwXaWzVuct--aufH4vxCrDHibfcN0cSS4FCq0h1g6LgKrJoWWxtqgwgA91RmYEehhAoTUToldhWZvy2Xm6LpfZ88sLbgoDbLl4P1S8vFDHu3UGVwTFA-82S6OJMBbL-hy6IG21hhY-_eBsEOoaGr=w1243-h906-s-no


The house on the left in the background looks very similar to our cottage, except we have better material for a roof ;)
 
I have been doing some digging around in my parts bin, and decided that it is time that those rusty brake blocks need fixing. So out came my trusty stainless steel bowl and a bottle of some chemical marked in Polish with a picture of rusty and clean bolts on the side that I assumed meant it was a derusting solution. Turns out I was right :)

AIL4fc8Fbkf9JWj9sBrWrSxosuwEmS2Wo3le4T6j_zd1Io_KyWE0OUwxm2cQJ8KHLJWD3O-V0SuJpPOudUIzFUm2v5FegdLmKRxNRtJuFWwgrSUeSguDTXseHtEwWip4kgnDFHfk-aJ9jneIZ5V9d1RdUi7B=w1524-h963-s-no


See, it says 'do stali i żeliwa', which means 'for steel and iron'.

As I also noticed some places I missed while painting my front sprocket, I gave that a quick touch up. I also remember enjoying my new angle grinder for the first time when I cleaned it after removing the black plastic that covered the arms originally. The plastic was nastily chunky and beginning to break up, which meant it was high time for it to go.

AIL4fc9Rh96qIrYahsAq3LiebKvgdIP2t0CAOkLlW3oTZAo3BrWusY8X9J2evqdoIZHvcxdX-CiL7Jz4BjQbKQxTl4Kx0tTbPs3SFpIvyV9FSjatqjetUYOoG2_8cABiGMcLhlzPSj4DyPTrkg0zmpsgmWT_=w1277-h963-s-no


Now I have a bundle of odd brackets and brake bits that need a bit of paint once I have got the corrosion off, which is always a bit of a fiddly and prolonged process, but I am managing to finish off some of my almost empty paint tins.

AIL4fc94HRFW2Ly08wnzz8Ed0mNswUXurTN2Ac3bpFCSyNe3ZsAYsQwJZXxyjaSxj_0OD02soHjuip6-1JxP0l1r8ATKgehTF_ObSZHYplOpu8XvLYTLowK5M64SThF_Q4icfi7glREVsOjPHysqNuR9A7GE=w1224-h963-s-no


If you look closely here, you can see progress - trust me, it is all in the fiddly bits!

AIL4fc-auz0GTEAjq9RoA9RfDwVJ5_TuT4PCbz11Na6ZVNGBcbBanHwD-eoC_2l5sgUtWzIlseHzNxp3mB-SasCbEP90npiXHmDGspRiH0m9Uo0wS42fGMRKYoRJQ5kAEV_5rzCOL_e2Lvww01eHNRqyJbbO=w1394-h963-s-no


Well I have about three weeks vacation coming up after I finish the bike, and a massive job to do for work before then, but it really is a case of just finishing up some bits on the bike, other than covering the seat. I am hoping the seat covering job will be quite easy.

Well, I am hoping...
 
Things are progressing, now that the weather is warmer and we are living in the same place as the bike is located, rather than only visiting it three days a week.

One of the things I still need to do is remove the already cut down square pieces from the seat mount. You know what it is like, you start to design something, then unexpected things happen, and now I have a pair of square-ish bits that visibly do not line up. I am going to replace them with a pair of washers, but if that does not make everything look cool down there then I might add a bit more expanded polystyrene to hide it all away.

I will think about it.

Anyway, the rear seat frame has now been mounted, and while it definitely looks good the top part is as far forward as it can go. Since the sides pieces are not identical, the other side just kisses the wheel bracket mounting nuts.

Somehow, I think the bike is beginning to come together, even the mix of colours. Originally I was going to repaint the forks, but now I am moving towards the idea that it should look slightly used, like it has been around for some time and been modified.

AIL4fc_0hgAD4Yt3EuAxBn7KKTVEimfQWg0F3uQUXCE0r7K1dS9nOzI4z31g3bZgfhUI3487_NseTZZVnDQgzuWjkMzab4TqjZROpnH2JlBiQDglEUyzMngnfWibTYFD1JMkK7ot-QebGQcOzeSxcQdpSloB=w1178-h912-s-no


Here is the front mudguard on. I cannot remember now whether I checked whether it fitted the mounting bracket, but it does - except it also just clips the new front suspension bars. I will have to think about what I should do there. I do not want to modify the mudguard, so it might be angle grinder time again.

I also see that I forgot to paint the front part of the mudguard mount...

AIL4fc_gVgmHIvZgtdUfinQQJhpcUDdLfkBSRh0ivfPGzLnEAyRpZLxoW60_hatQoTNKYGvM62i0eqvGgOnEzQelr_Gvo-tythTdFpgeJMkVnHqJlP0MU17aLLIMuuLtbcVBqxrqcOigf8f7i-J-BtB1QPId=w632-h912-s-no


When I decided where to position the brake/mudguard, I forgot that the brake caliper would need to clear the original brake mounting points. Since the rim is curving down in relation to the caliper, the brake blocks no longer fully touch the wheel rim. I knew that the design was tight because I wanted the mudguard a certain distance away from the wheel at the front, a bit like you see on motorcross bikes, even though there is not any suspension movement between the wheel and the mudguard.

AIL4fc-X_QBZCL-eFd7ZmwFcu0V2RnRdDwX_prl1V8Sdm1ANPw-_2iXG8Qn97uXaBF6MRoA7l62ZOx-x2pCNO2tuA-OHUq1J8V6S9j-9aRmBrTqOwNYD8d6NuVHIhpO2RsoEB1Oo5qdiNkpt2bVUyqmZ9owc=w684-h912-s-no


That is what I enjoy about this stage - time is getting short, and there are a ton of little issues that need resolving now that the parts are finally going together. The dream is finally arriving in a series of minor issues that will all have to be thought out and fixed.
Looking good!😎
 
Shaping up nicely. I love the funky sexy curves of the sissy bar. It works so well with the frame and build. That fork is killer too.
Build on brother and cross the finish line!
 
Compared to the bulby Bedford vans, I like the utilitarian look of the Zuk much better.
I know what you mean! Those indentations on the side used to curve around onto the front on the original version of the van:

AIL4fc-vdTMOm53JLC5lwdcAGr63sSeymLpXNgT8ppeVFqL_jD0Afm84i-Qvmmk-XM3_QY4-laVZWk69dBBz3F7sRFbNiqRmlz3P6DRHv9Tr9xppwvPv0mxGrm3Z2CySG8hEkKTQNDR7bjr9LE70EHq-raFF=w1155-h906-s-no

I have been taking pictures of them since back when I used to have to ignore the people making sarcastic comments about it ;)

Shaping up nicely. I love the funky sexy curves of the sissy bar. It works so well with the frame and build. That fork is killer too.
Build on brother and cross the finish line!

People often wonder why I spend so much time looking at junk, but it is to find things like this ;)
 
This is my only down pull brake on for a test fit, and now it fits perfectly, even avoiding those rack mounting brackets. It still needs a bit of a clean up, the bracket needs a bit of paint and I need to choose an inner cable - and then we will be done at this end of the rear brakes...

AIL4fc8eM7fb__tBvPjJX4N-WE0hNqXUVSBjDvAdEO47pHlV87jRsVejpVBI-HHJd0H3GCOrxDAS30T545iQ1vwA24yEwNwyAKeBI9OiZXeiHQ0yqvE8XkIWACR1dPC4DUqco9WSj1HpUEnfNL3JqY_xQIY1=w1078-h906-s-no


I also did a bit of searching to find a bracket to mount one of my round reflectors at the top of the rear bar. As the tube is a non-bicycle standard size, it is hard to find anything to fit just right. However, I found a piece of rubber designed for mounting such things on tubes, trimmed it a bit and it all seems fine.

AIL4fc-RrdjxpBI-XkO2D3FsZ0MtkxwPKHp2pjgLu3OuC8Ecxl6iAMfEzBbD9H_7tl_ht9tbEL7B8ELXnrgltKss8_tK4h2ois04qRDNF5gu4HETxw6CxG0PaBGs-hnjg6Oxanf00JTQmO9yxFeRvxsdQn8G=w714-h906-s-no


I also took one of my front lamps and painted it red. I picked the paint up during my most recent to a DIY store while back in the big city for a day, which did not have much choice, but the slightly orangey look will be ok on my orange frame.

AIL4fc8-q-LNlQ_vsLfhEG2Qpc-BdIbKC5wvm8tNUIxIK6ehG-lGRD0SNEBscCO0rdWkuPfqRR8v_xOyUuwH94bjw5HAO-0s_xYuRNJNvaUb4UC2WpwxGL0HfyBJeAd3erCbkcoF8hbfAfYJiCsmzptnAPex=w835-h906-s-no


I still need to make a bracket to fit it, but that will only be about half an hours work as I have a roll of aluminium strip lying around somewhere.
 
So here is the last big task left, the sorting out of the seat material. The first problem is that my nephew has broken my normal scissors somehow, which meant I had to make use of this pair that I recently found in the attic. They look OK here, but one of the blades was badly bent when I found them - and after bending them back somewhat in place, they still jammed when fully closed. Well, that is how they were before starting this job, but with some tweaking in the vice I actually got them to true up enough that they became fully functional, and then with a bit of sharpening they were good enough to cut this thickish material that was on the chair that the rear seat support tubes came off.

AIL4fc-TxNfyxkz8e4ZolQjBeAXDnmd5bSI3w7RAxyTOUvx0LkgTwolLd6IABvhZH6In73d6hfZhwTAdhO8L4yCJiJxzShYMDDiYPn31MSSjewq9brqQdtezCdrQr7ZtjuaJ379cUVEsnb_b4dHjHynLNrPp=w710-h906-s-no


I cut some of the hardboard and attached it to the base. I considered doing that to the back of the upright part of the seat, but since I would have to sew that as both the front and back would be visible, I decided not to.

AIL4fc_A3bRcOAj9aTycEoYbNDwr4y3_-er8_yF1WMeSOHWfV1VH5UcsRaVv4ZX4I6uhpYecpFdKy-vKdMahZLc_hxqO90oJnR-1e8bXWUrNbP895W5mwnCcRX-E2uwZhQHyARrG4AUgHCysHvP3tOEbo0eH=w839-h906-s-no


It at least looks OK at this stage, but I need to practice using my stapler first, to see how well I can attach everything, especially around the front.

AIL4fc8BEsV9CJK7gdRfgcDG6LnDsZKJ35ZRxWE1DDZ1-6QKv9Z1wOJeicxFKVJz9T6gZffHndgdZJ0ZSF4MZcqTEGuqM2cxbhRtrvmeu-hqwvYCjG2a5zRqVtenew6vrJmrQo8h2n6EG-fNriIoOa4UKoOS=w786-h906-s-no


Well, the stapling actually worked, and I can still get them out if I need to redo it for some reason. I am sure that there will be reasons, that is what happens when you do things in new ways.

AIL4fc8K5U5hT86DjY0takzDaTlF6S1IRS-Dqso762iZA27DMl79z68mfbUdAA5QIkuIbbgl5KKJiC_O6FxxN3Yed23gMx14uFVPw067PEhH9FQy3nlSZVcHZEwWpk1aLydd7HZqrrVUx7lbnswN9NmYja2L=w749-h906-s-no


I have been putting together other bits on the bike as well, but I will have to cover that tomorrow. I think that the only major task left is mounting the rear light, the rest is merely a case of bolting things together.

That should be easy enough.
 
Still working on my seat. As it is the first time I have had to deal with this kind of seat, there has been a lot of experimentation. I have decided that I am going to try adding some sponge to the upright part of the seat, and then maybe add it to the base part as well if I can get it to work out well enough. This should be enough sponge to do all the seat, but I have some more if I need to change the design a bit.

AIL4fc8YM49qnl_TwljXKAk831xVPRyYJg0Hug3lamEs14FY6rw7xBIqlTO2fx4yNNV-70ikOOtWRFeWXK5H-k7Ormp-1oPlQ6r4yOgk6ZSuu0rygTNBwcLi52b0ZIYnVFU7vTYDzOs8X0G_4yK8lG0kCo91=w820-h906-s-no


OK, so the sewing is not always straight, but it has been many decades since I have had to do anything other than some minor repairs. I even need to sort my sewing kit out as many duff things have crept in there, like a really truly rubbishy pair of 'scissors'. Even those metal scissors you can see in the picture below are rubbishy, as they failed to tighten the screw sufficiently before hammering the end of the thread. The best needles are in that film canister, as they actually have holes for the thread that do not need a finely cut thread that you are never going to achieve with those scissors :)

AIL4fc9_y8hnP47VUV4ywlwWp24gp-1Krkl-TFm52x_i1voPzWPIAGbCo6bEl_sOTI1C7Ljhn96AyrX5MMD7oyM7wo3tCG8ntXbL1lASeb4nO89UdQQe0Us6jtCFm3FqWbDmFuS1Rd5VvH7V-L9RbLZaQRju=w970-h906-s-no


You may also have observed that the material I am using is a bit grimy, that is because it came off a chair that had seen a lot of use. I really did think of cleaning it first, but then since I want the bike to look used then I really could do with the grimy marks on it.
 

Latest posts

Back
Top